AccuKnox OnPrem Deployment Guide
Pre-requisites to be prepared by the Customer Team
| Pre-requisites | Why is it needed? | Specs |
|---|---|---|
| 3 Virtual machines or bare-metal nodes [Mandatory] | To install the AccuKnox POC control plane in on-prem mode. Root access to the nodes would be required by the AccuKnox team during installation. | - 1 node with at least 4 CPU + 16GB - 2 nodes, each with 8 CPU + 16GB - Each node has at least 256 GB of disk space. - Each node is installed with Debian 13 OS - These 3 nodes should have full ingress + egress connectivity between themselves. - Users/APIs access to ports [443, 8443, 3000, 8081, 9090] should be enabled for all these VMs. |
| Internet Connectivity [Mandatory] | The VMs would require Internet connectivity during the installation. | Egress only access to Port 80 + 443. |
| Email User + Password + email ID + Server Address [Optional] | AccuKnox Control plane allows one to invite other users to the Portal by sending an invitation via email | AccuKnox Control plane configures 5 default users for whom the access will be enabled if this configuration is not provided. |
| Trusted SSL Certificates [Optional] | SSL Certificates are used for AccuKnox Portal. | If trusted certs are not provided, we can use self-signed certs. |
| Domain name entries [Mandatory] | AccuKnox Portal and its REST APIs are accessible using these domain names. | Domain names to configure: - app.accuknox.domain.com - cspm.accuknox.domain.com - cwpp.accuknox.domain.com - reports.accuknox.domain.com |
Container Registry
A Harbor container registry will be deployed on the master node if not available. Full Access to the registry is required to push and pull the AccuKnox microservice images from this registry.
Harbor Installation using Ansible
AccuKnox team will leverage an ansible playbook that:
- Installs Harbor
- Supports self-signed and letsencrypt-signed certificates.
This playbook is tested with Harbor version 2.6.0 on Ubuntu 24.10 & Debian 13.
External Roles
This playbook uses the following 3rd party collections/roles from ansible galaxy:
- geerlingguy.certbot: Installing and setting up certbot for managing letsencrypt-signed certificate.
- geerlingguy.docker: Installing docker and docker-compose.
- community.crypto: Generating self-signed certificate.
- robertdebock.roles: Collection of useful roles used to install Harbor.
Prerequisites
Make sure you have ansible and the jmespath python library installed.
python3 -m venv .venv
source .venv/bin/activate
pip3 install ansible jmespath netaddr
You can also install ansible using your distros package manager.
Running the Playbook
Please edit the hosts.yaml file based on your environment before running this playbook. E.g.,
hosts:
  harbor:
    # this should point to a SSH host in your ssh config OR the VMs IP/Domain
-   # ansible_host: ""
-   # ansible_user: root
-   # ansible_ssh_private_key_file: /path/to/ssh-priv-key.pem
+   ansible_host: <your-harbor-host-ip>
+   ansible_user: root
+   ansible_ssh_private_key_file: /home/myuser/.ssh/harbor.pem

vars:
  ansible_python_interpreter: /usr/bin/python3
  harbor_installation_type: online
  # Specify the IP address or the fully qualified domain name (FQDN) of the target host on which to deploy Harbor.
- # harbor_hostname: "example.com"
+ harbor_hostname: "harbor-test.example.com"
  harbor_admin_password: "changeme"
  # Fill harbor_external_url if you want to enable external proxy.
  # Use either harbor_hostname or harbor_external_url
- # harbor_external_url: "https://example.com"
+ harbor_external_url: "https://harbor-test.example.com"
  harbor_enable_https: true

  ## certificate configuration ##
  ###############################
  cert:
-   # domain: "example.com"
+   domain: "harbor-test.example.com"
    # Both LetsEncrypt and self-signed cannot be enabled at the same time
    self_signed:
      enable: true
Next,
ansible-galaxy install -r requirements.yaml
ansible-playbook playbook.yaml
If your ansible_user is set to a non-root user on the system, ensure the user has permission to run commands with sudo. If running sudo commands requires a password, pass --ask-become-pass to the ansible-playbook command.
ansible-galaxy install -r requirements.yaml
ansible-playbook playbook.yaml --ask-become-pass
Add Registry CA Certificate to Worker Nodes
The harbor CA certificate should be located at /etc/nginx/certs/harbor.crt. You will have to copy it to every worker node under /usr/local/share/ca-certificates/
cat /etc/nginx/certs/harbor.crt
Worker Node:
vi /usr/local/share/ca-certificates/harbor.crt
You’ll also have run update-ca-certificates on the worker nodes and restart the container runtime (containerd / docker)
update-ca-certificates
Note: Restart the worker nodes.
Kubernetes Cluster
Installation is currently tested on Ubuntu 24.2, Debian 12, and RedHat 9.
Prerequisites
VM Requirements:
- 8 vCPU / 32GB Memory
- 200GB Storage
Install k3s
cd Helm-chart
./install_k3s.sh
Air-Gapped Mode Setup
If you want to use your private/local registry as the exclusive source of images for the entire cluster, please install the accuknox-onprem-mgr component first.
Required Credentials
| Value | Description | Provider |
|---|---|---|
registry.username |
Registry User | Customer |
registry.password |
Registry Password | Customer |
registry.address |
The registry server address | Customer |
ecr.user |
Credential to pull images from AccuKnox registry Value: ****** |
AccuKnox |
ecr.password |
Credential to pull images from AccuKnox registry Value: ****** |
AccuKnox |
Upload Images Using Docker
cd airgapped-reg

# Configure AWS CLI with AccuKnox provided secrets
aws configure

# Connect to AccuKnox docker registry
aws ecr get-login-password --region us-east-2 | docker login --username AWS --password-stdin 956994857092.dkr.ecr.us-east-2.amazonaws.com

# Connect to airgapped registry
docker login <registry_address>

# Upload images to private registry
./upload_images.sh <registry_address>

# Upload helm charts to private registry
./upload_helm.sh <registry.address>

# Upload onboarding images to private registry
./upload_onboarding_images.sh <registry.address>
Upload Images Using Skopeo (Alternative Method)
skopeo --version

# Configure AWS CLI with AccuKnox provided secrets
aws configure

# Connect to AccuKnox registry
aws ecr get-login-password --region us-east-2 | skopeo login --username AWS --password-stdin 956994857092.dkr.ecr.us-east-2.amazonaws.com

# Upload images to private registry
skopeo login --username <username> --password <password> <registry.address>

./skopeo_upload_image.sh <registry.address>
./skopeo_upload_onboarding_images.sh <registry.address>
Air-Gapped Installation
To create Cert Manager, onprem-manager, and Longhorn, and update the registry URL in override-values.yaml:
cd airgapped-reg
./airgapped-install.sh <registry.address> <username> <password>
Options:
- Use
--longhornflag to install Longhorn - Use
--cleanupflag to cleanup generated secrets, onprem-mgr, and cert-manager
Verify Longhorn Installation
Check all Longhorn pods and ensure they are running before proceeding.
Configure override-values.yaml
cd ..
Update the following fields in override-values.yaml:
Platform Configuration
platform: "" # k0s, openshift, rke2
Domain Configuration
Replace <your_domain.com> with your actual domain throughout the file.
Storage Class Configuration
Use the default storageclass if deploying on k3s (local-path). Update the StorageClass <storageclass> as needed.
NGINX Gateway Configuration
Regular method:
nginx-Ingress:
  enabled: false
IP-based deployment:
ingressGateway:
  enabled: false

nginxIngressGateway:
  enabled: false
  loadBalancerHost: "app.<your_domain.com>"
On-Prem Variables
Verify that onprem variables were updated by the script:
onprem:
  enabled: true
  airgapped: true
  allowsignup: true
  airgapped_reg: "<registry.address>"
SSL Certificate Configuration
We offer three deployment models for SSL certificates to accommodate client requirements.
Prerequisites for Air-gapped/Private Registry Environments
If the environment is air-gapped or using a private registry, set ssl.certmanager.install to false:
ssl:
  certmanager:
    install: false
Prerequisites for IP-based Deployments
If you are deploying with IP-based method, disable SSL:
ssl:
  selfsigned: false
  customcerts: false
1. Auto-generated Self-signed Certificate
We auto-generate the needed self-signed certificates for the client. To enable this option, set the following in your override-values.yaml:
ssl:
  selfsigned: true
  customcerts: false
2. Certificate Signed by a Known Authority
Client provides certificate signed by a known authority. To enable this option, set:
ssl:
  selfsigned: false
  customcerts: true
3. Self-signed Certificates Provided by the Customer
Client provides their own self-signed certificate. To enable this option, set:
ssl:
  selfsigned: true
  customcerts: true
Configure override-values.yaml
The AccuKnox installation package contains override-values.yaml file with installation-specific options:
- Replace
<your_domain.com>with your actual domain - Set your SSL preferences in the override values by changing the
sslblock
Install AccuKnox Charts
Run the installation script:
./install_chart.sh
DNS Mapping
Map worker node IPs to each of the DNS entries:
app.<your_domain.com>cspm.<your_domain.com>cwpp.<your_domain.com>
Map any one of the worker node IPs to:
app.<your_domain.com>
Access the UI
Open the UI in a browser at https://app.<your_domain.com> and complete sign-up.
Jump Host
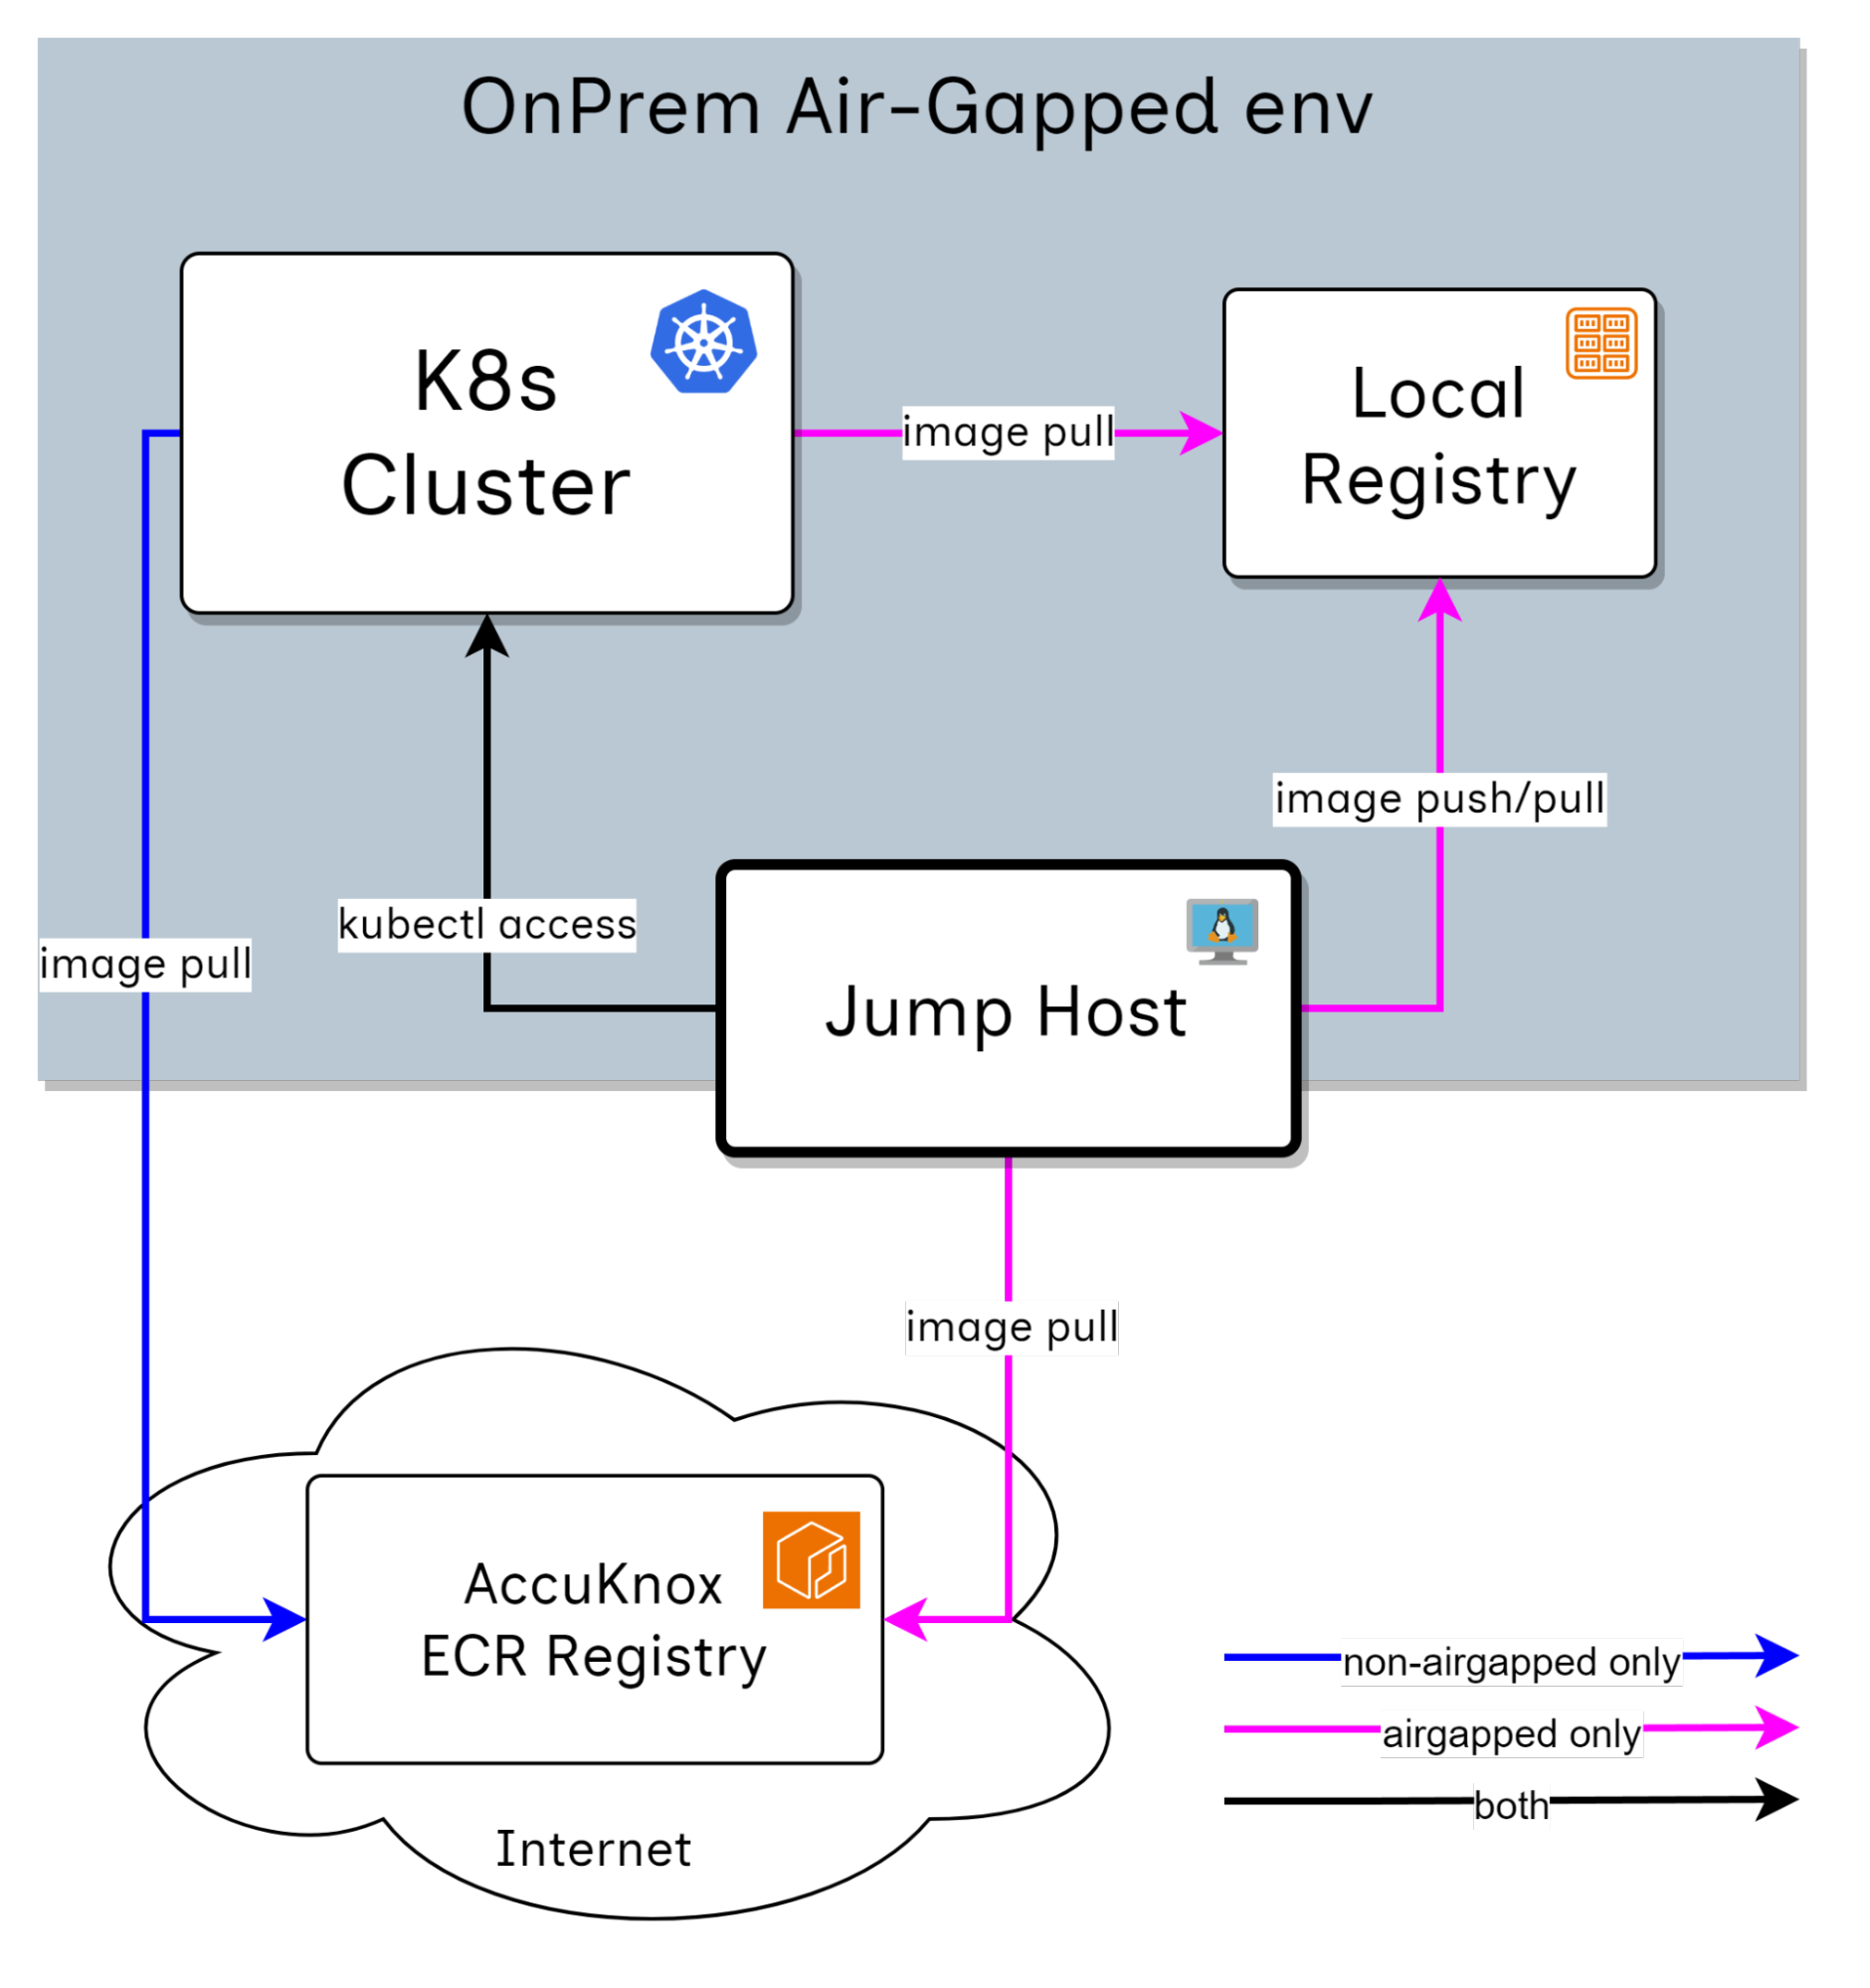
The jump host should have admin access to the deployed Kubernetes cluster to perform the installation.
The jump host should have 80 GB of storage available. This will be required to temporarily store the container images before pushing them to the container registry.
Tools to be Installed
| Tool | Version | Install Command |
|---|---|---|
jq |
1.6 | apt install jq |
unzip |
x.x | apt install unzip |
yq |
v4.40.x | See detailed install script below |
helm |
v3.x.x | curl https://raw.githubusercontent.com/helm/helm/main/scripts/get-helm-3 \| bash |
kubectl |
Supported by cluster | Ensure compatible version is used |
aws |
v2 | See detailed install script below |
docker |
v20.xx | apt install docker.io |
yq Installation (v4.40.x)
VERSION=v4.40.5
BINARY=yq_linux_amd64
wget https://github.com/mikefarah/yq/releases/download/${VERSION}/${BINARY}.tar.gz -O - | tar xz
mv ${BINARY} /usr/bin/yq
AWS CLI v2 Installation
curl "https://awscli.amazonaws.com/awscli-exe-linux-x86_64.zip" -o "awscliv2.zip"
unzip awscliv2.zip
sudo ./aws/install --bin-dir /usr/local/bin --install-dir /usr/local/aws-cli --update
SMTP Server
A working SMTP server is required for:
- User sign-in
- Password change
- Scan notifications
- Sending reports
Required credentials:
- Email Username
- Password
- Sender Email ID
- Email Server Address
Network Requirements
External Connections
Connectivity between AccuKnox components and other networks.
| Component A | Component/Endpoint B | Ports | Connection Type | Purpose |
|---|---|---|---|---|
| Worker Nodes | VM/k8s clusters to be protected | 443, 3000, 8081, 9090 | Inbound to A | For the runtime security agents to connect to the platform |
| Worker Nodes | Instance used for scanning/platform access | 443 | Inbound to A | To access the platform and for scan results to be sent |
| External Code Repository | Worker Nodes | 443 | Bidirectional | To connect and scan the code stored in an external code repository |
| Master Node and Worker Nodes | Internet | * | Outbound from A | Temporary connection for initial setup |
DNS Provisioning
A DNS record will need to be created for the AccuKnox endpoints after installation.
- A domain name must be provided for the AccuKnox installation.
SSL Certificates
Trusted SSL certificates need to be provided for the AccuKnox application.
Staging and Installation Steps
Installation Package
-
Helm charts archive
-
Kubectl and Helm tools are pre-requisite tools for using these helm charts
tar xvf accuknox-helm-charts.tgz
cd Helm-charts
Push to Airgapped registry
If you want to use your private/local registry as the exclusive source of images for the entire cluster, please install the accuknox-onprem-mgr component first.
| Value | Description | Provider |
|---|---|---|
registry.username |
Registry User | Customer |
registry.password |
Registry Password | Customer |
registry.address |
The registry server address | Customer |
ecr.user |
Credential to pull images from AccuKnox registry | AccuKnox |
ecr.password |
Credential to pull images from AccuKnox registry | AccuKnox |
cd airgapped-reg

# configure aws cli with AccuKnox  provided secrets
aws configure

# connect to docker Accuknox docker registry
aws ecr get-login-password --region us-east-2 | docker login --username AWS --password-stdin 956994857092.dkr.ecr.us-east-2.amazonaws.com

# connect to airgapped registry
docker login <registry_address>

# upload images to private registry
./upload_images.sh <registry_address>
./upload_onboarding_images.sh <registry.address>

# upload helm charts to private registry
./upload_helm.sh <registry.address>


# create a namespace
MGR_NS="accuknox-onprem-mgr"
CERT_MGR_NS="cert-manager"
kubectl create ns $MGR_NS
kubectl create ns $CERT_MGR_NS

kubectl create secret docker-registry airgapped-reg --docker-server=<registry.address> --docker-username=<registry.username> --docker-password=<registry.password> -n $MGR_NS

kubectl create secret docker-registry airgapped-reg --docker-server=<registry.address> --docker-username=<registry.username> --docker-password=<registry.password> -n $CERT_MGR_NS

# <registry_address> can include port as well
./install-certmanager.sh <registry_address>

./install-onprem-mgr.sh <registry_address>

kubectl apply -k .
kubectl apply -f onprem-mgr.yaml
Update override.values
Only for air-gapped/private registry environment
Set global.onprem.airgapped to true in the override-values.yaml file.
Before You Start
- Set your domain name in the override values file by replacing
<your_domain.com>with your actual domain. - Set your SSL preferences in the override values file by editing the
sslblock. - If the environment is air-gapped or using a private registry, make
ssl.certmanager.install: false
ssl:
  certmanager:
    install: false
SSL Certificate Deployment Models
We offer three deployment models for SSL certificates:
1. Auto-generated Self-signed Certificate
We auto generate the needed self signed certificates for the client. To enable this option, set the following in your override-values.yaml:
ssl:
  selfsigned: true
  customcerts: false
2. Certificate Signed by a Known Authority
Client provides certificate signed by a known authority:
ssl:
  selfsigned: false
  customcerts: true
3. Self-signed Certificates Provided by the Customer
Client provides their own self-signed certificate:
ssl:
  selfsigned: true
  customcerts: true
AccuKnox Installation Package
The override-values.yaml file contains installation-specific configurations:
- Override
<your_domain.com>with your actual domain. - Set your SSL preferences in the override values by changing the
sslblock.
Install AccuKnox Base Dependencies
Run the following commands:
kubectl create namespace accuknox-chart

helm upgrade --install -n accuknox-chart accuknox-base accuknox-base-chart \
  --create-namespace -f override-values.yaml
⚠️ IMPORTANT
Some resources deployed in the above step take time to provision. Running the next command too early may break the installation.
Run the below script to make sure that the provisioning was done successfully:
while true
do
    status=$(kubectl get cephcluster -n accuknox-ceph rook-ceph -o=jsonpath='{.status.phase}')
    [[ $(echo $status | grep -v Ready | wc -l) -eq 0 ]] && echo "You can proceed" && break
    echo "wait for initialization"
    sleep 1
done
Install AccuKnox Pre Chart
| Value | Description | Provider |
|---|---|---|
email.user |
Email user used for signup invites, reports | Customer |
email.password |
Email password | Customer |
email.host |
Email server address | Customer |
email.from |
Sender email address (e.g. noreply@domain.com) | Customer |
ecr.user |
Registry credential username | AccuKnox |
ecr.password |
Registry credential password | AccuKnox |
helm upgrade --install -n accuknox-chart accuknox-pre pre-chart \
  --create-namespace -f override-values.yaml \
  --set global.email.from="" \
  --set global.email.user="" \
  --set global.email.password="" \
  --set global.email.host="" \
  --set ecr.user="" \
  --set ecr.password=""
Install AccuKnox Microservices Chart
| Value | Description | Provider |
|---|---|---|
email.user |
Email user used for signup invites, reports | Customer |
email.password |
Email password | Customer |
email.host |
Email server address | Customer |
email.from |
Sender email address | Customer |
helm upgrade --install -n accuknox-chart accuknox-microservice accuknox-microservice-chart \
  --set global.email.user="" \
  --set global.email.from="" \
  --set global.email.password="" \
  --set global.email.host="" \
  --create-namespace -f override-values.yaml
Map DNS
Run the following script to generate DNS entries:
./generate_dns_entries
Install Certificates
Certificates Signed by a Known Authority
./install_certs.sh <certificate_path> <certificate_key_path> <ca_path>
Self-Signed Certificates (Provided by Customer)
Install NGINX Ingress
Navigate to the addons directory:
cd airgapped-reg/addons
Install the NGINX ingress controller:
helm upgrade --install ingress-nginx ingress-nginx \
  --namespace ingress-nginx --create-namespace \
  -f ingress-nginx.yaml \
  --set controller.image.registry=<registry_address> \
  --set controller.admissionWebhooks.image.registry=<registry_address>
Update domains in ingress.yaml and apply it:
kubectl apply -f ingress.yaml
Verify Installation
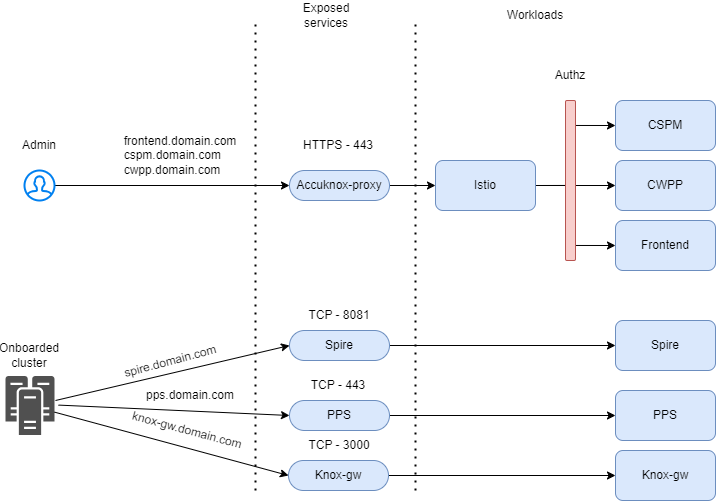
After successful installation, you should be able to access the following URLs:
- https://frontend.<your-domain.com>/ — Access the Sign-in page.
- https://cspm.<your-domain.com>/admin/ — Access the CSPM Admin page.
- https://cwpp.<your-domain.com>/cm/ — Access the CWPP Configuration Management page.
References
- AccuKnox Deployment and Operations FAQs
- AccuKnox Splunk Integration Guide
- KubeArmor Splunk Integration Guide
- CSPM: Use-cases & Scenarios
- CWPP: Use-cases & Scenarios
- Detailed Support Matrix