MCP Server for AccuKnox
Query your cloud security data directly from AI tools (VS Code Copilot, Cursor, Claude Code, Claude Desktop, Gemini CLI) instead of logging into the dashboard. Get live answers about assets, findings, and compliance.
Hosted at mcp-server.accuknox.com/mcp. Read-only, no installation needed, token-authenticated. Each token is scoped to one tenant.
Use cases
- Ask: "How many critical vulnerabilities?" or "Show me all public S3 buckets."
- Generate custom reports (CIS, STIG compliance, etc.)
- Build dashboards and visualizations in your AI terminal
Source & self-hosting: github.com/accuknox/mcp_server
Step 1: Get Your API Token
-
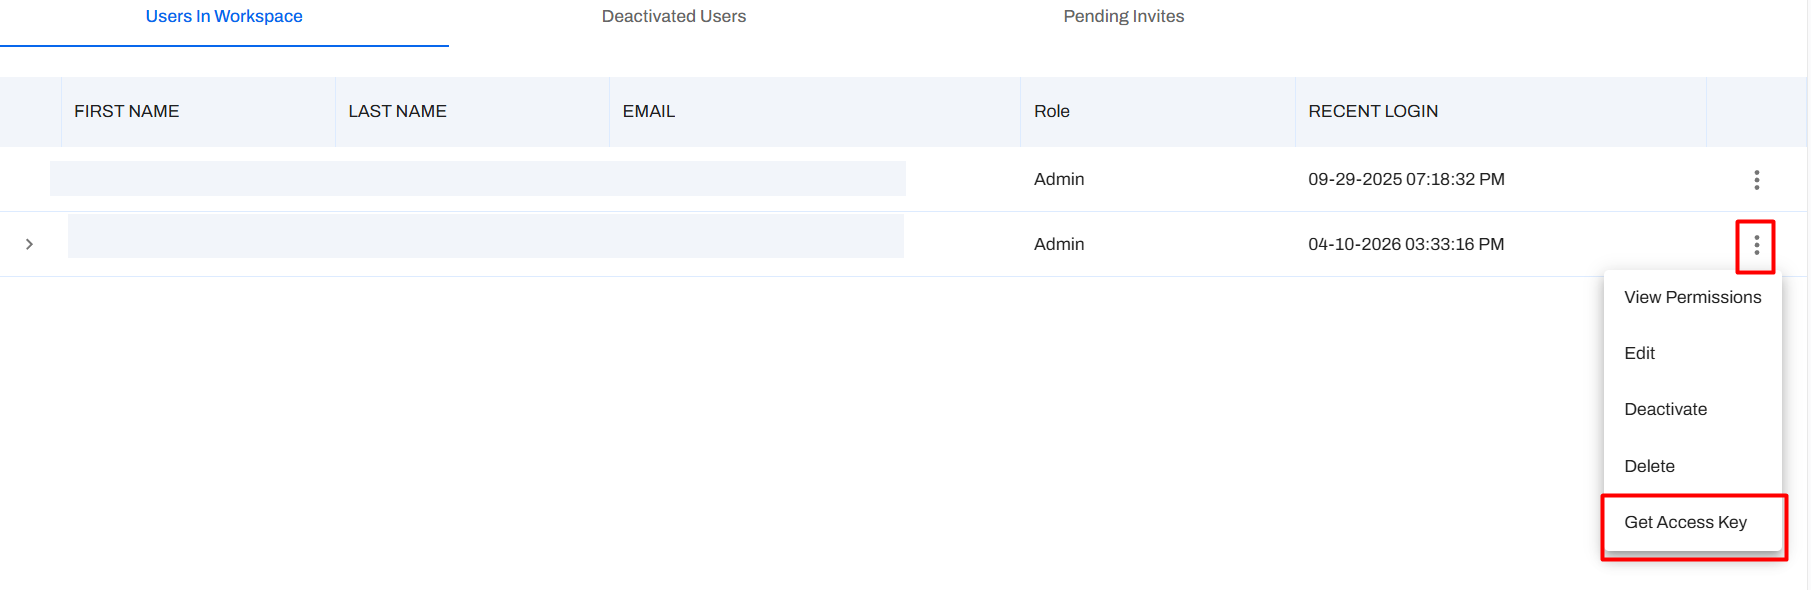
Log in and go to Settings → User Profiles > click the ⋮ menu > Get Access Key.
-
Fill in the dialog:
- Name: e.g.,
MCP Access - Role:
Viewer(read-only) - Expiration: Choose a date
- Tenant Id: Save this value
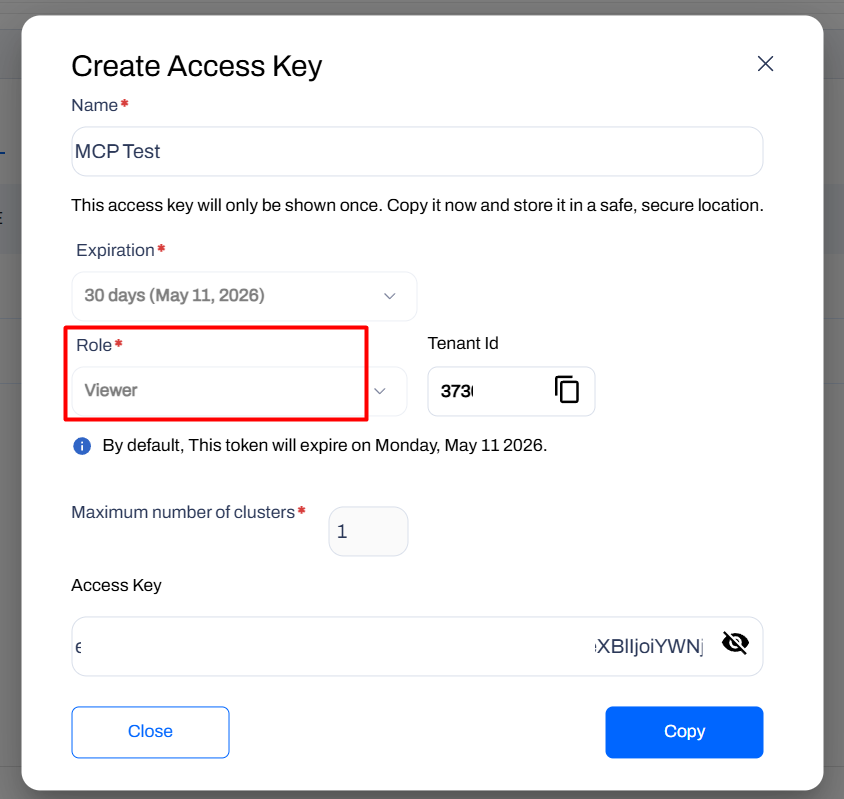
- Name: e.g.,
-
Copy the key and save it somewhere safe (only shown once).
Warning
Tokens are scoped to one tenant. For multiple tenants, generate separate tokens and use separate project folders.
Step 2: Connect Your AI Tool
Your endpoint and headers:
| Header | Value |
|---|---|
base_url |
Your AccuKnox environment URL, e.g. https://cspm.demo.accuknox.com/ |
token |
The API token you copied in Step 1 |
Select your AI tool below:
Have GitHub Copilot installed.
Create .vscode/mcp.json:
```
{
  "servers": {
    "accuknox": {
      "type": "http",
      "url": "https://mcp-server.accuknox.com/mcp",
      "headers": {
        "base_url": "https://cspm.demo.accuknox.com/",
        "token": "your_token_here"
      }
    }
  }
}
```
Save the file. VS Code will show a Start button. Open Copilot Chat (Ctrl+Shift+I / Cmd+Shift+I) and confirm accuknox in the Tools list.
Create .cursor/mcp.json:
```
{
  "mcpServers": {
    "accuknox": {
      "type": "http",
      "url": "https://mcp-server.accuknox.com/mcp",
      "headers": {
        "base_url": "https://cspm.demo.accuknox.com/",
        "token": "your_token_here"
      }
    }
  }
}
```
Restart Cursor and check the MCP panel for the connected accuknox server.
In your project folder, create .claude.json:
Windows
```json
{
  "mcpServers": {
    "accuknox": {
      "command": "C:\\Program Files\\nodejs\\npx",
      "args": [
        "-y",
        "mcp-remote",
        "https://mcp-server.accuknox.com/mcp",
        "--header",
        "base_url: https://cspm.demo.accuknox.com/",
        "--header",
        "token: your_token_here"
      ]
    }
  }
}
```
macOS / Linux
```json
{
  "mcpServers": {
    "accuknox": {
      "command": "/usr/local/bin/npx",
      "args": [
        "-y",
        "mcp-remote",
        "https://mcp-server.accuknox.com/mcp",
        "--header",
        "base_url: https://cspm.demo.accuknox.com/",
        "--header",
        "token: your_token_here"
      ]
    }
  }
}
```
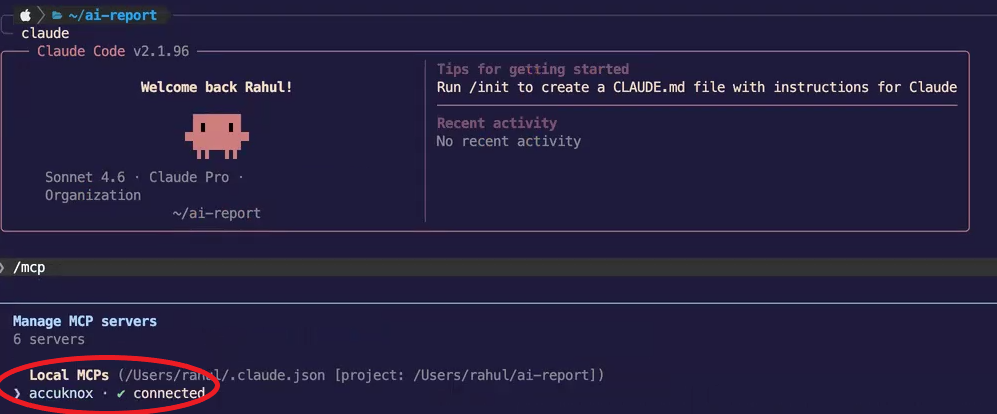
Open the folder in Claude Code (claude in terminal), then run /mcp to verify connected.
Edit your Claude Desktop config file:
- macOS:
~/Library/Application Support/Claude/claude_desktop_config.json - Linux:
~/.config/Claude/claude_desktop_config.json - Windows:
%APPDATA%\Claude\claude_desktop_config.json
Add the AccuKnox entry:
Windows
```json
{
  "mcpServers": {
    "accuknox": {
      "command": "C:\\Program Files\\nodejs\\npx",
      "args": [
        "-y",
        "mcp-remote",
        "https://mcp-server.accuknox.com/mcp",
        "--header",
        "base_url: https://cspm.demo.accuknox.com/",
        "--header",
        "token: your_token_here"
      ]
    }
  }
}
```
macOS / Linux
```json
{
  "mcpServers": {
    "accuknox": {
      "command": "/usr/local/bin/npx",
      "args": [
        "-y",
        "mcp-remote",
        "https://mcp-server.accuknox.com/mcp",
        "--header",
        "base_url: https://cspm.demo.accuknox.com/",
        "--header",
        "token: your_token_here"
      ]
    }
  }
}
```
Save and restart Claude Desktop. Look for the 🔌 icon to confirm connection.
Add the MCP server:
```bash
gemini mcp add accuknox --url https://mcp-server.accuknox.com/mcp \
  --header "base_url=https://cspm.demo.accuknox.com/" \
  --header "token=your_token_here"
```
Note
If your Gemini CLI version does not support --header flags, use a local wrapper instead. See the self-hosting section below.
Available Tools
Once connected, your AI tool will have access to 5 tools:

| Tool | What it does |
|---|---|
search_assets |
Search, count, and filter cloud assets by type, region, cloud provider, status, and date. |
data_type_selection |
List all available finding types (Cloud, Container, CIS Benchmark, DAST, SAST, SCA, STIG, LLM, etc.). |
get_finding_config |
Get valid filters, display fields, grouping, and sort options for a finding type. |
get_finding |
Fetch findings with full filter, display, grouping, and pagination control. |
get_finding_filter |
Get available filter values for a specific field within a finding type. |
Info
All JSON fields from AccuKnox GET APIs are queryable: assets, findings, compliance and benchmark results across all platforms.
Note
KubeArmor real-time alerts (MongoDB) not yet available.
Sample Use Case: Billable Assets Report
Generate a billable asset breakdown with dashboard visualization.
1. Set up and query
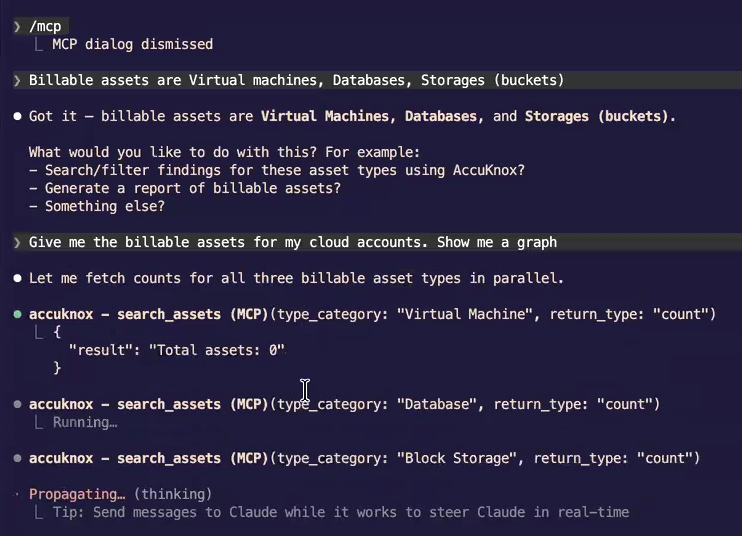
Open your AI tool, run /mcp, confirm accuknox is connected.
Tell the AI your billable asset definition:
Billable assets are Virtual machines, Databases, Storages (buckets)
Then ask:
Give me the billable assets for my cloud accounts. Show me a graph.
The server calls search_assets in parallel and returns live counts:
2. Review results
The AI returns a summary:
| Type | Count | Cloud |
|---|---|---|
| Virtual Machines | 37 | Azure (35), GCP (2) |
| Block Storage | 33 | Azure (31), Oracle (4) |
| Object Storage | 18 | — |
| Databases | 5 | Azure (5) |
| Total | 93 |
Plus a dashboard:
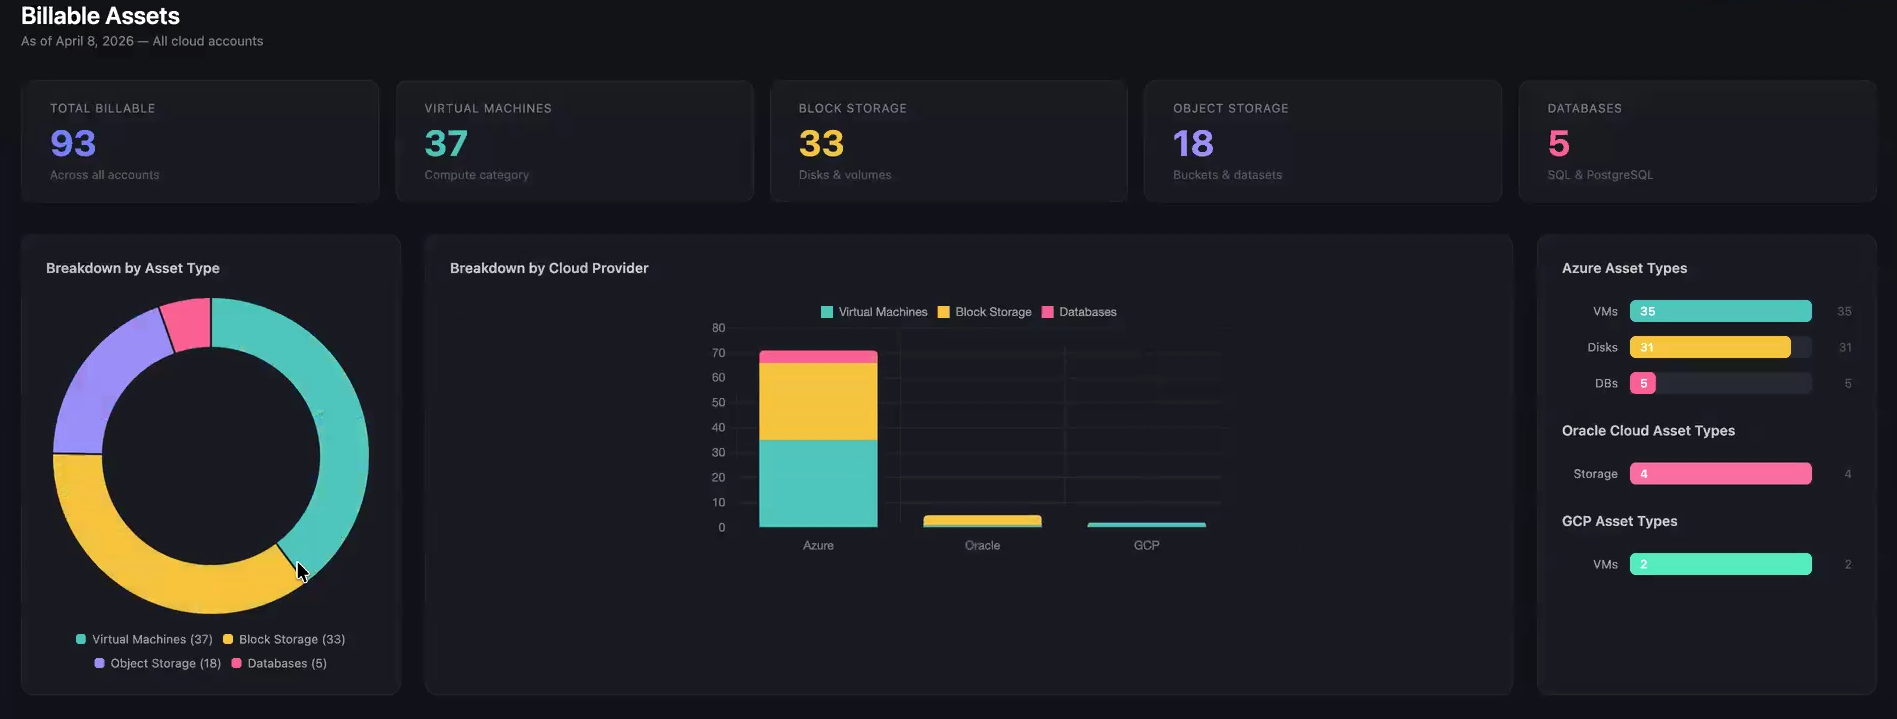
The dashboard includes:
- Donut chart: Asset type breakdown with percentages
- Stacked bar chart: Breakdown by cloud provider (Azure, Oracle, GCP)
- Per-provider detail: Horizontal bar charts for each provider
Tip
Live API calls = deterministic results. No guessing. Be specific: "S3 buckets" not just "storage".
Sample Use Case: AI Model Vulnerability Report
Identify critical vulnerabilities across container images, LLM deployments, and dependencies.
1. Ask and get results
What are the critical vulnerabilities in my AI models?
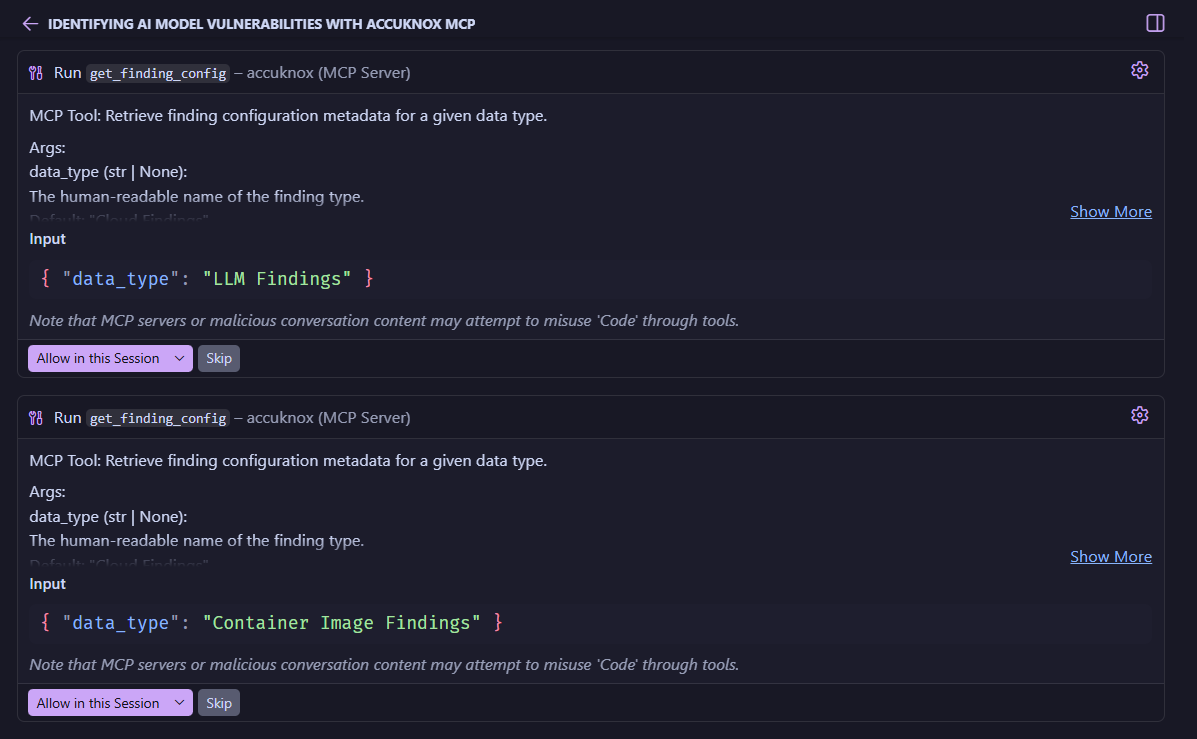
The server auto-identifies relevant finding types, calls get_finding_config for LLM Findings and Container Image Findings, then runs get_finding and cross-references results.
2. Review the report
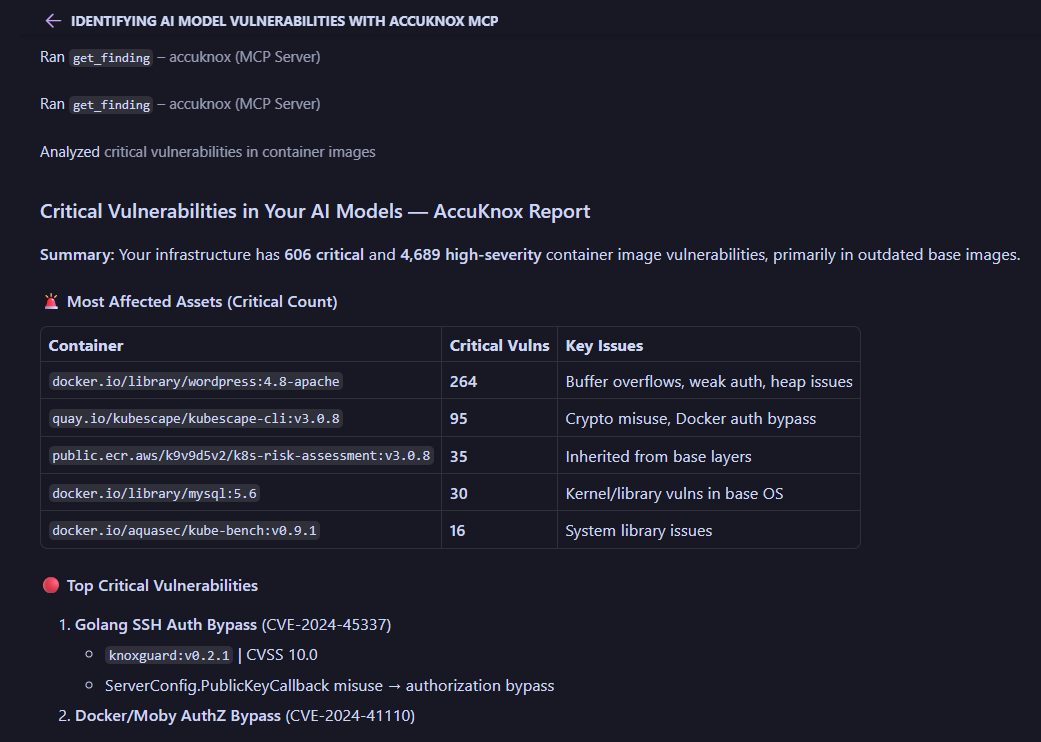
3. Get action items

Here the AI identifies 368 critical vulnerabilities across LLM deployments and container images, with the top categories being Buffer Overflows and Denial of Service. It then recommends specific remediation steps like updating base images, patching vulnerable tools, migrating outdated software, and rescanning after fixes.
You can ask follow-up questions like:
Show me the top 5 most vulnerable container images and their CVEs.
Using natural language to drill down into the data is a game-changer for security teams, making it easy to prioritize and act on critical issues without sifting through dashboards or raw API responses.
Tip
The get_finding_config → get_finding pattern ensures accurate, structured results every time.
More Example Prompts
Try these in your AI tool
- "How many cloud assets do I have?"
- "Show me all AWS S3 buckets in us-east-1."
- "What are the critical vulnerabilities in my AI models?"
- "List deployed AI models discovered in the last 24 hours."
- "How many of my assets are publicly exposed?"
- "Show me Cloud Findings with Critical severity, grouped by resource type."
- "Generate a CIS Kubernetes benchmark compliance report."
- "Find all secret scan findings from the last 7 days."
- "What SAST findings exist for my repositories?"
Troubleshooting
Bug
- Not connecting? Check
base_urlandtokeninmcp.json. - Auth failed? Token expired? Generate a new one from Settings → User Profiles.
- Wrong tenant data? Verify
base_urlmatches your environment. - Tool missing? Restart your AI tool. In VS Code, use the Start button.
Self-Hosting (Optional)
Clone and run the server locally for private environments.
Self-hosting instructions
Requirements: Python 3.10+, AccuKnox API token.
git clone https://github.com/accuknox/mcp_server/
cd mcp_server
python3 -m venv venv
source venv/bin/activate  # Windows: venv\Scripts\activate
pip install -r requirements.txt
Create a .env file in the project root:
ACCUKNOX_BASE_URL=https://cspm.demo.accuknox.com
ACCUKNOX_API_TOKEN=your_token_here
Then configure your AI tool to point to the local server. In .vscode/mcp.json:
{
  "mcpServers": {
    "accuknox": {
      "command": "/absolute/path/to/mcp_server/venv/bin/python",
      "args": ["/absolute/path/to/mcp_server/MCP_server.py"]
    }
  }
}
Or to run the HTTP server locally:
python3 fastmcp_server.py
# Server starts on http://0.0.0.0:8000
Then point your client at http://localhost:8000/mcp using "type": "http" in your mcp.json.
For full self-hosting documentation, see the README on GitHub.