Connect GitHub, GitLab, or Bitbucket for Source Code Scanning
AccuKnox scans your repositories directly. You install the AccuKnox app on your source code manager once, pick the repositories and branches you care about, choose the scan types, and every scan runs on the AccuKnox platform.
Nothing goes into your pipeline. There is no workflow file to add, no runner to install, and no build to keep green.
This is the App Based integration. AccuKnox also supports CI/CD and CLI integrations for the same scanners, and you can run more than one at a time.
How it works
- You install the AccuKnox app on your GitHub organization, GitLab group, or Bitbucket workspace and grant read access.
- AccuKnox discovers every repository the app can see, along with its branches.
- You choose which repositories and branches to onboard, and which scan types to run on each.
- Scans run on the AccuKnox platform and rerun as your code changes.
- Findings land in the ASPM dashboard and the Findings pages.
What you can connect
| Source | Cloud | Self-hosted |
|---|---|---|
| GitHub | Supported, using the AccuKnox app | Supported, using a personal access token |
| GitLab | Supported, using the AccuKnox app | Supported, using a personal access token |
| Bitbucket | Supported, using the AccuKnox app | Not supported |
Bitbucket Data Center and Bitbucket Server are not covered by the app-based flow. Use the Bitbucket CI/CD integration for those.
Scan types
The same five scan types are available on all three sources.
| Scan type | What it finds |
|---|---|
| SCA | Known vulnerabilities in your open-source dependencies |
| Secrets | Hardcoded credentials, tokens, and keys committed to the repository |
| SAST | Insecure patterns in your own source code |
| SBOM | The software bill of materials for the repository |
| IaC | Misconfigurations in infrastructure-as-code, selectable by framework |
AI Enabled SAST is a separate checkbox that layers AI-assisted analysis on top of the standard static scan.
Prerequisites
- Permission to install an app on your GitHub organization, GitLab group, or Bitbucket workspace. On GitHub this means organization owner or an equivalent role.
- An AccuKnox account with permission to manage integrations.
- For a self-hosted GitHub or GitLab instance, a personal access token with read scope on the repositories you want to scan, plus network access from AccuKnox to that instance.
Step 1: Start the integration
Go to Settings → Integrations, open the Integrations tab, and select Application Security. The Application Security Posture Management (ASPM) section lists GitHub, GitLab, Bitbucket, and the CI/CD platforms.
Find your source and click Connect.
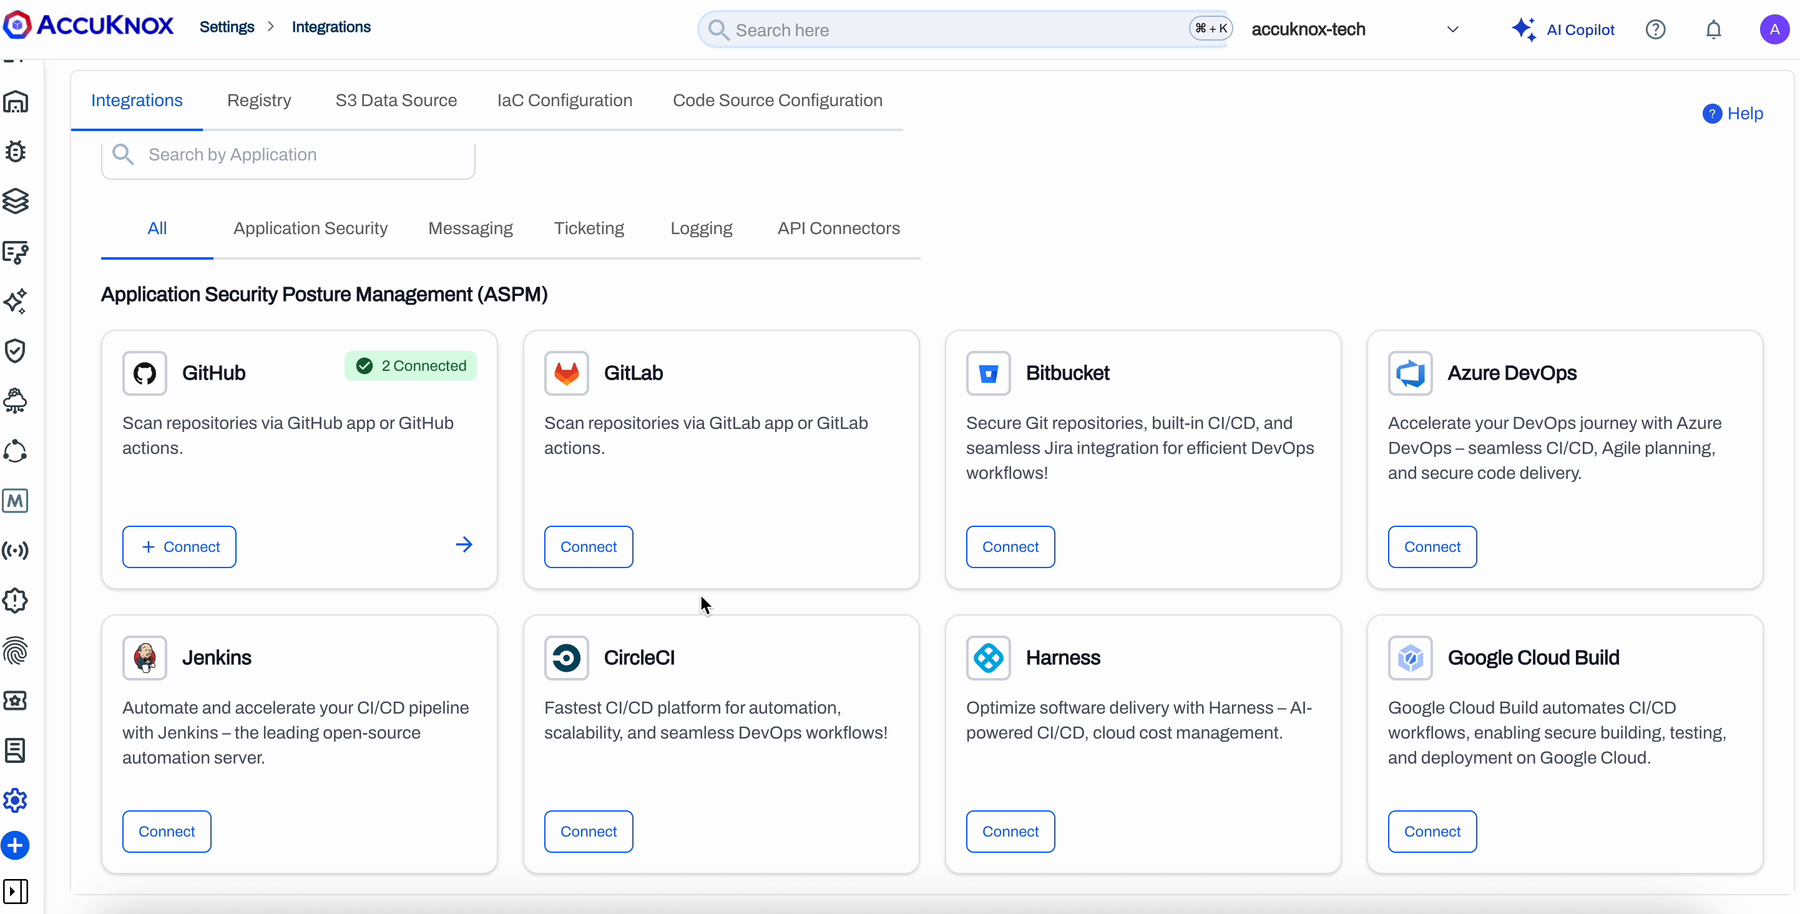
A card that already has connections shows a green Connected badge with the count. Clicking Connect on that card adds another connection rather than replacing the existing one.
Step 2: Choose the integration type
The Select Integration Type dialog asks how you want to connect. Pick App Based and click Continue.
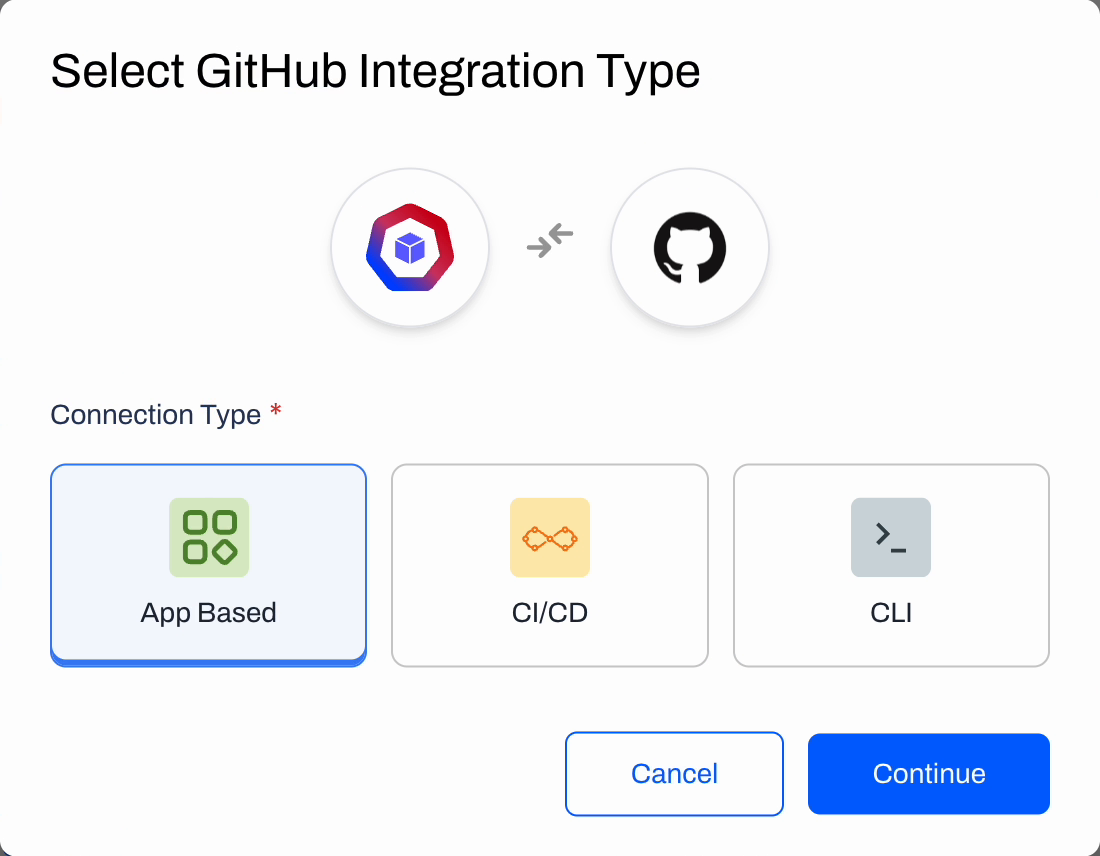
| Type | When to use it |
|---|---|
| App Based | You want AccuKnox to fetch and scan the code itself. No pipeline work. This is the flow this page covers. |
| CI/CD | You want scans to run as a step inside your existing pipeline. |
| CLI | You want to run the scanner manually or from a script. |
A three-step wizard opens: Connect → Repo & Branches → Scan.
Step 3: Connect the source
Under Connection Type, choose how AccuKnox reaches your instance.
- GitHub Cloud (Using Application) for repositories on github.com.
- GitHub Self-Hosted (Using PAT) for GitHub Enterprise Server. Supply the instance URL and a personal access token with read scope.
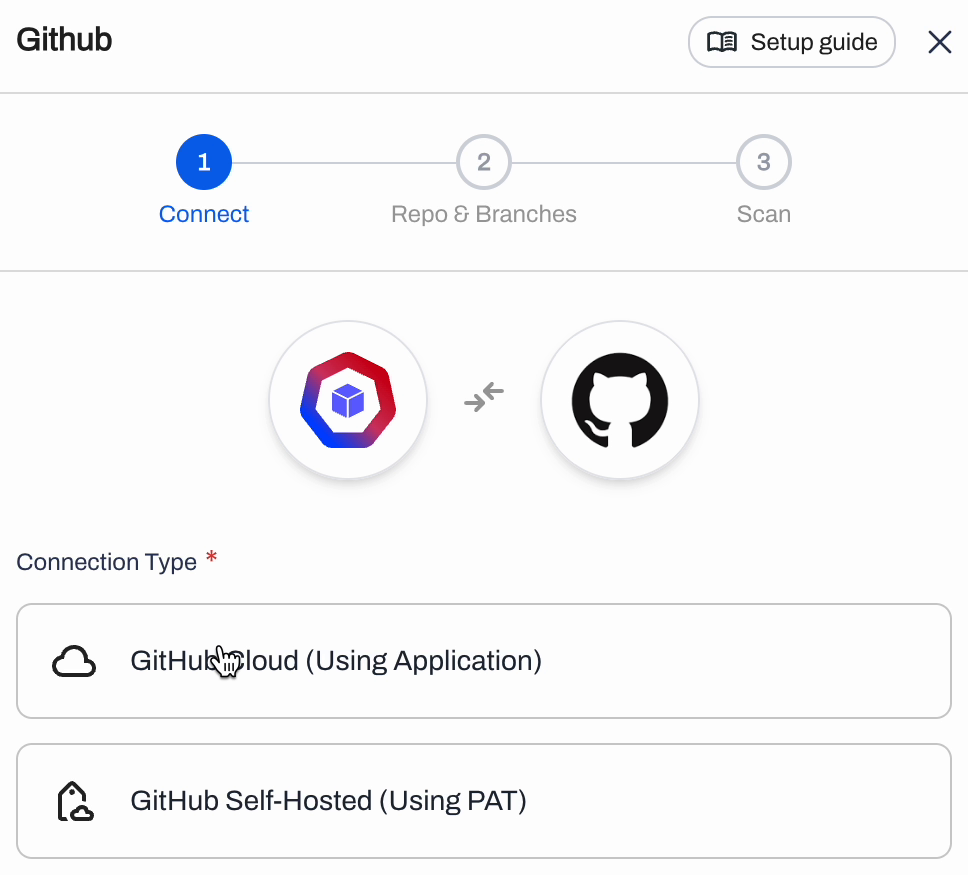
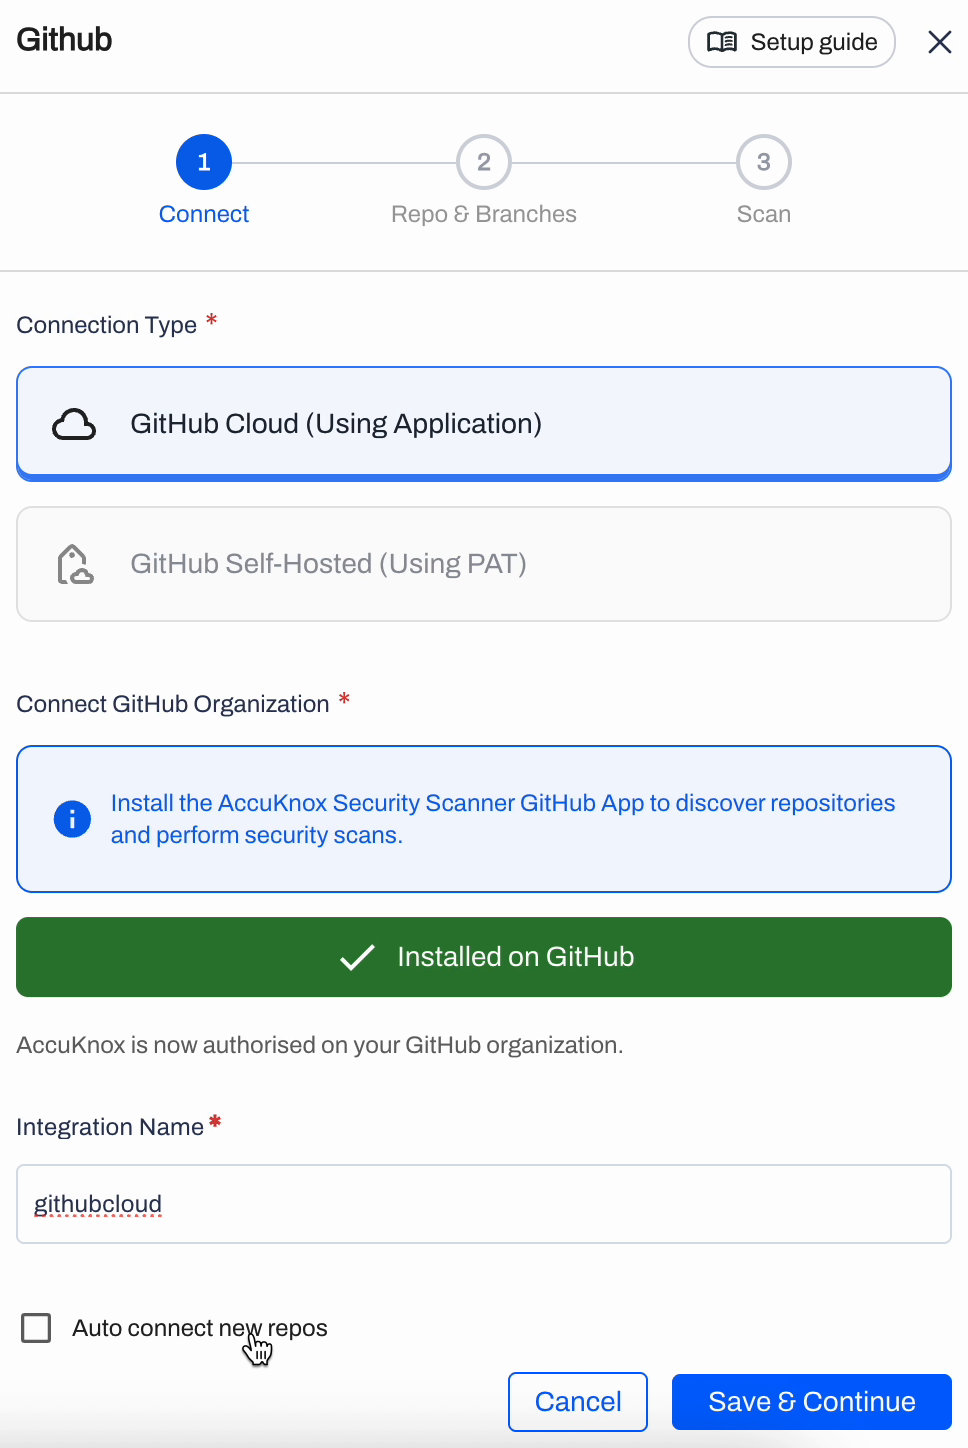
For GitHub Cloud, click Install on GitHub. AccuKnox opens the app installation page on GitHub in a new tab.
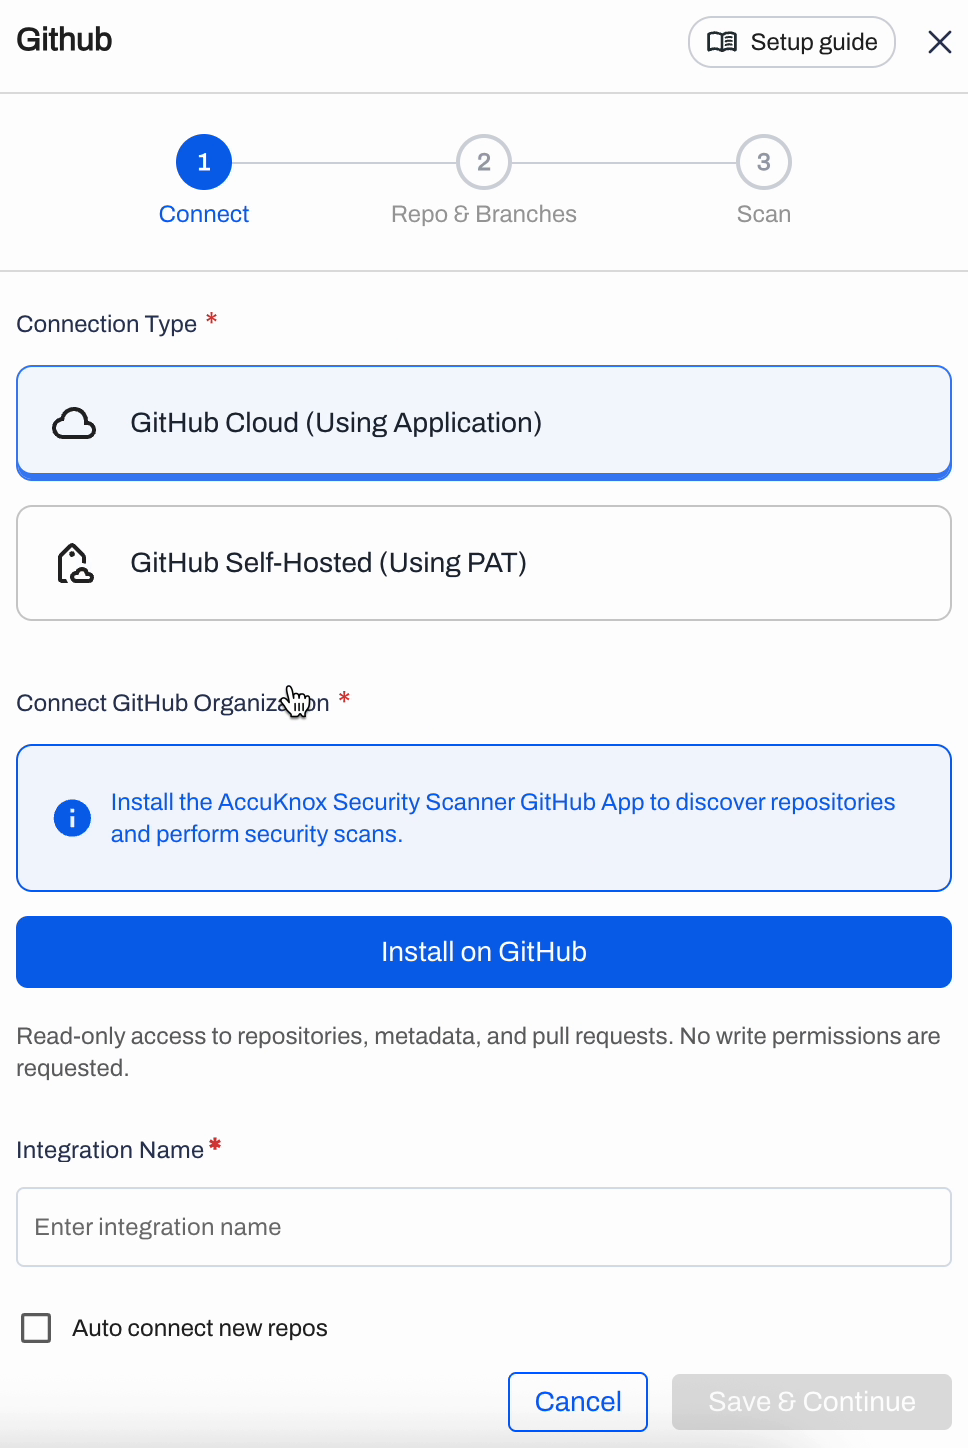
The access AccuKnox asks for is read-only. No write permissions are requested.
On GitHub, pick the organization to install into and choose the repository scope:
- All repositories covers every current and future repository owned by that organization.
- Only select repositories limits the app to the repositories you pick.
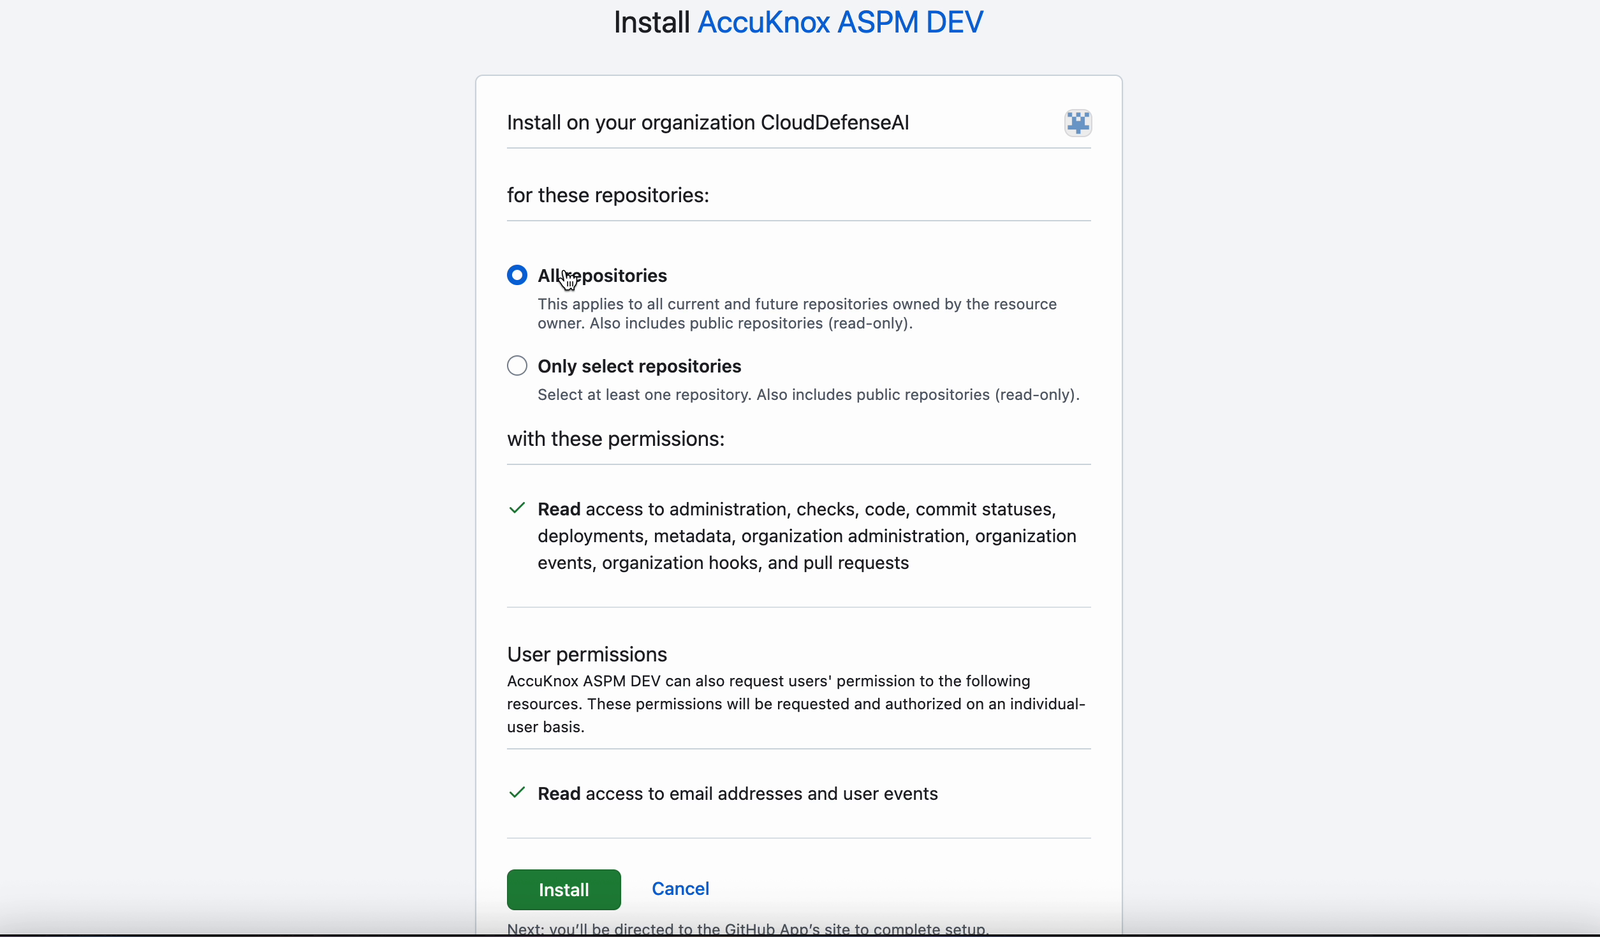
Review the permission list and click Install. GitHub sends you back to AccuKnox.
Which scope should you pick
Choose All repositories if you want new repositories to become scannable on their own. Choose Only select repositories if you want the app scoped to a known list. See Auto connect new repos for how each scope behaves afterwards.
Back in AccuKnox the button turns green and reads Installed on GitHub. Give the connection an Integration Name, tick Auto connect new repos if you want new repositories onboarded automatically, and click Save & Continue.
Under Connection Type, choose how AccuKnox reaches your instance.
- GitLab Cloud for projects on gitlab.com. AccuKnox installs its app against your GitLab group and you authorize it in GitLab.
- GitLab Self-Managed for a GitLab instance you run yourself. Supply the instance URL and a personal access token with
read_apiandread_repositoryscope.
For GitLab Cloud, start the install from the wizard, sign in to GitLab if prompted, and authorize AccuKnox against the group whose projects you want to scan. The access requested is read-only.
GitLab returns you to AccuKnox once the authorization succeeds. Give the connection an Integration Name, tick Auto connect new repos if you want new projects onboarded automatically, and click Save & Continue.
Projects and repositories
GitLab calls them projects and AccuKnox calls them repositories. They are the same thing in this wizard, and GitLab subgroups appear under the group you authorized.
Bitbucket connects through Bitbucket Cloud only.
Start the install from the wizard, sign in to Bitbucket if prompted, and grant AccuKnox access to the workspace whose repositories you want to scan. The access requested is read-only.
Bitbucket returns you to AccuKnox once the grant succeeds. Give the connection an Integration Name, tick Auto connect new repos if you want new repositories onboarded automatically, and click Save & Continue.
Bitbucket Data Center is not supported here
The app-based flow covers Bitbucket Cloud. For Bitbucket Data Center or Bitbucket Server, run scans through the pipeline instead. See Bitbucket integrations.
Screenshots on this page show GitHub
The wizard is the same for all three sources. Only the connect step and the vocabulary differ: GitHub organization, GitLab group, Bitbucket workspace.
Step 4: Select repositories and branches
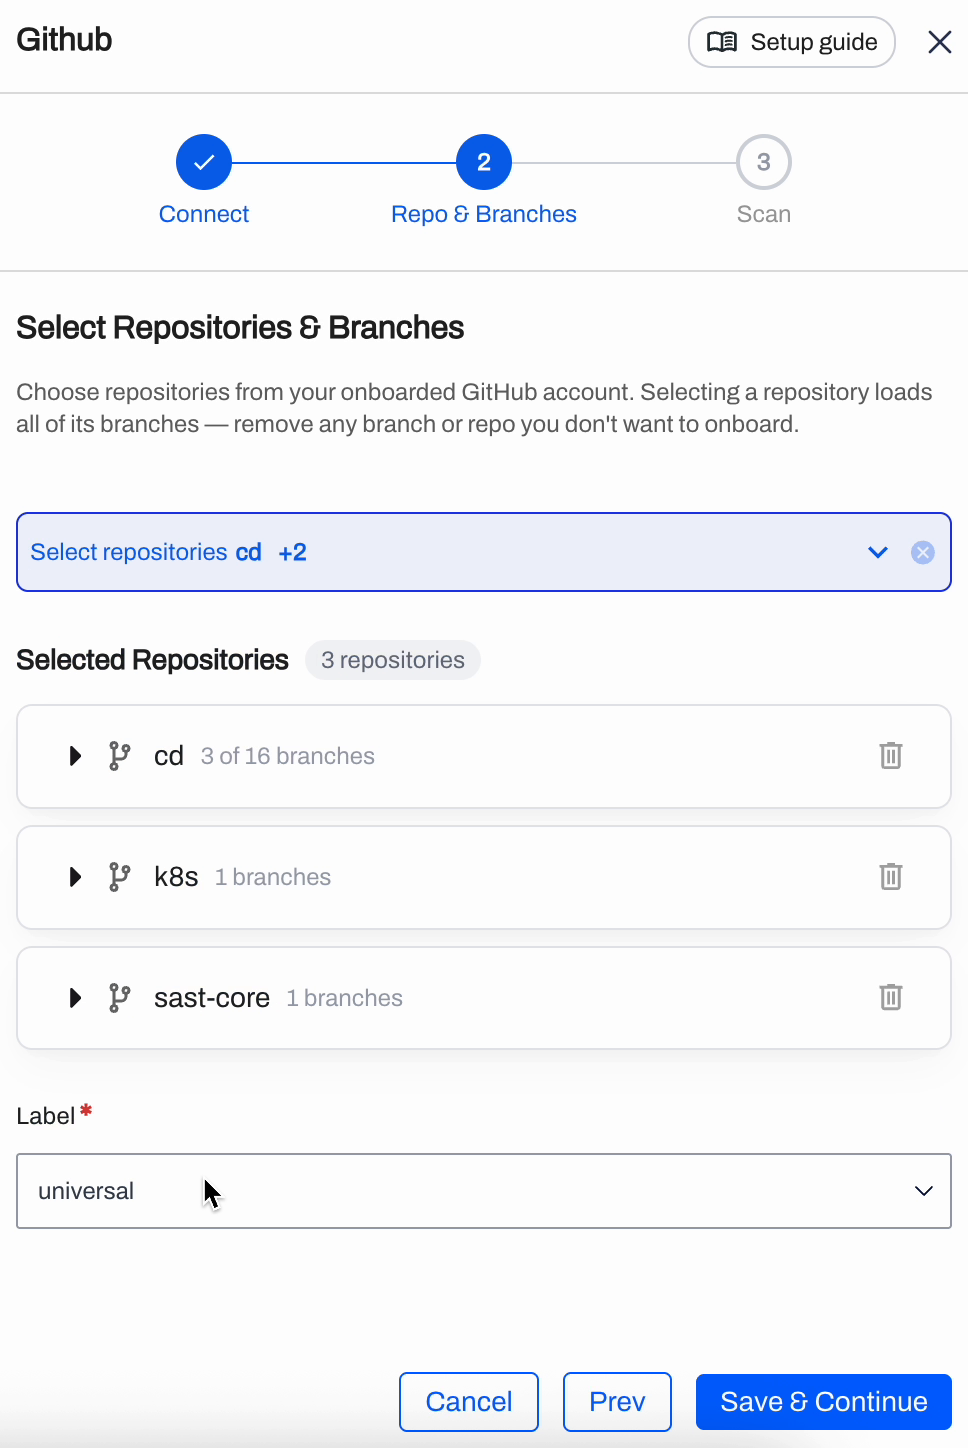
Step 2 of the wizard is Select Repositories & Branches. Open the Select repositories dropdown and pick the repositories to onboard. The list is searchable, which matters on a large organization.
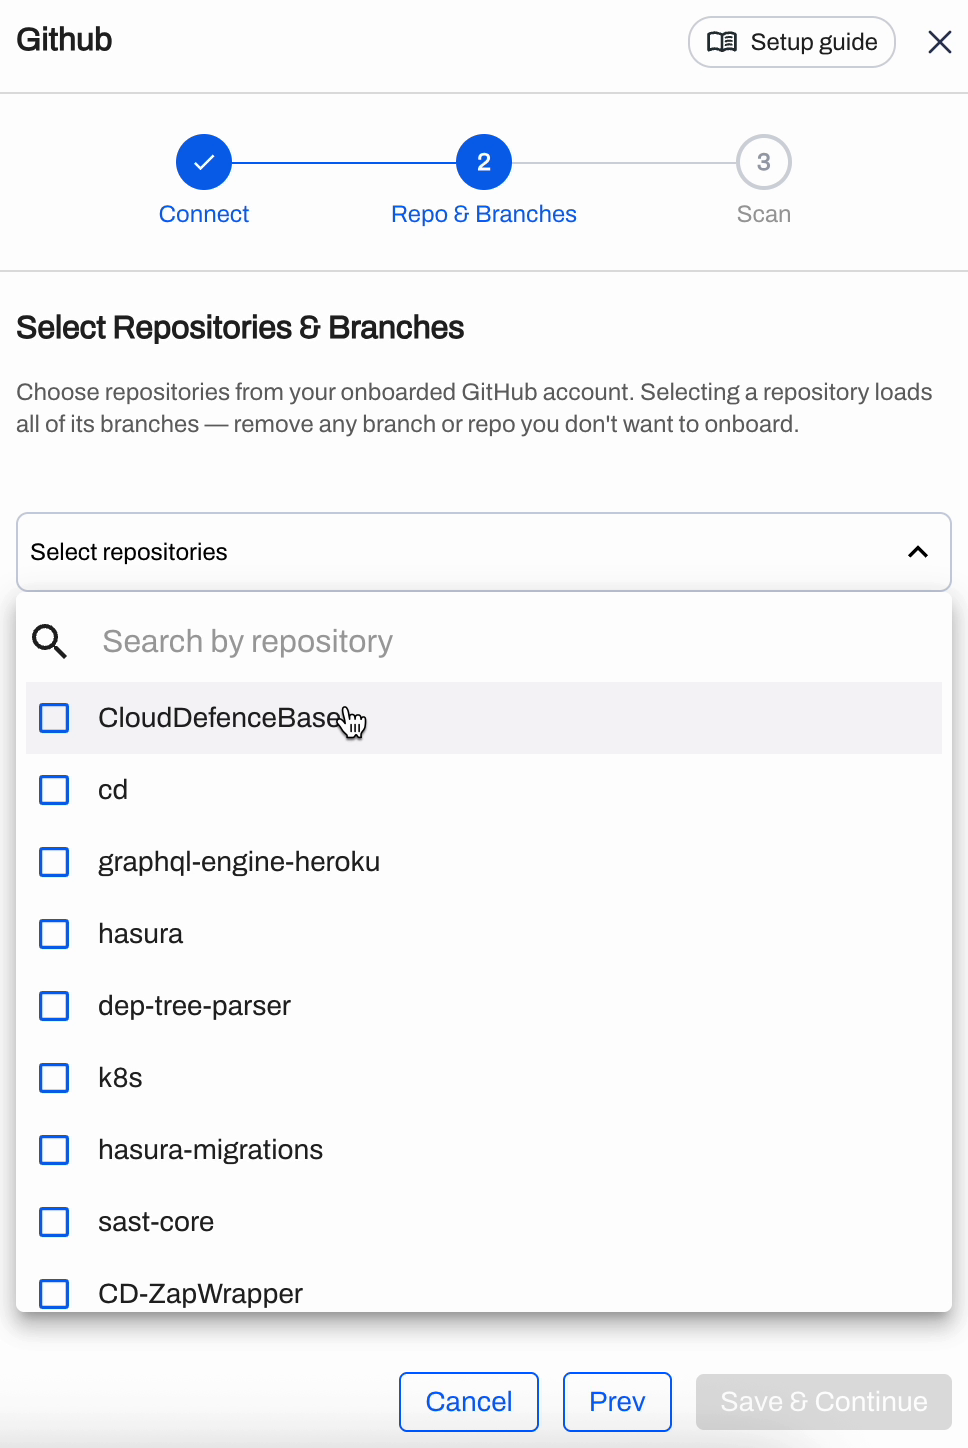
Selecting a repository loads all of its branches. Each repository then appears under Selected Repositories with its own branch dropdown.
The default branch is selected for you. Add more branches from the dropdown, or remove any branch you do not want scanned by clicking the × on its chip. The trash icon removes the whole repository from the selection.
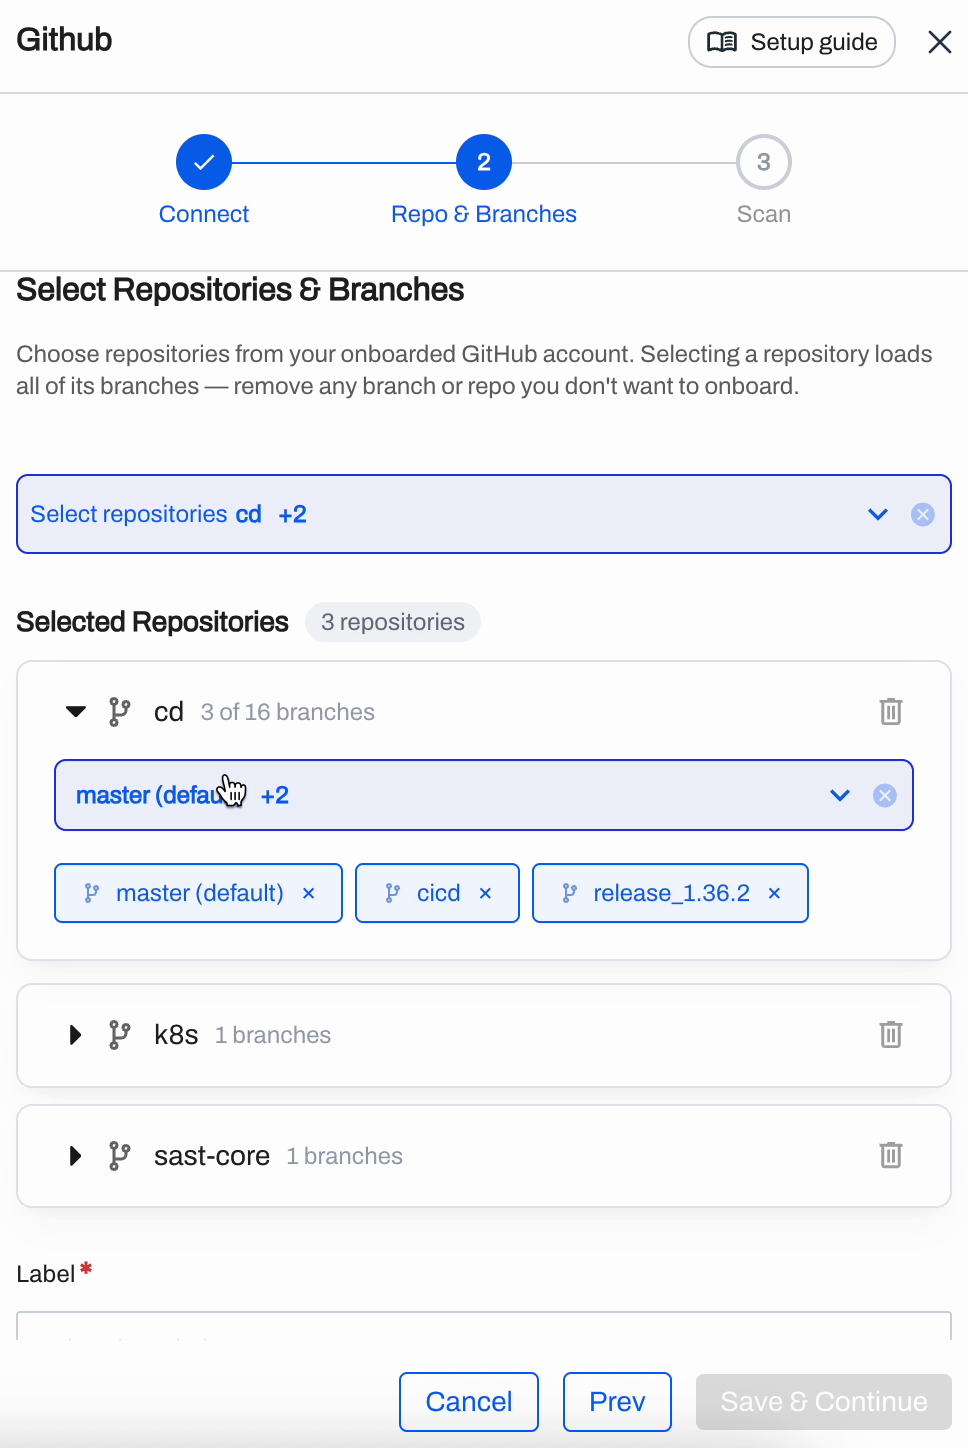
Below the repository list, pick a Label. One label applies to every repository in this connection and is how you group and filter these repositories later.
Click Save & Continue.
Step 5: Configure the scans
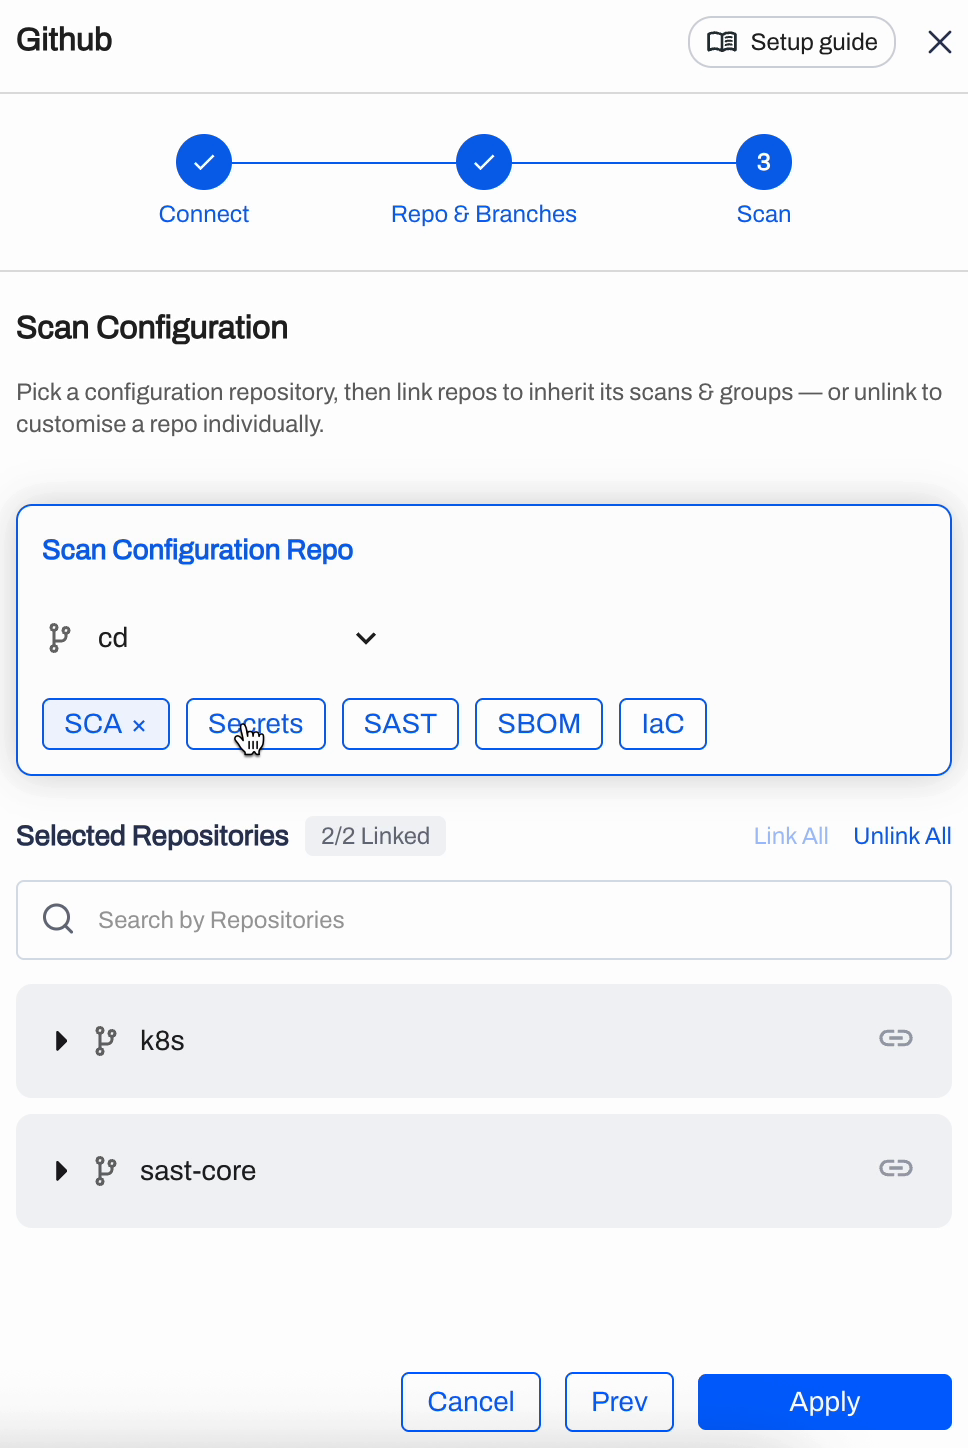
Step 3 is Scan Configuration. Rather than setting up every repository by hand, you configure one repository and link the rest to it.
Pick a repository under Scan Configuration Repo and select its scan types. Click a chip to add or remove that scan type.
Two options need a second look:
- IaC carries its own dropdown for frameworks. Leave it on All, or narrow it to the frameworks your repository actually uses.
- AI Enabled SAST is a checkbox under the chips. Turning it on applies AI-assisted static analysis to every linked repository.
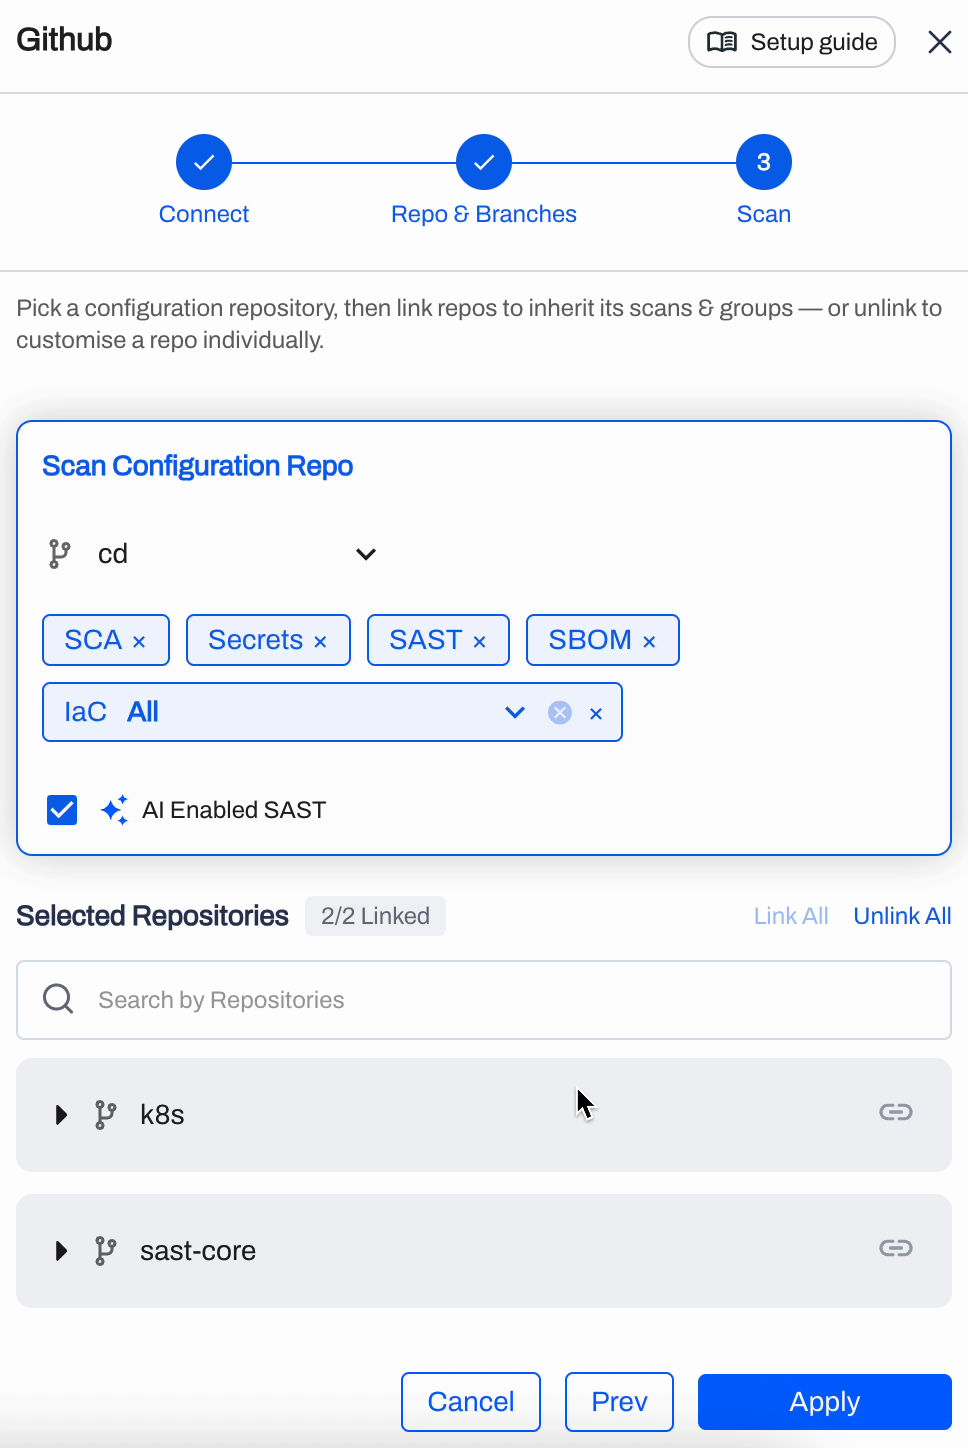
Under Selected Repositories, the counter shows how many repositories inherit that configuration, for example 2/2 Linked. Every linked repository runs exactly what the configuration repository runs.
Give one repository a different configuration
Click the link icon next to a repository to unlink it. Its own set of scan-type chips appears, and you set them independently. The counter drops to ½ Linked.
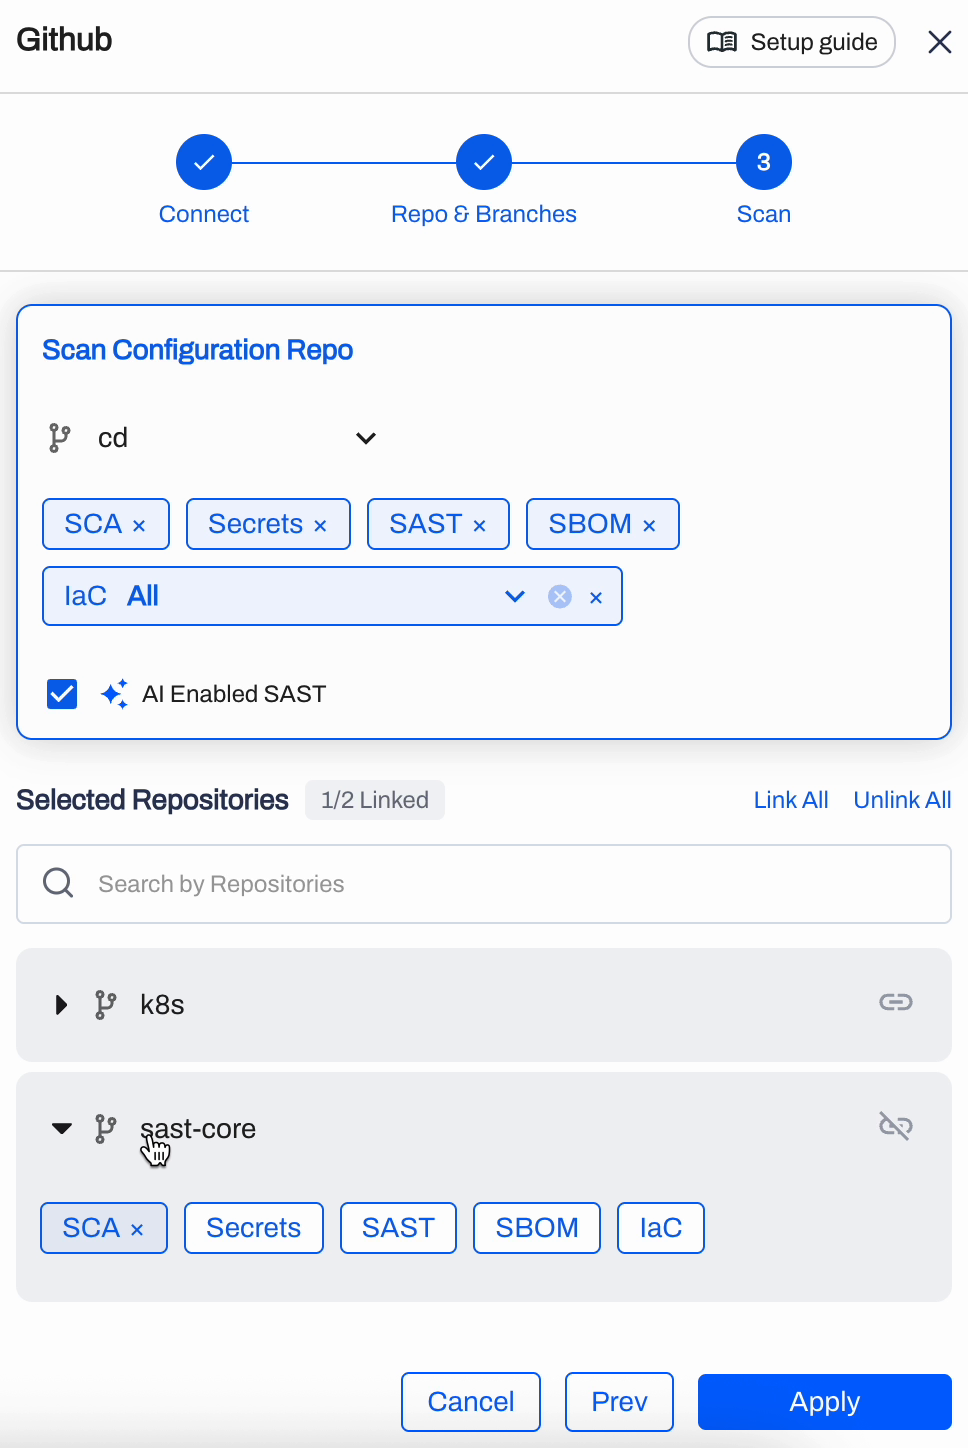
Use Link All and Unlink All to switch every repository at once.
Click Apply to finish. Scanning starts on the repositories you onboarded.
Read the results
Open the connection from Settings → Integrations to see what the scans found. The connection header shows its status, and Edit / Add Repo takes you back into the wizard.
The table nests three levels: repository, then branch, then scan type. Every row carries a Critical, High, Medium, and Low count, and each scan type row shows when it last ran.
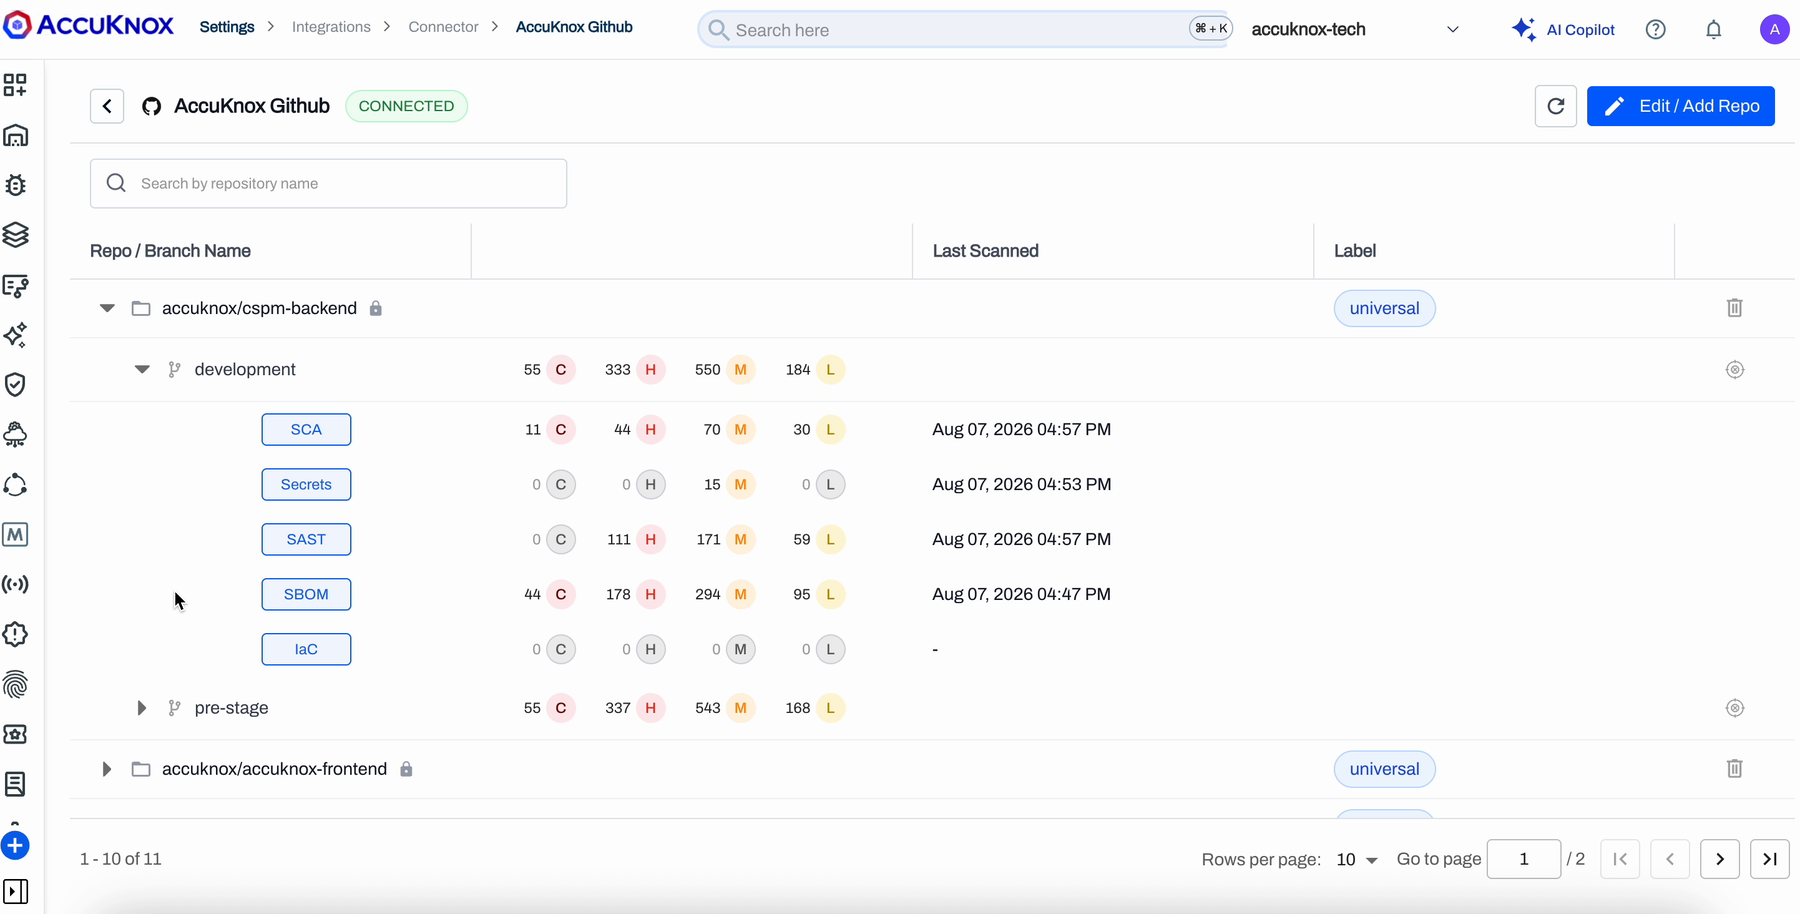
A dash under Last Scanned means that scan type has not run yet on that branch.
Click through from a row to reach the Findings page filtered to that scan type, repository, and branch.
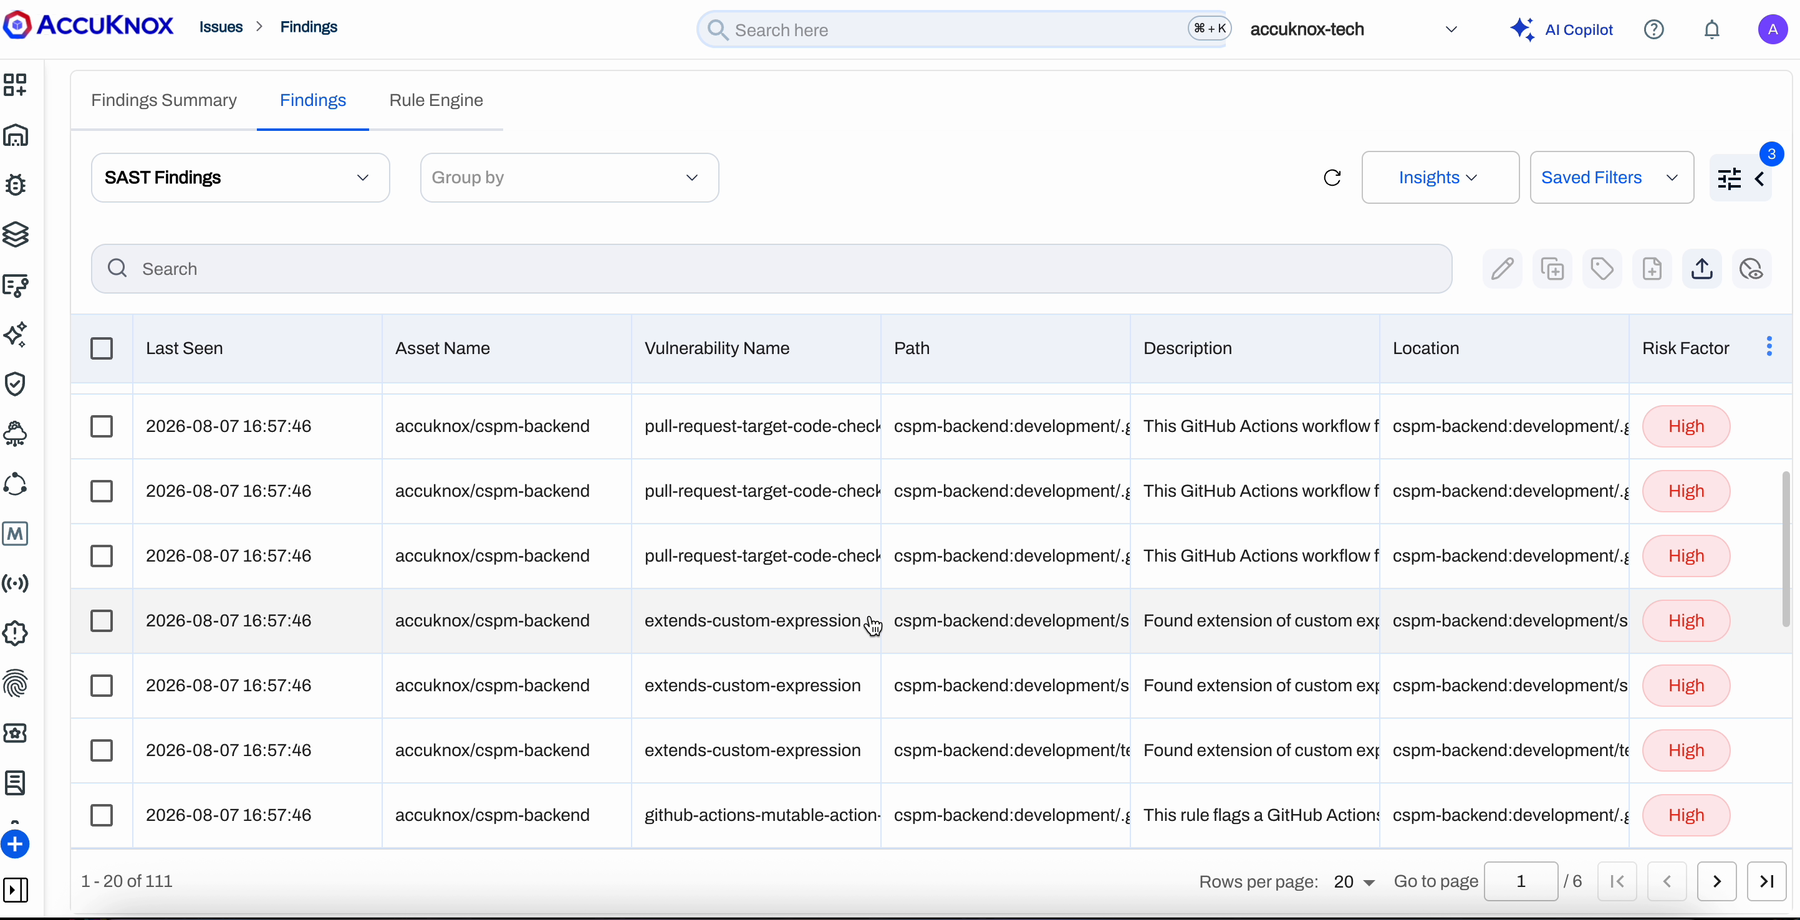
Findings also roll up into the ASPM view on the dashboard.
Auto connect new repos
Auto connect new repos is the checkbox on the Connect step. What it can do depends on the scope you gave the app when you installed it.
- App scoped to all repositories: a daily sync picks up repositories created in the last 24 hours and onboards them against the connection's configuration.
- App scoped to selected repositories: new repositories are invisible to AccuKnox, because you limited what the app can see. Grant the app access on your source code manager first, then add them through Edit / Add Repo.
Leave the checkbox off if you would rather review every new repository before it starts consuming scans.
Change or remove a connection
To change what a connection covers, open it and click Edit / Add Repo. The wizard reopens on the repository step with your current selection intact.
Removing a connection takes two actions, because the connection lives in two places:
- In AccuKnox, delete the connection. This stops the scans.
- On your source code manager, uninstall the AccuKnox app. AccuKnox cannot do this for you. On GitHub, open the app under your organization's settings and use Uninstall. Suspend blocks access without removing the app.
If you remove the app on the source code manager while the AccuKnox connection is still there, the connection reports itself as disconnected with the reason. A background check picks this up, so give it a few minutes.
Troubleshooting
The repository dropdown is empty. The app installed but has no repositories in scope. Check the app's repository access on your source code manager, then reopen the wizard.
A repository you expect is missing. Either the app is scoped to selected repositories and this one was not among them, or it was created after the last sync. Add it to the app's access list, then use Edit / Add Repo.
A scan type shows a dash under Last Scanned. That scan type has not completed a first run on that branch yet. Large repositories take longer on the first pass.
Self-hosted connection fails. Confirm the instance URL is reachable from AccuKnox and that the personal access token still has read scope and has not expired.