Secure Coding Agents With Agent Identities
Coding agents such as Claude Code and Codex run on a developer's machine with that developer's own login. Their calls look like the developer's calls, and nothing limits or records them.
An agent identity gives each agent its own name, a list of approved models, a trace of its activity and its own access that you can revoke. Claude Code and Codex are supported today. The screens below show Codex.
Each Identity Closes a Gap in Shared Logins
| Gap | Control | Where you see it |
|---|---|---|
| No attribution | Each agent has its own name, such as work-laptop |
Workspace settings > External agents |
| No boundary | You approve the models the agent may use when it signs in | Approved access column |
| No audit trail | The agent's activity is written to traces | Lens > Traces |
An authorized agent keeps access until you disconnect it.
Prerequisites
- An AgentZ workspace where you can open Workspace settings.
- Claude Code or Codex on the machine you want to connect. Codex must be version 0.162.1 or later.
Add an Agent in Five Steps
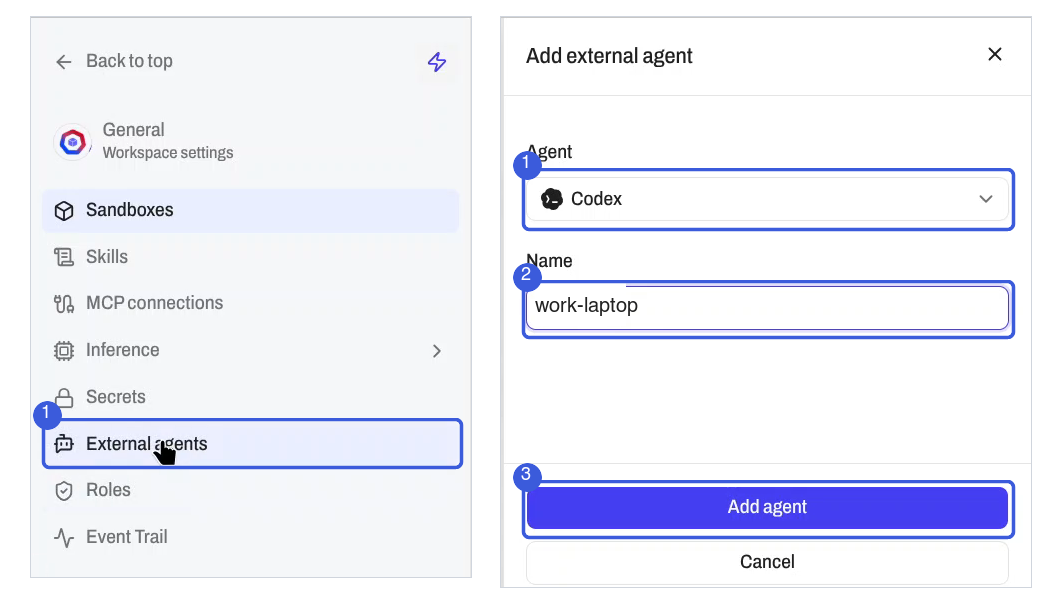
1. Open External Agents
Go to Workspace settings > External agents and click Add agent.
2. Pick the Agent and Name It
- Select Claude Code or Codex in the Agent list.
- Enter a Name that identifies the machine, such as
work-laptop. - Click Add agent.
A setup panel opens with the steps for that agent.
3. Install the AgentZ CLI
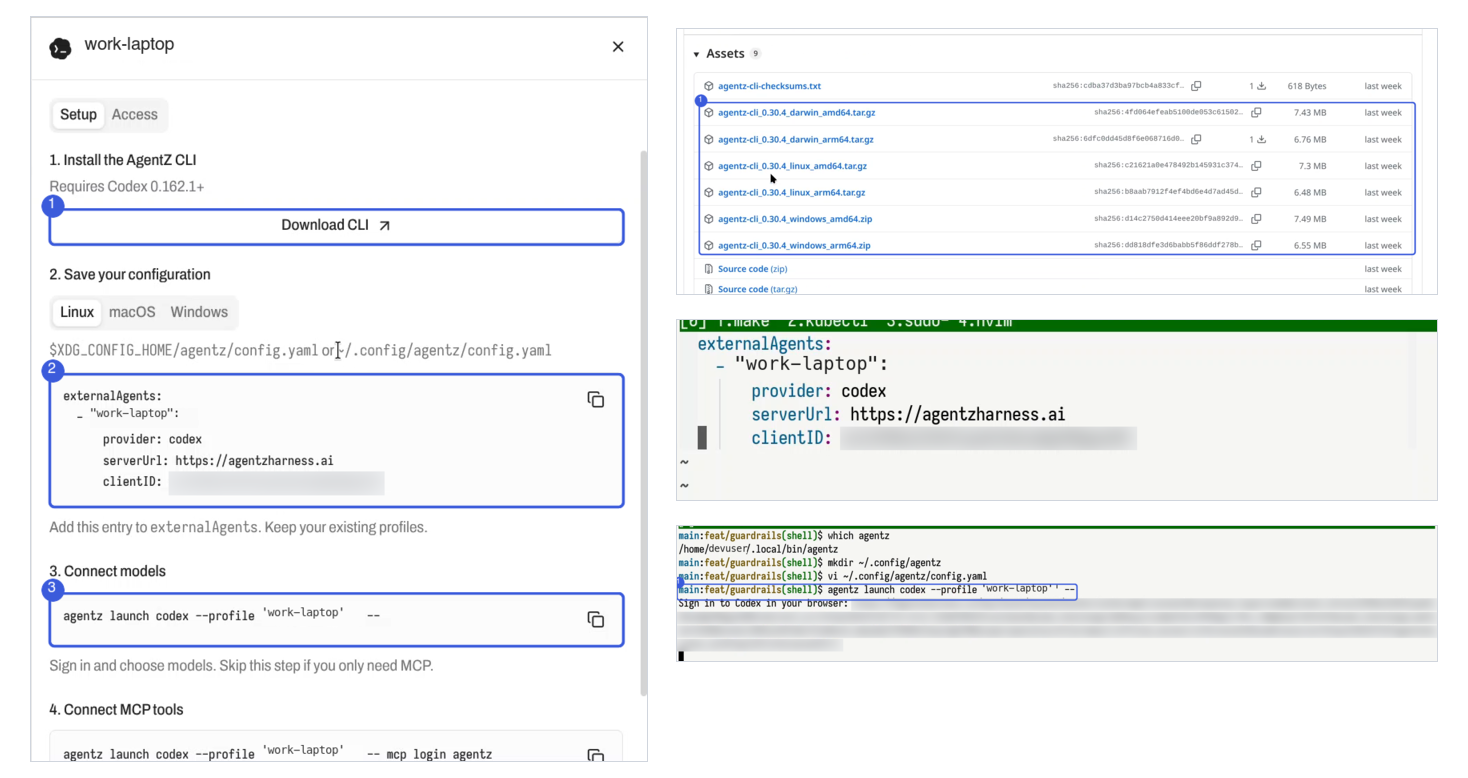
- In the Setup tab, click Download CLI. It opens the latest AgentZ release on GitHub.
- Under Assets, download the archive for your system: macOS, Linux or Windows, in amd64 or arm64.
- Unpack it and put the
agentzbinary on yourPATH. -
Confirm the binary is found:
which agentz
4. Save the Configuration
The Setup tab shows a config block and the file path for your system. On Linux the path is ~/.config/agentz/config.yaml.
-
Create the folder and open the file:
mkdir -p ~/.config/agentz vi ~/.config/agentz/config.yaml -
Copy the config block from the panel and paste it into the file.
- Save the file.
The entry looks like this. If the file already has an externalAgents list, add the entry to it.
externalAgents:
  - "<agent-name>":
      provider: codex
      serverUrl: https://agentzharness.ai
      clientID: <client-id>
5. Sign In and Choose Models
-
Copy the launch command from the Setup tab and run it. For Codex:
agentz launch codex --profile '<agent-name>' --For Claude Code, run the command in its Setup tab.
-
Open the sign-in link the terminal prints.
- In the Models list, tick the models this agent may use.
- Click Authorize.
The page lists what the agent can read: your name, profile image and email. The agent then starts in your terminal.
To use an approved model in Codex, type /model and pick one.

Connect MCP Tools (Optional)
Setup step 4 connects MCP tools. Run the command it shows, then choose the tools, prompts and resources in the browser. For Codex:
agentz launch codex --profile '<agent-name>' -- mcp login agentz
See the Agent's Activity
- Go to Lens > Traces.
- Open the dropdown and select the external agent.
Revoke an Agent's Access
Go to Workspace settings > External agents and open the agent. The Access tab shows what it can use. Disconnect any agent you no longer use.