Deploy BlueLock on ECS Fargate
Overview
Build an ECS Fargate test environment with Terraform, onboard it to AccuKnox as a VM cluster and block a command in a running task.
Workflow at a Glance
How the Deployment Fits Together
| Container | Role in the task |
|---|---|
bluelock |
Copies the binary into a shared volume, then exits |
armored-container |
Runs your app behind /kubearmor/bluelock. The sample runs socat on port 1337 |
kubearmor-vm-adapter |
Sends events to the control plane and receives policies |
Prerequisites
| Requirement | Used for |
|---|---|
| AWS admin access | Creating the VPC, EC2 instance, IAM role, CloudWatch log group, ECS cluster and service |
| AWS CLI, configured | Terraform and the ECR login use your credentials |
| Terraform | Running both scripts |
| Docker | The docker login command in Step 2 |
git |
Cloning the BlueLock repository |
socat |
Connecting to the sample task in Step 6 |
An EC2 key pair in us-east-1 |
The SSH key prompt in Step 3 |
| AccuKnox account | Getting a join token and viewing the results |
Step 1. Get a Join Token From AccuKnox
In AccuKnox, open Settings, then Manage Cluster, then Onboard. Select the cluster type VM, enter a name and copy the join token from the knoxctl onboard vm cp-node command.
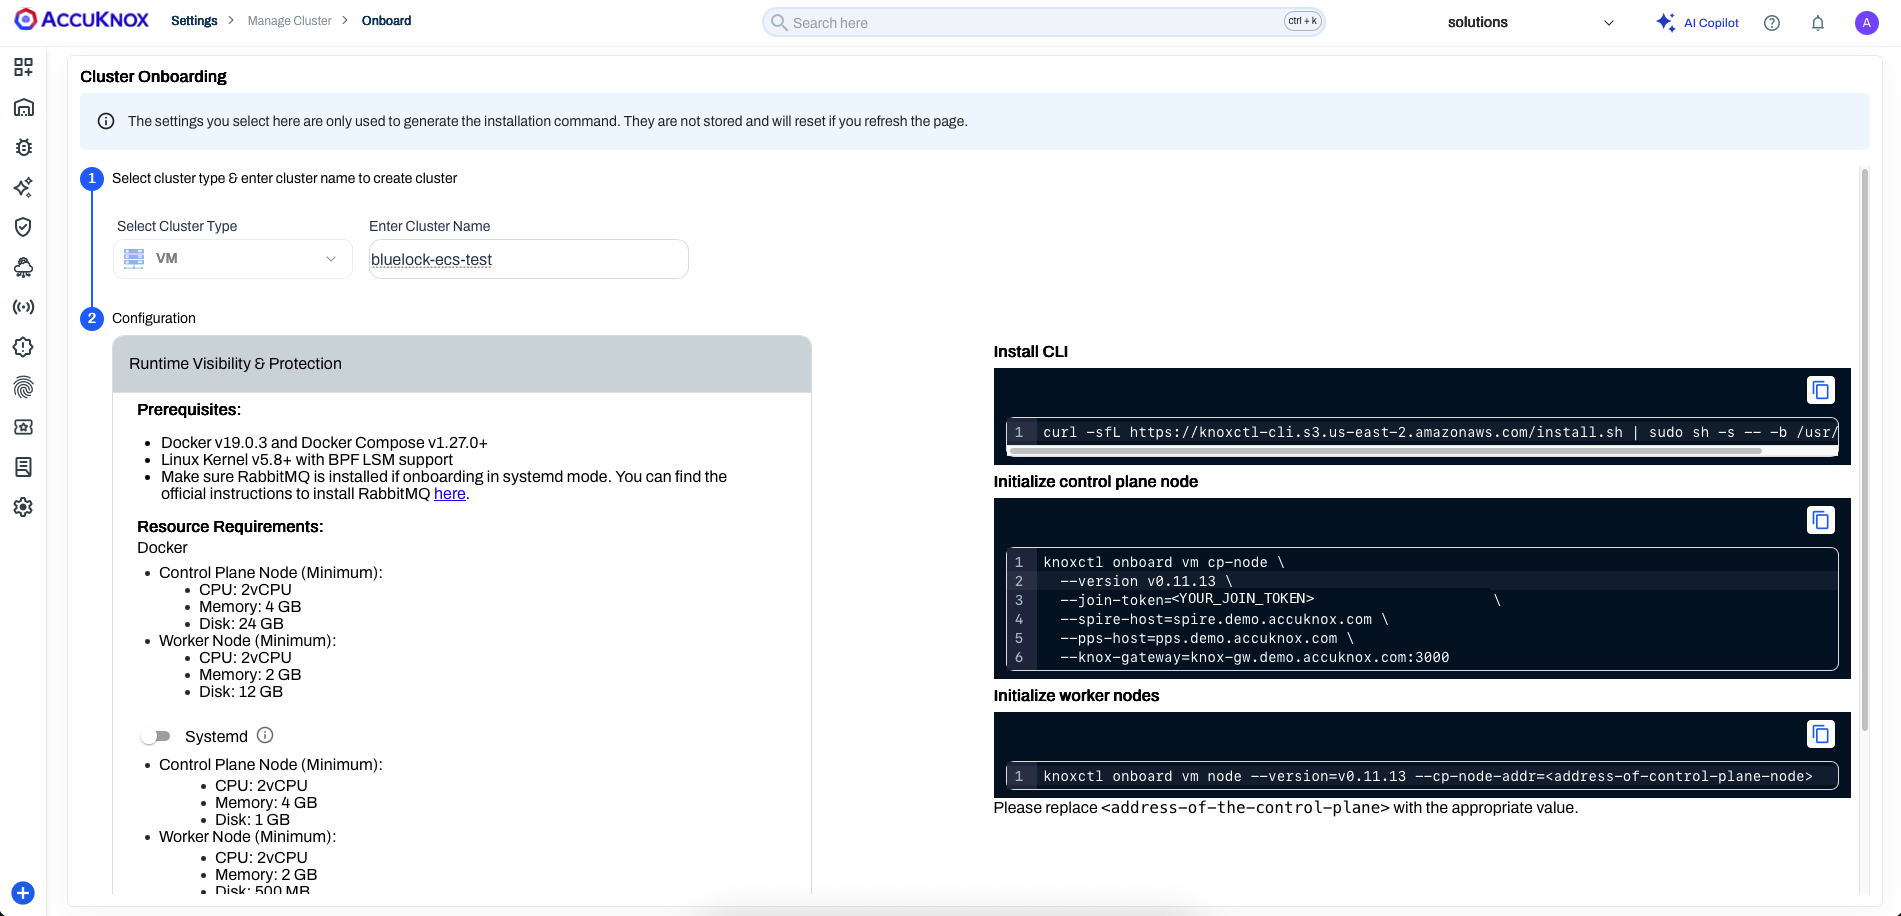
Terraform runs that command on the new EC2 instance, so you only need the token.
Step 2. Sign in to AWS and Public ECR
Enter your Access Key ID and Secret Access Key.
aws configure
Log in to public ECR.
aws ecr-public get-login-password --region us-east-1 | docker login --username AWS --password-stdin public.ecr.aws/k9v9d5v2
Step 3. Create the Base Infrastructure
Clone the repository and open base-infra.
git clone https://github.com/accuknox/bluelock.git
cd bluelock/terraform/ecs-fargate/base-infra
Run Terraform.
terraform init
terraform apply
terraform apply prompts for join_token (from Step 1) and ssh_key_name (an existing EC2 key pair in us-east-1). To skip the prompts, pass -var="join_token=<JOIN_TOKEN>" and -var="ssh_key_name=<KEY_PAIR_NAME>".
The script creates these resources in us-east-1:
| Resource | Details |
|---|---|
| Network | VPC bluelock-vpc (10.0.0.0/16), subnet bluelock-subnet (10.0.1.0/24), an internet gateway and a route table |
| Security group | bluelock-sg allows all inbound and outbound traffic |
| Control plane node | EC2 instance cp-node, Ubuntu 24.04 on t3.medium with a 20 GB gp3 volume. It installs Docker and knoxctl, then runs knoxctl onboard vm cp-node with your token |
| Logging | CloudWatch log group /ecs/armored-container with 7-day retention |
| IAM | Role ecsTaskExecutionRolePolicy with the AmazonECSTaskExecutionRolePolicy policy |
| ECS | Cluster bluelock-test and task definition worker-node (256 CPU, 512 MB, X86_64 Linux) with the three containers |
The security group is open to the internet
bluelock-sg allows all inbound traffic from anywhere. Use it for testing only. In production, open only the ports the agents need.
The script onboards against spire.demo.accuknox.com, pps.demo.accuknox.com and knox-gw.demo.accuknox.com:3000. Edit base-infra/main.tf to use another environment.
Step 4. Deploy the Sample Service
Run Terraform in test-task.
cd ../test-task
terraform init
terraform apply
Terraform creates the service worker-test-service on bluelock-test. It runs 2 Fargate tasks in bluelock-subnet with bluelock-sg, each with a public IP.
Set up manually instead of using Terraform
Replaces Steps 3 and 4. Create a VPC and a VM with a public IP first.
Control plane
- Install Docker on the VM.
-
Create a VM cluster on this VM, with only the control plane node, and onboard it to AccuKnox with the commands from Step 1.
-
Confirm that the cluster onboarded.
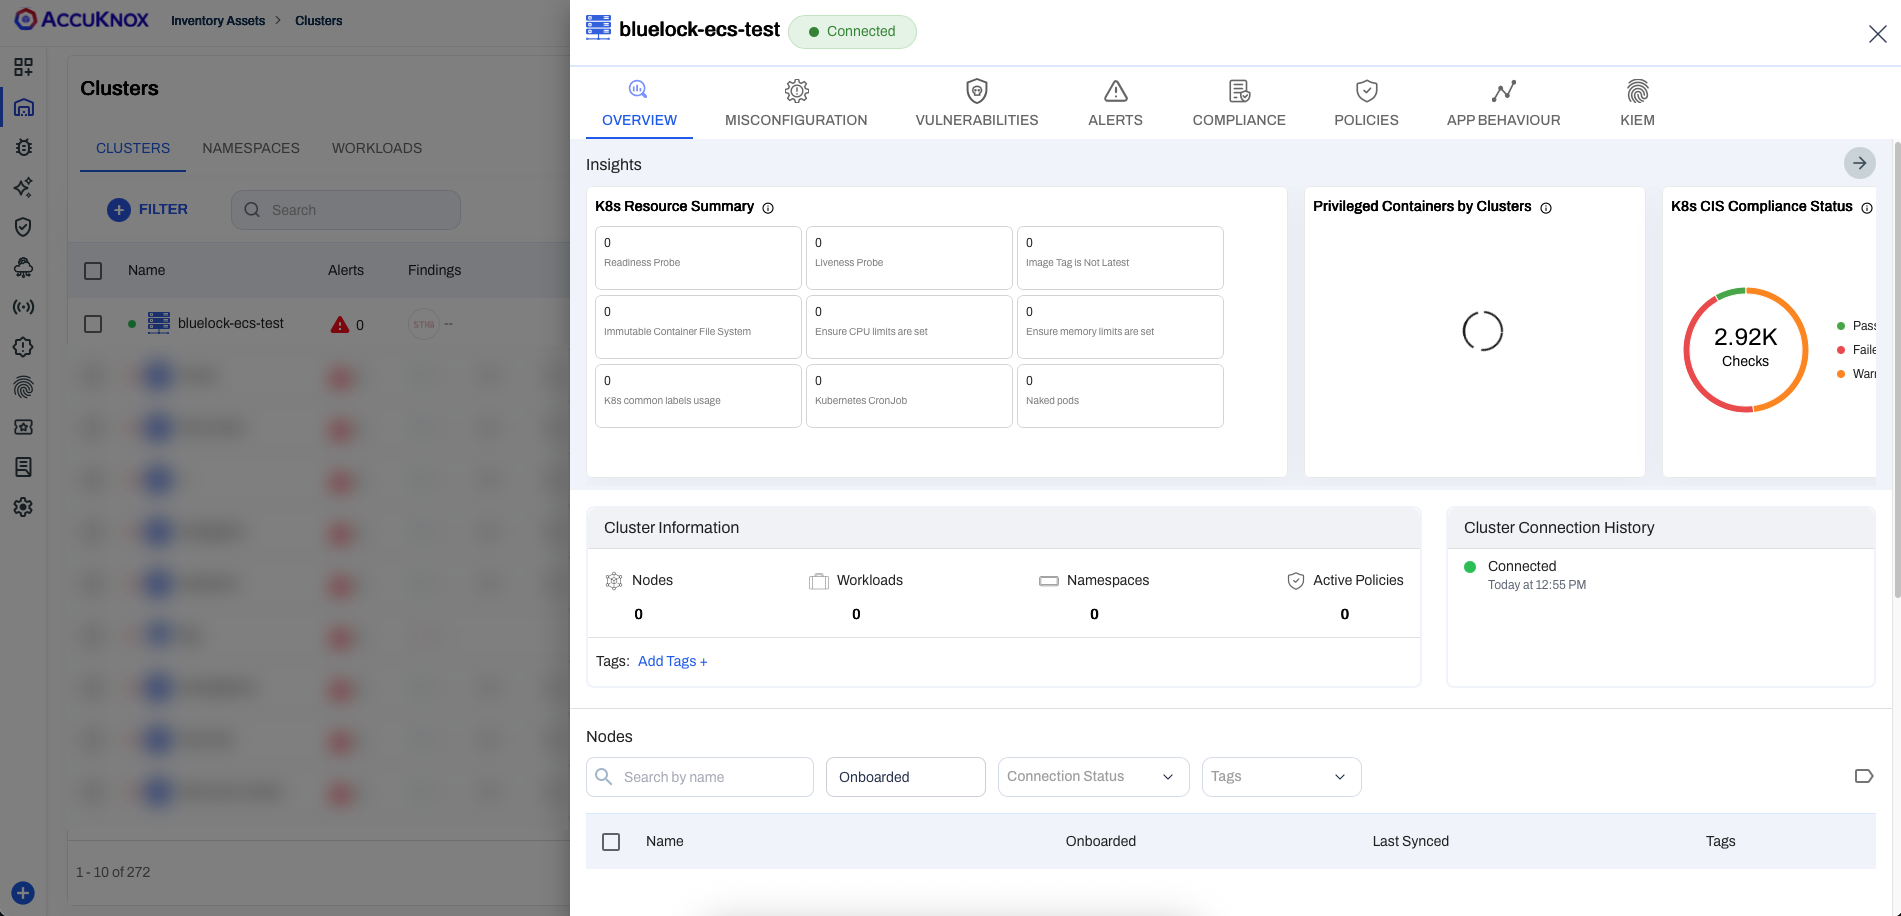
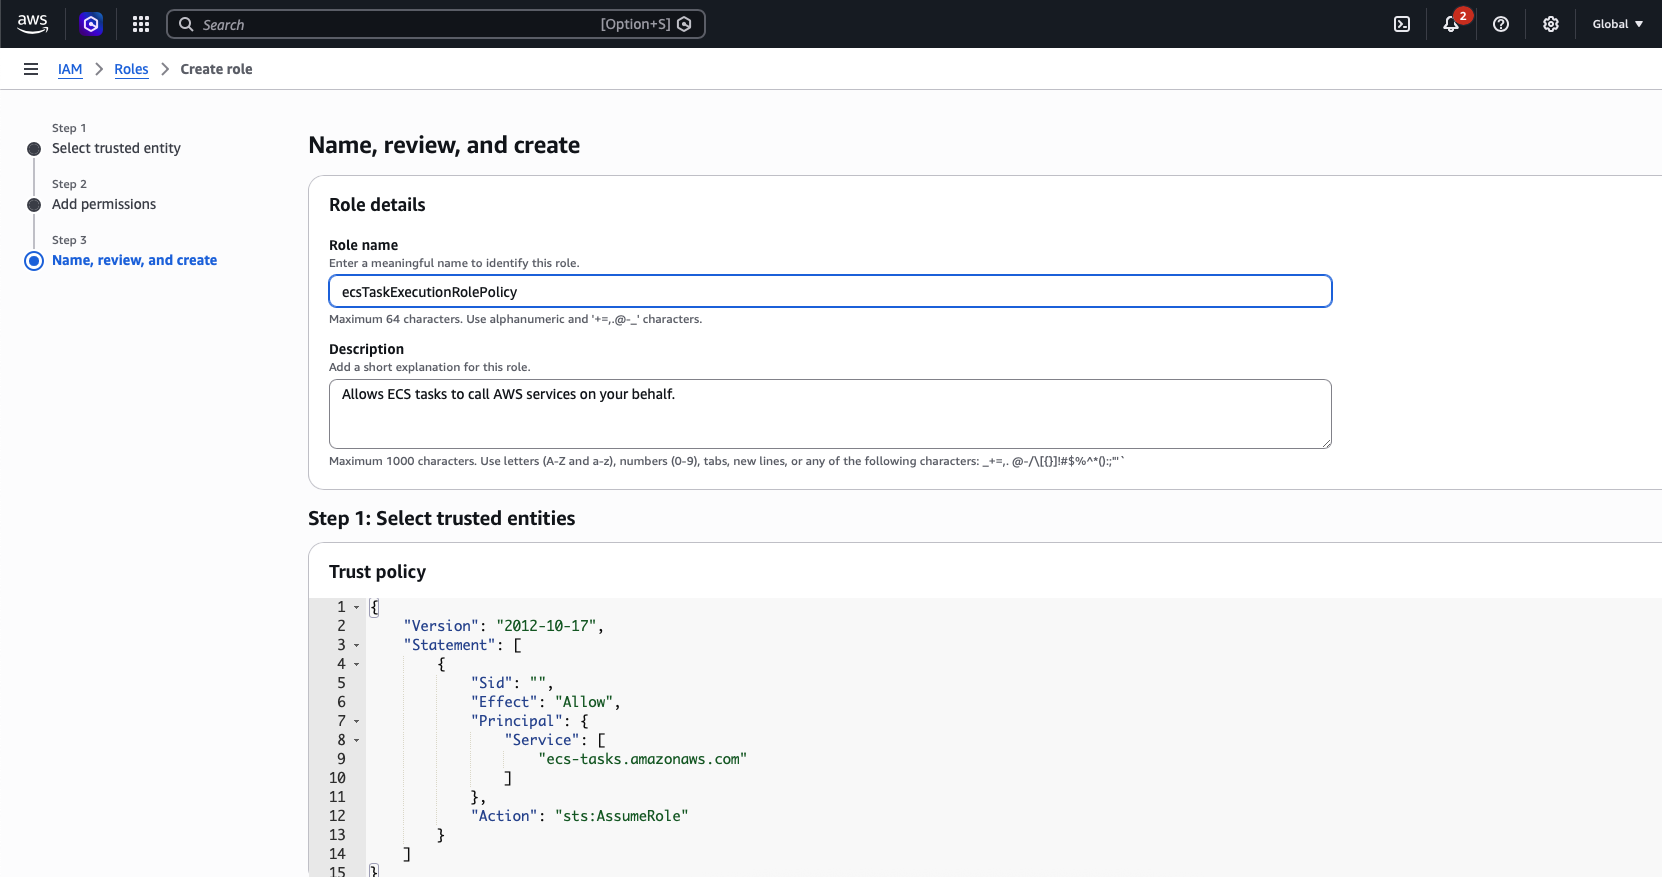
IAM role
-
In AWS IAM, create a role for the ECS task. Under Service, select
Elastic Container Service. Under Use case, selectElastic Container Service Taskand choose Next.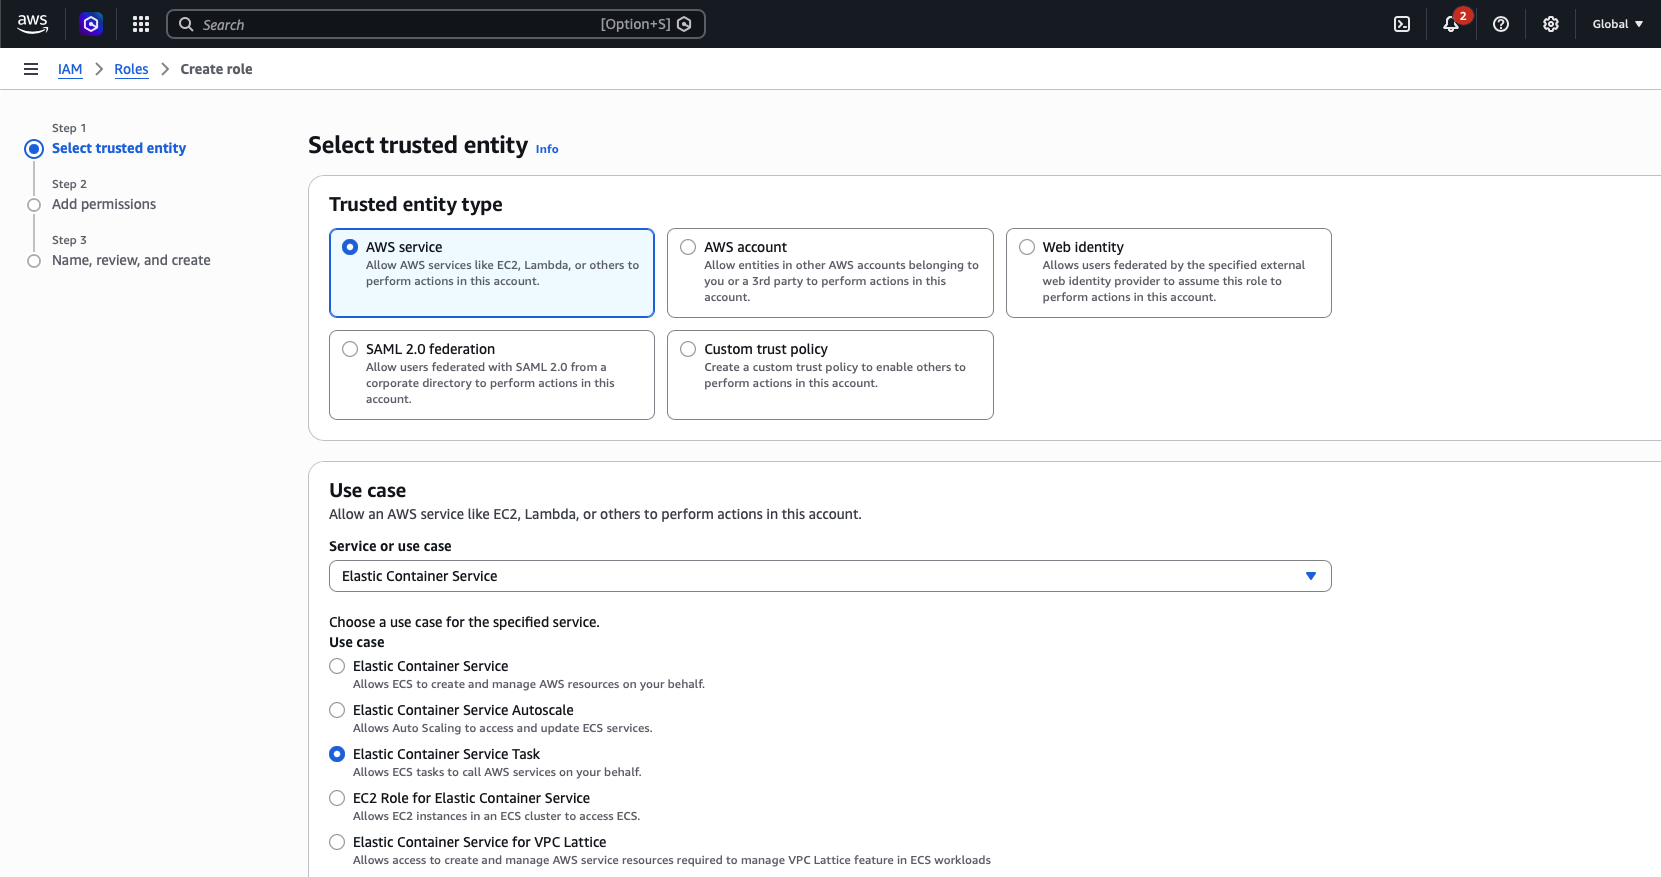
-
Select
AmazonECSTaskExecutionRolePolicyand choose Next.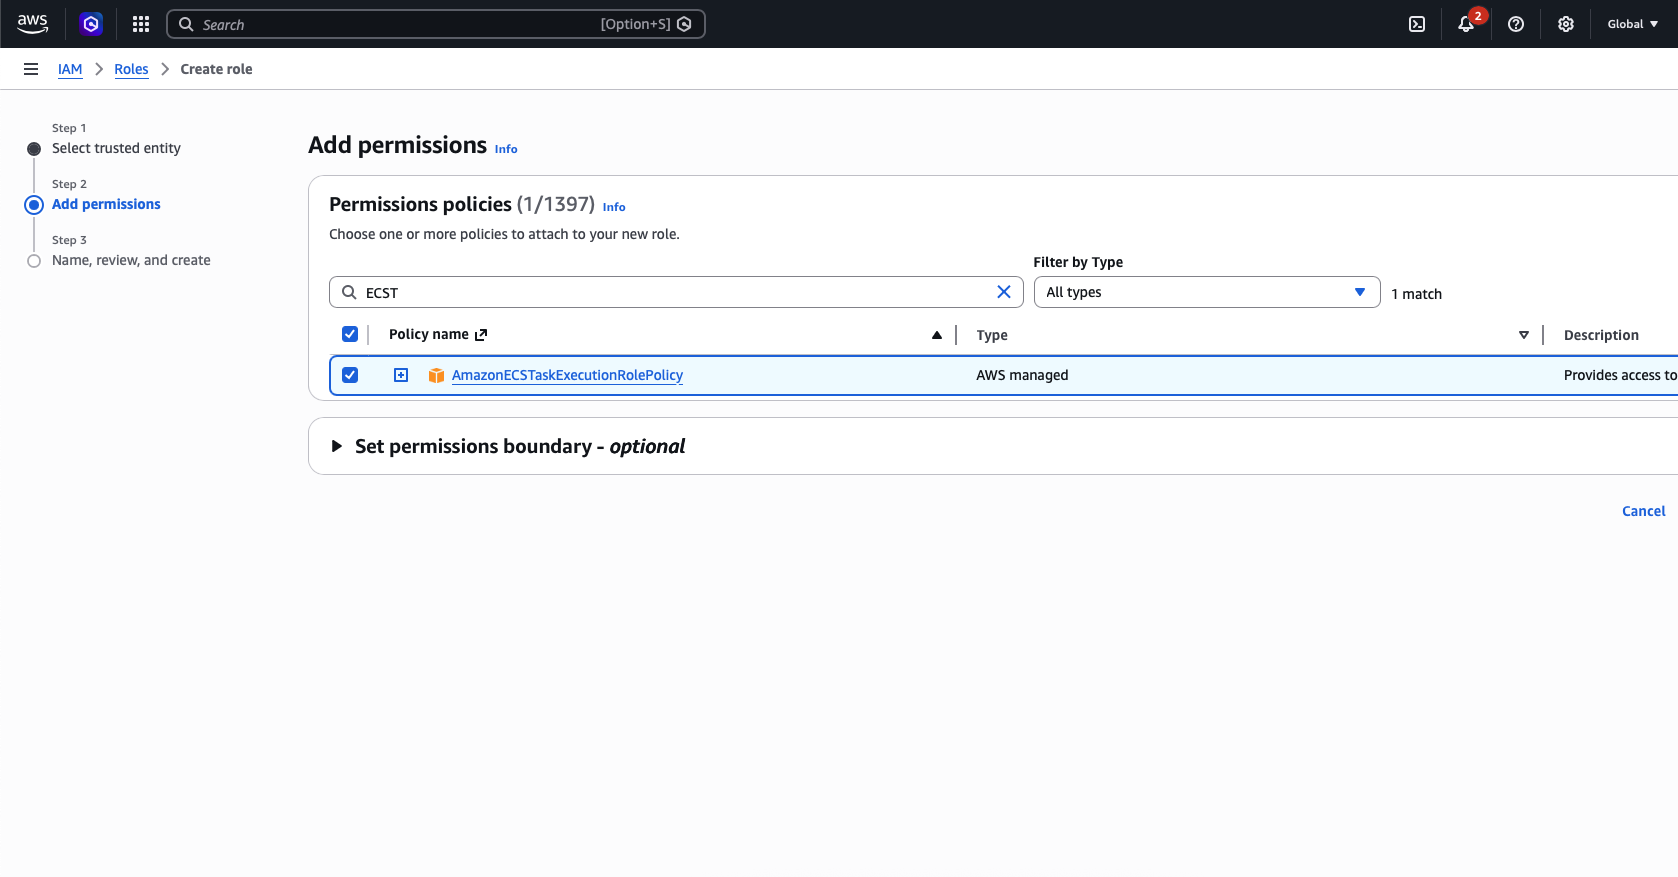
-
Name the role and save it.
CloudWatch log group
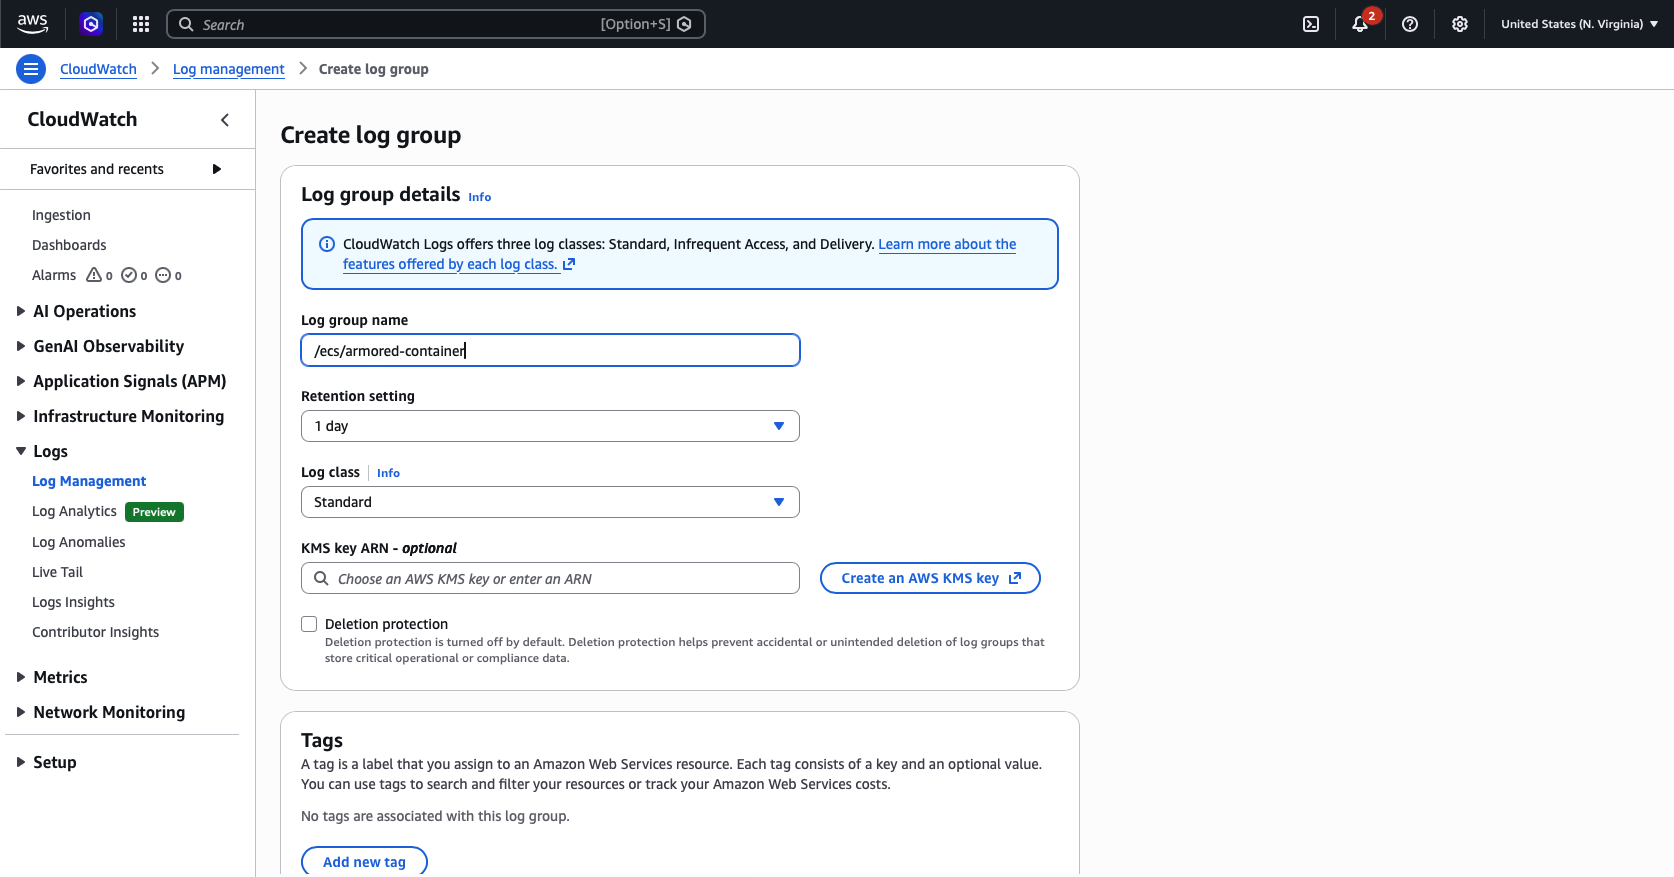
Open CloudWatch, then Log management, and create a log group named /ecs/armored-container.
ECS cluster
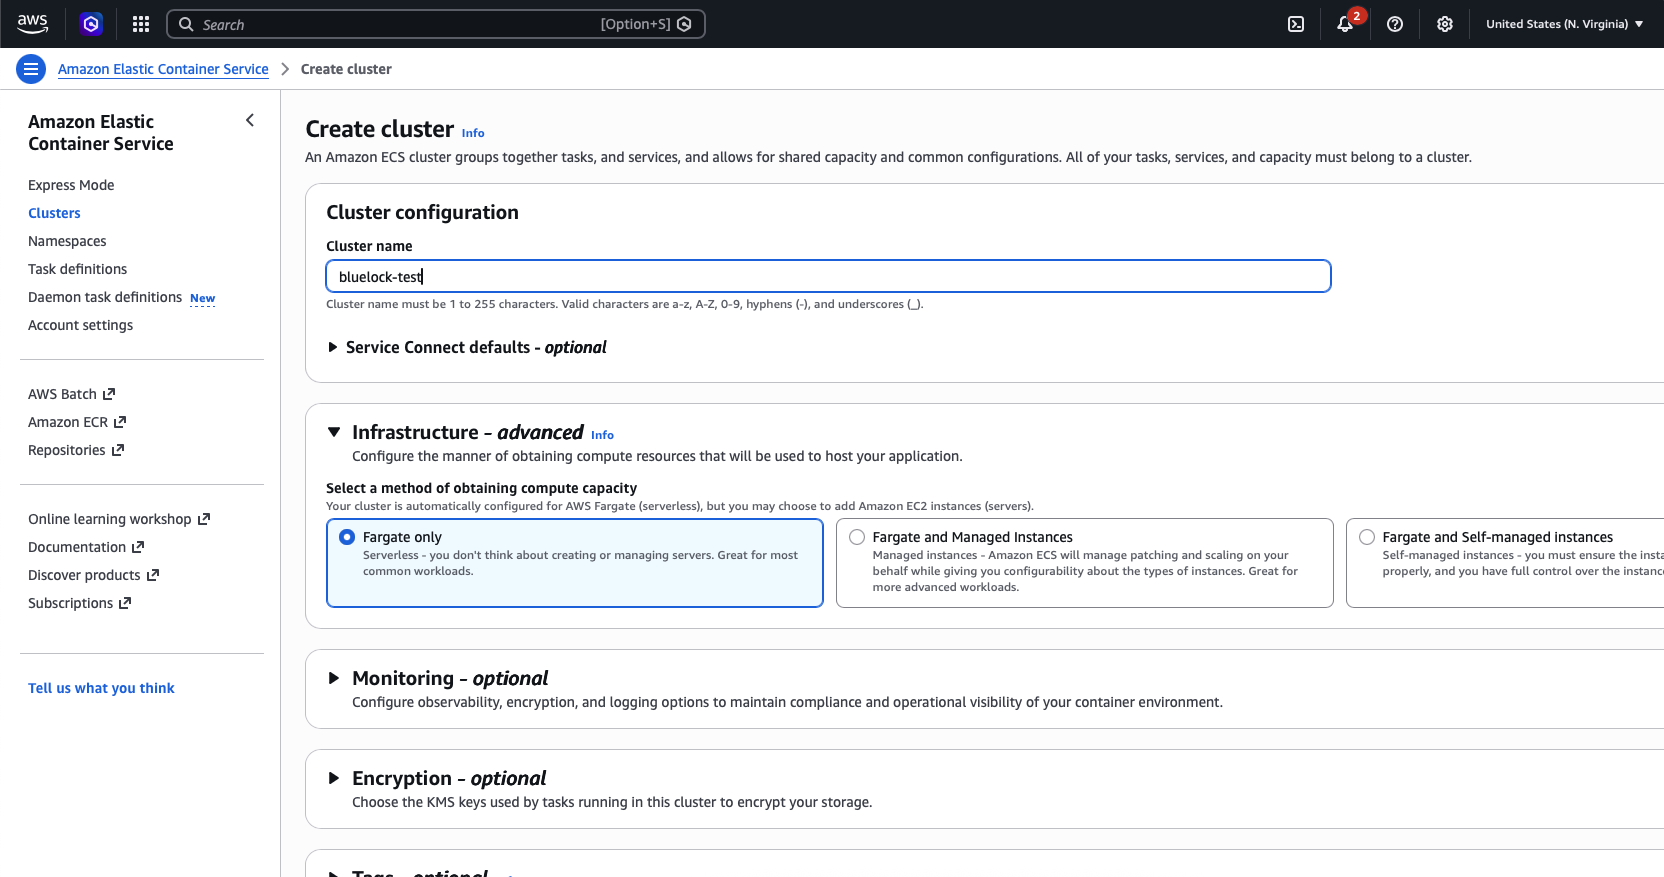
Create an ECS cluster with the Fargate only option and the default settings.
Task definition
Create a task definition from the following JSON. Set awslogs-region to the region where you created the log group. In the kubearmor-vm-adapter commands, replace <CONTROL-PLANE-IP> with the IP address of the control plane node.
{
    "family": "worker-node",
    "containerDefinitions": [
        {
            "name": "armored-container",
            "image": "public.ecr.aws/k9v9d5v2/accuknox-bluelock/ka-socat-demo:latest",
            "cpu": 0,
            "portMappings": [
                {
                    "containerPort": 1337,
                    "hostPort": 1337,
                    "protocol": "tcp",
                    "name": "armored-container-1337-tcp",
                    "appProtocol": "http"
                }
            ],
            "essential": true,
            "command": [
                "/kubearmor/bluelock",
                "socat",
                "TCP-LISTEN:1337,reuseaddr,fork",
                "EXEC:bash,pty,stderr,setsid,sigint,sane"
            ],
            "environment": [
                {
                    "name": "CONTAINERNAME",
                    "value": "armored-container"
                },
                {
                    "name": "K8S",
                    "value": "false"
                }
            ],
            "mountPoints": [
                {
                    "sourceVolume": "kubearmor-dir",
                    "containerPath": "/kubearmor",
                    "readOnly": true
                }
            ],
            "volumesFrom": [],
            "dependsOn": [
                {
                    "containerName": "bluelock",
                    "condition": "SUCCESS"
                }
            ],
            "logConfiguration": {
                "logDriver": "awslogs",
                "options": {
                    "awslogs-group": "/ecs/armored-container",
                    "awslogs-region": "us-east-1",
                    "awslogs-stream-prefix": "ecs"
                }
            },
            "systemControls": []
        },
        {
            "name": "bluelock",
            "image": "public.ecr.aws/k9v9d5v2/accuknox-bluelock:v1.0.0",
            "cpu": 0,
            "portMappings": [],
            "essential": false,
            "environment": [],
            "mountPoints": [
                {
                    "sourceVolume": "kubearmor-dir",
                    "containerPath": "/kubearmor",
                    "readOnly": false
                }
            ],
            "volumesFrom": [],
            "logConfiguration": {
                "logDriver": "awslogs",
                "options": {
                    "awslogs-group": "/ecs/armored-container",
                    "awslogs-region": "us-east-1",
                    "awslogs-stream-prefix": "ecs"
                }
            },
            "systemControls": []
        },
        {
            "name": "kubearmor-vm-adapter",
            "image": "docker.io/accuknox/vm-adapter:v0.1.29",
            "cpu": 0,
            "portMappings": [],
            "essential": true,
            "command": [
                "--kubearmor-addr=localhost:32767",
                "--relay-server-addr=<CONTROL-PLANE-IP>:32768",
                "--node-state-refresh=4",
                "--policy-list-enable=true",
                "--policy-list-relay-frequency=5m0s",
                "--sia-addr=<CONTROL-PLANE-IP>:32769",
                "--pea-addr=<CONTROL-PLANE-IP>:32770",
                "--harden-addr=<CONTROL-PLANE-IP>:32771",
                "--annotation-topic=annotation",
                "--annotation-enable=true"
            ],
            "environment": [
                {
                    "name": "test",
                    "value": "true"
                }
            ],
            "mountPoints": [
                {
                    "sourceVolume": "opt-storage",
                    "containerPath": "/opt",
                    "readOnly": false
                }
            ],
            "volumesFrom": [],
            "dependsOn": [
                {
                    "containerName": "armored-container",
                    "condition": "START"
                }
            ],
            "logConfiguration": {
                "logDriver": "awslogs",
                "options": {
                    "awslogs-group": "/ecs/armored-container",
                    "awslogs-region": "us-east-1",
                    "awslogs-stream-prefix": "adapter"
                }
            },
            "systemControls": []
        }
    ],
    "taskRoleArn": "arn:aws:iam::<ACCOUNT_ID>:role/<ROLE_NAME>",
    "executionRoleArn": "arn:aws:iam::<ACCOUNT_ID>:role/<ROLE_NAME>",
    "networkMode": "awsvpc",
    "volumes": [
        {
            "name": "kubearmor-dir",
            "host": {}
        },
        {
            "name": "opt-storage",
            "host": {}
        }
    ],
    "placementConstraints": [],
    "requiresCompatibilities": [
        "FARGATE"
    ],
    "cpu": "256",
    "memory": "512",
    "runtimePlatform": {
        "cpuArchitecture": "X86_64",
        "operatingSystemFamily": "LINUX"
    }
}
Run the task
Run a new task from this task definition. In Networking, select the correct VPC and turn on Public IP. In Task overrides, select the task role and the task execution role that you created.
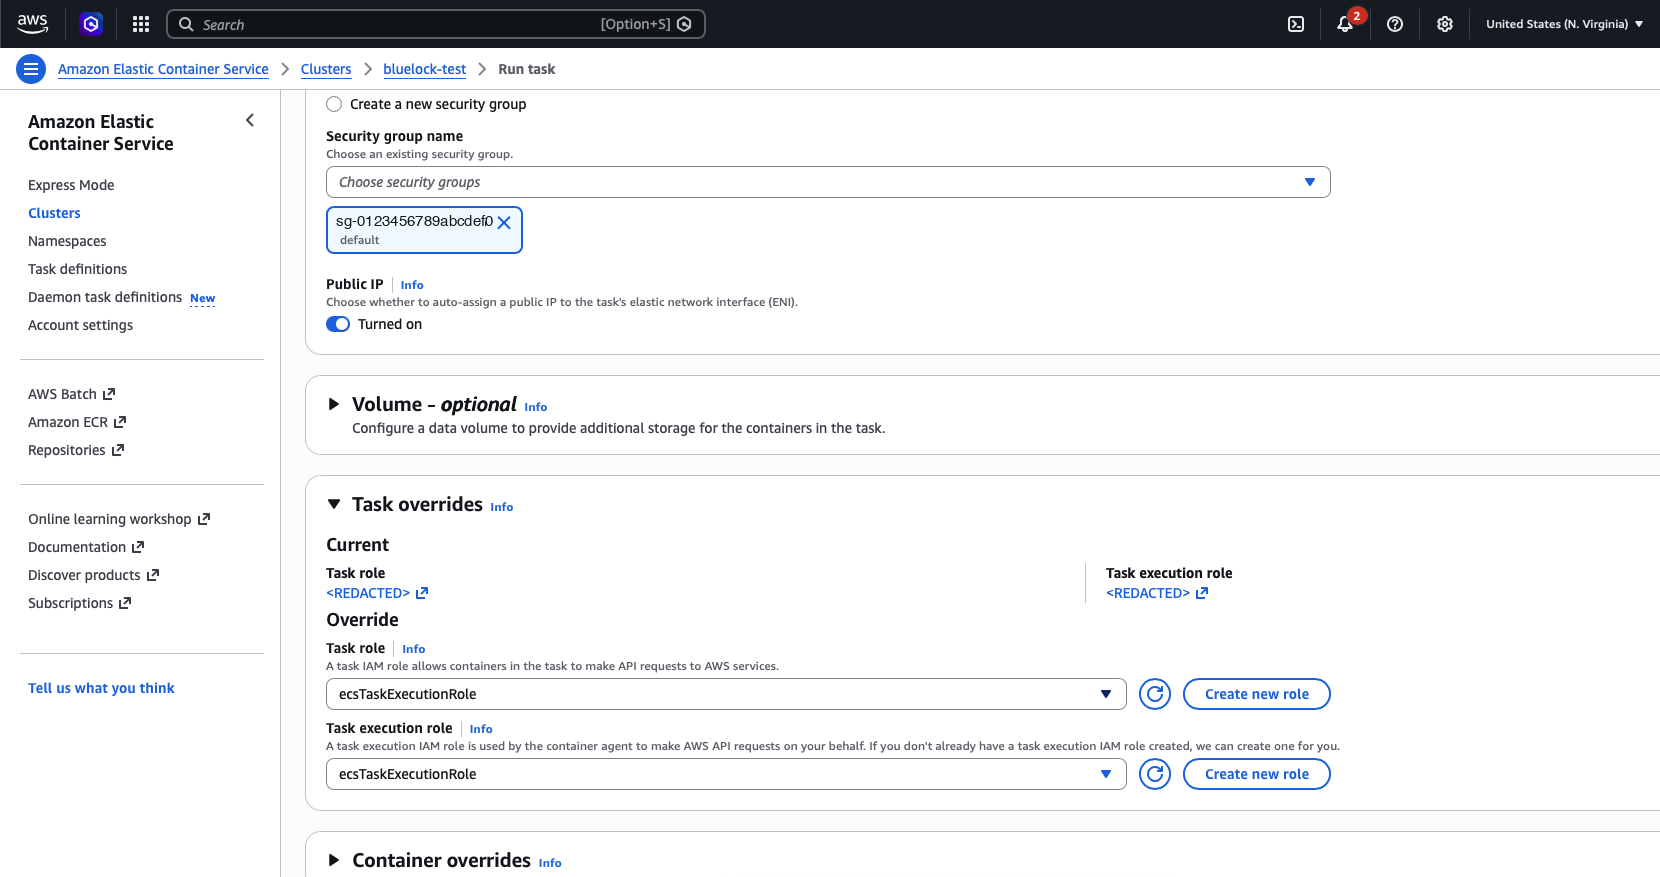
The security group of the task must allow all inbound traffic from anywhere. Use this for testing only.
Step 5. Confirm the Nodes Appear in AccuKnox
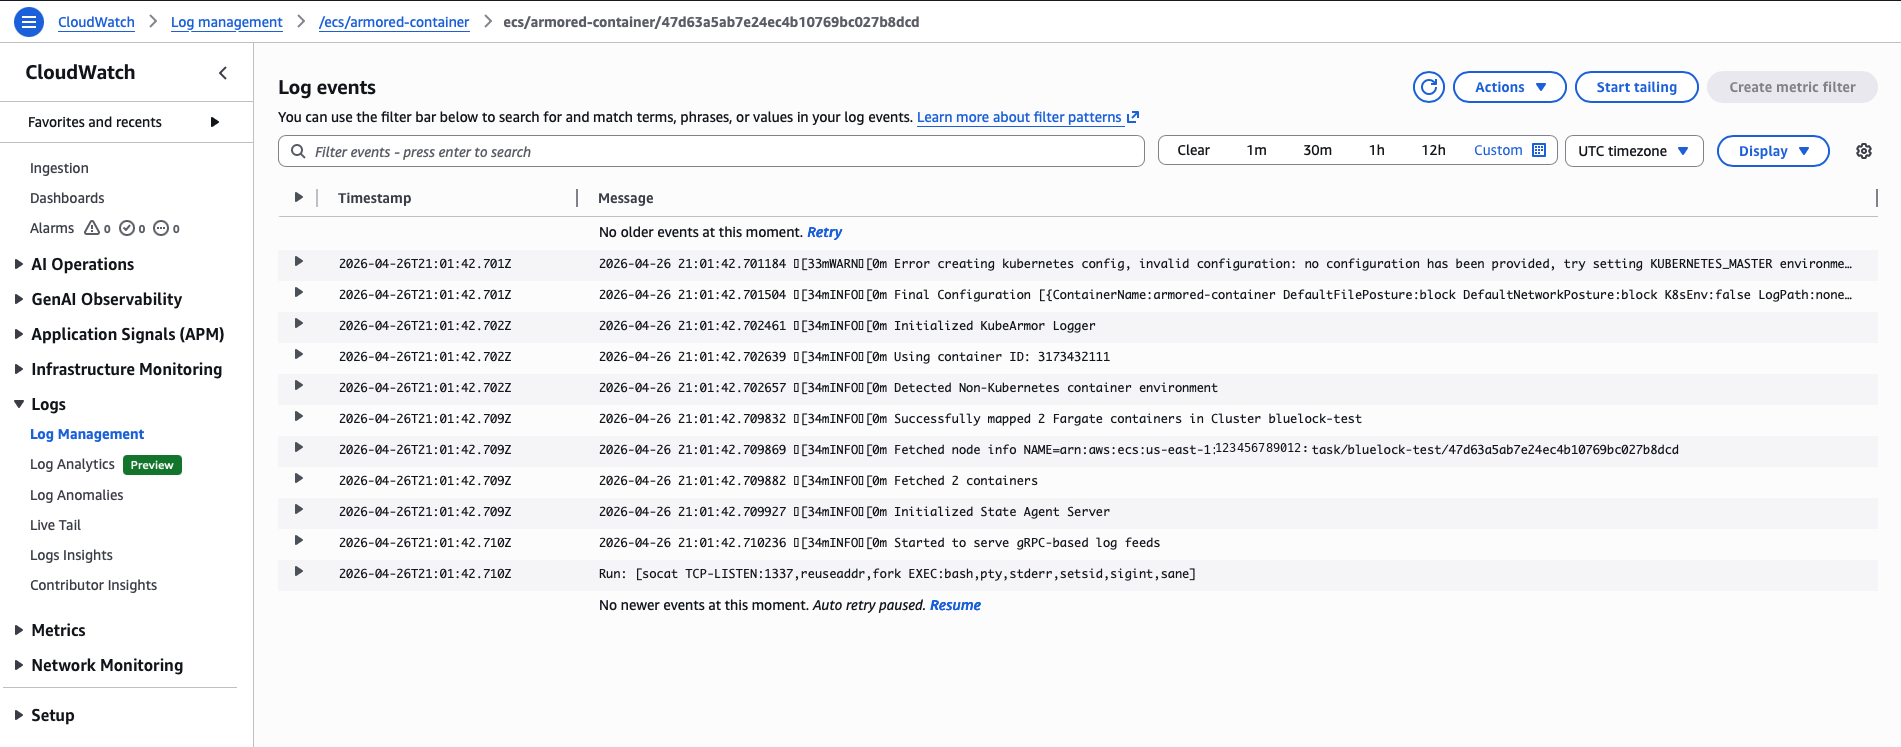
In CloudWatch, the armored-container stream shows BlueLock starting socat.
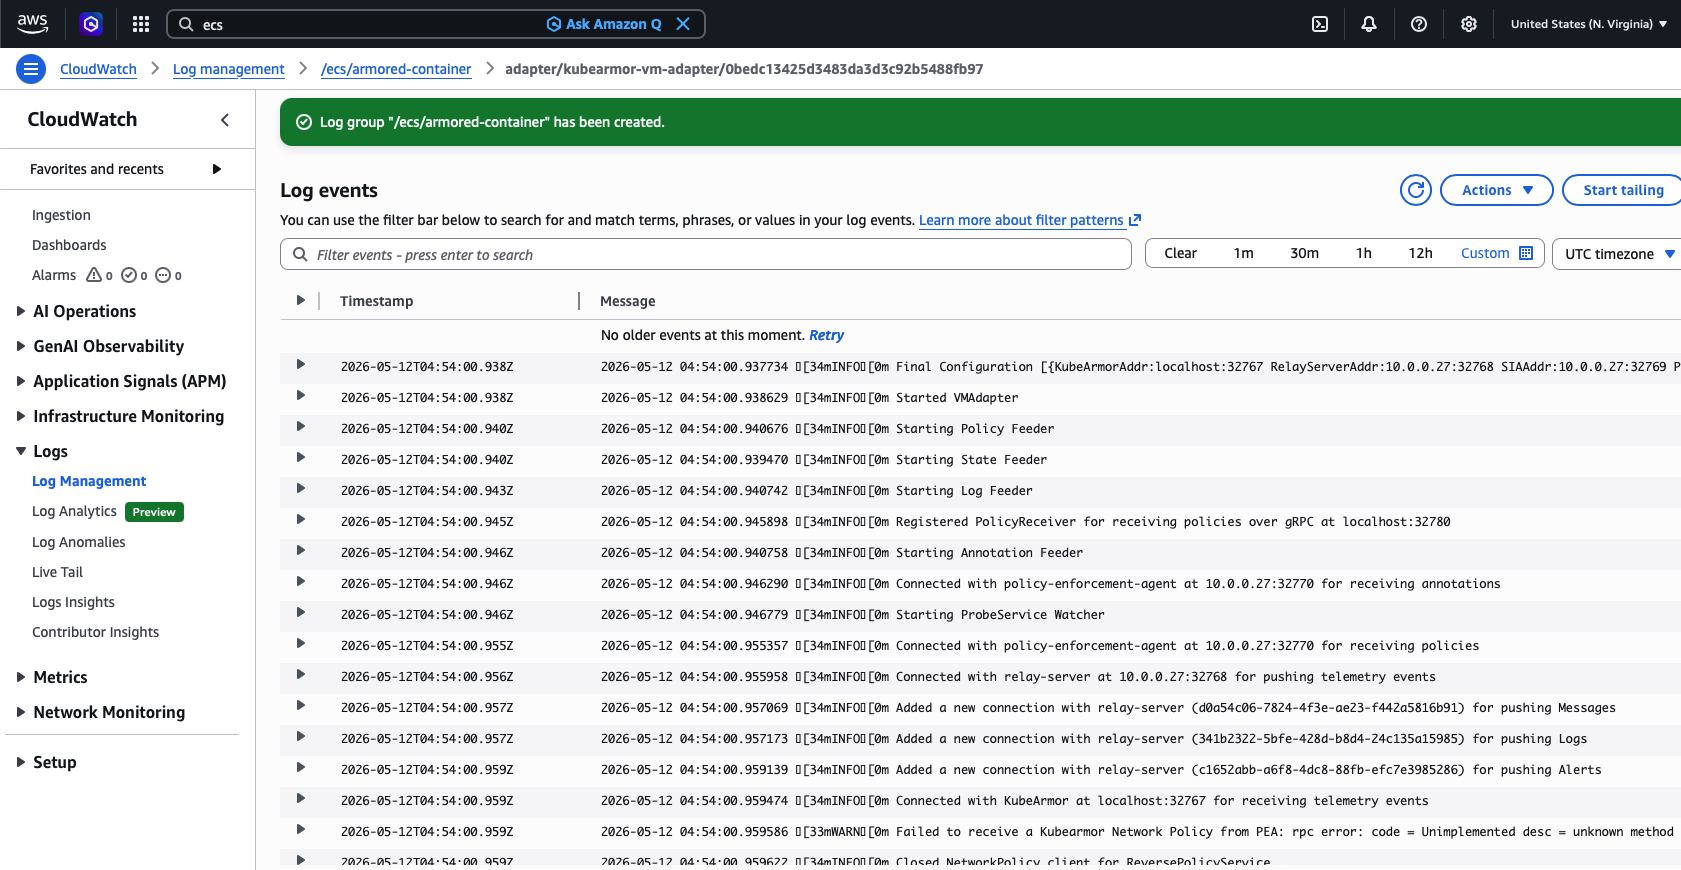
The kubearmor-vm-adapter stream shows the connection to the control plane.
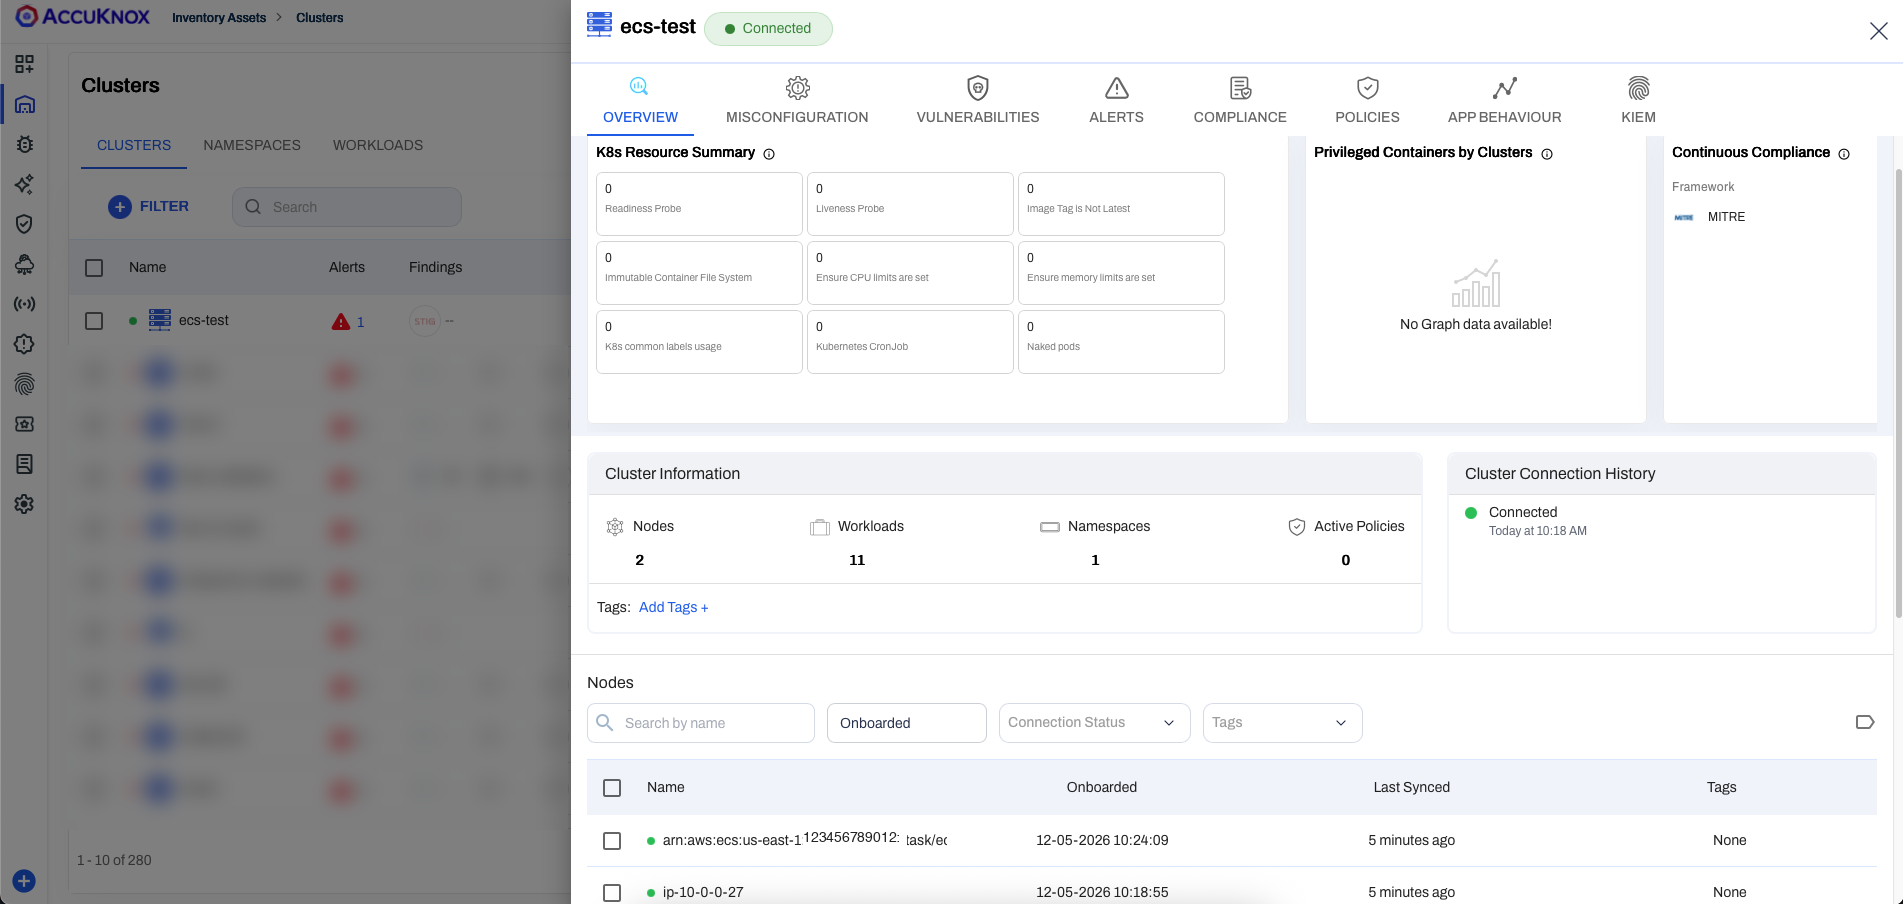
In AccuKnox, the cluster shows its nodes, workloads and namespaces after a few minutes.
Step 6. Test Enforcement With a Block Policy
-
In the ECS console, open
bluelock-test, thenworker-test-service, and copy a task's public IP. -
Connect to the task.
socat - TCP:<task-ip>:1337 -
Run this. It succeeds because no policy exists yet.
ls /etc/ssl/certs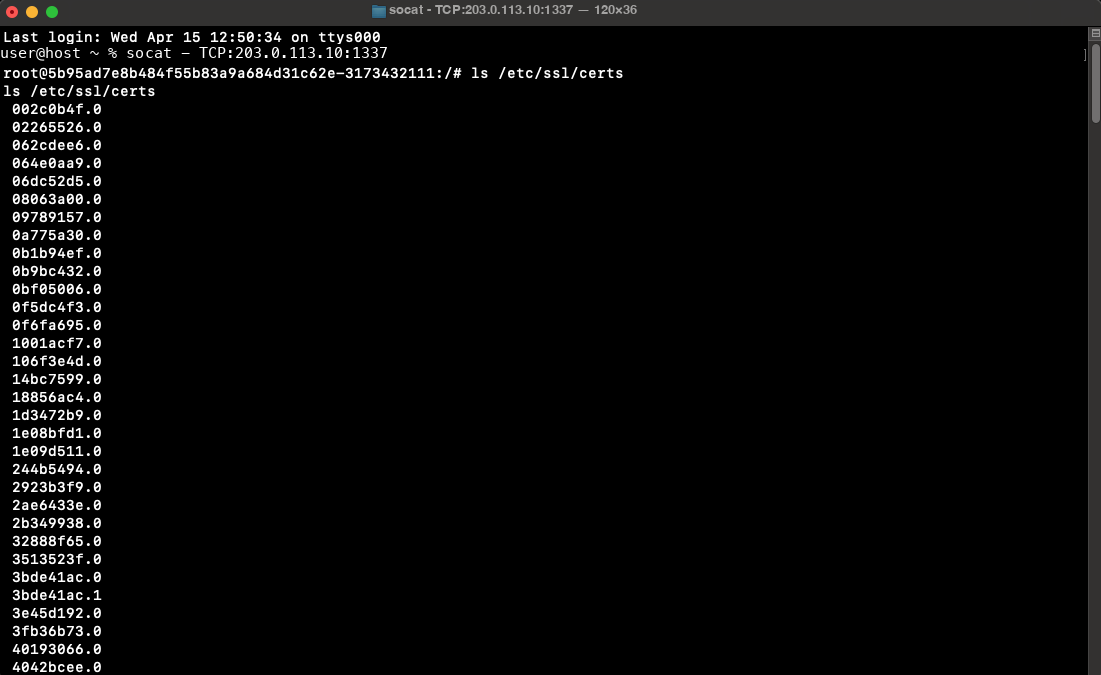
-
In AccuKnox, open Runtime Protection, then Policies, and create this policy.
ksp-block-file-dir-recursive.yamlholds the same rules.apiVersion: security.kubearmor.com/v1 kind: KubeArmorPolicy metadata: name: bluelock-test-policy namespace: container_namespace spec: action: Block file: matchDirectories: - dir: /etc/ssl/ recursive: true - dir: /etc/pki/ recursive: true - dir: /usr/local/share/ca-certificates/ recursive: true message: Credentials modification denied selector: matchLabels: kubearmor.io/container.name: armored-container severity: 1 tags: - MITRE - MITRE_T1552_unsecured_credentials -
Select the policy and choose Activate.
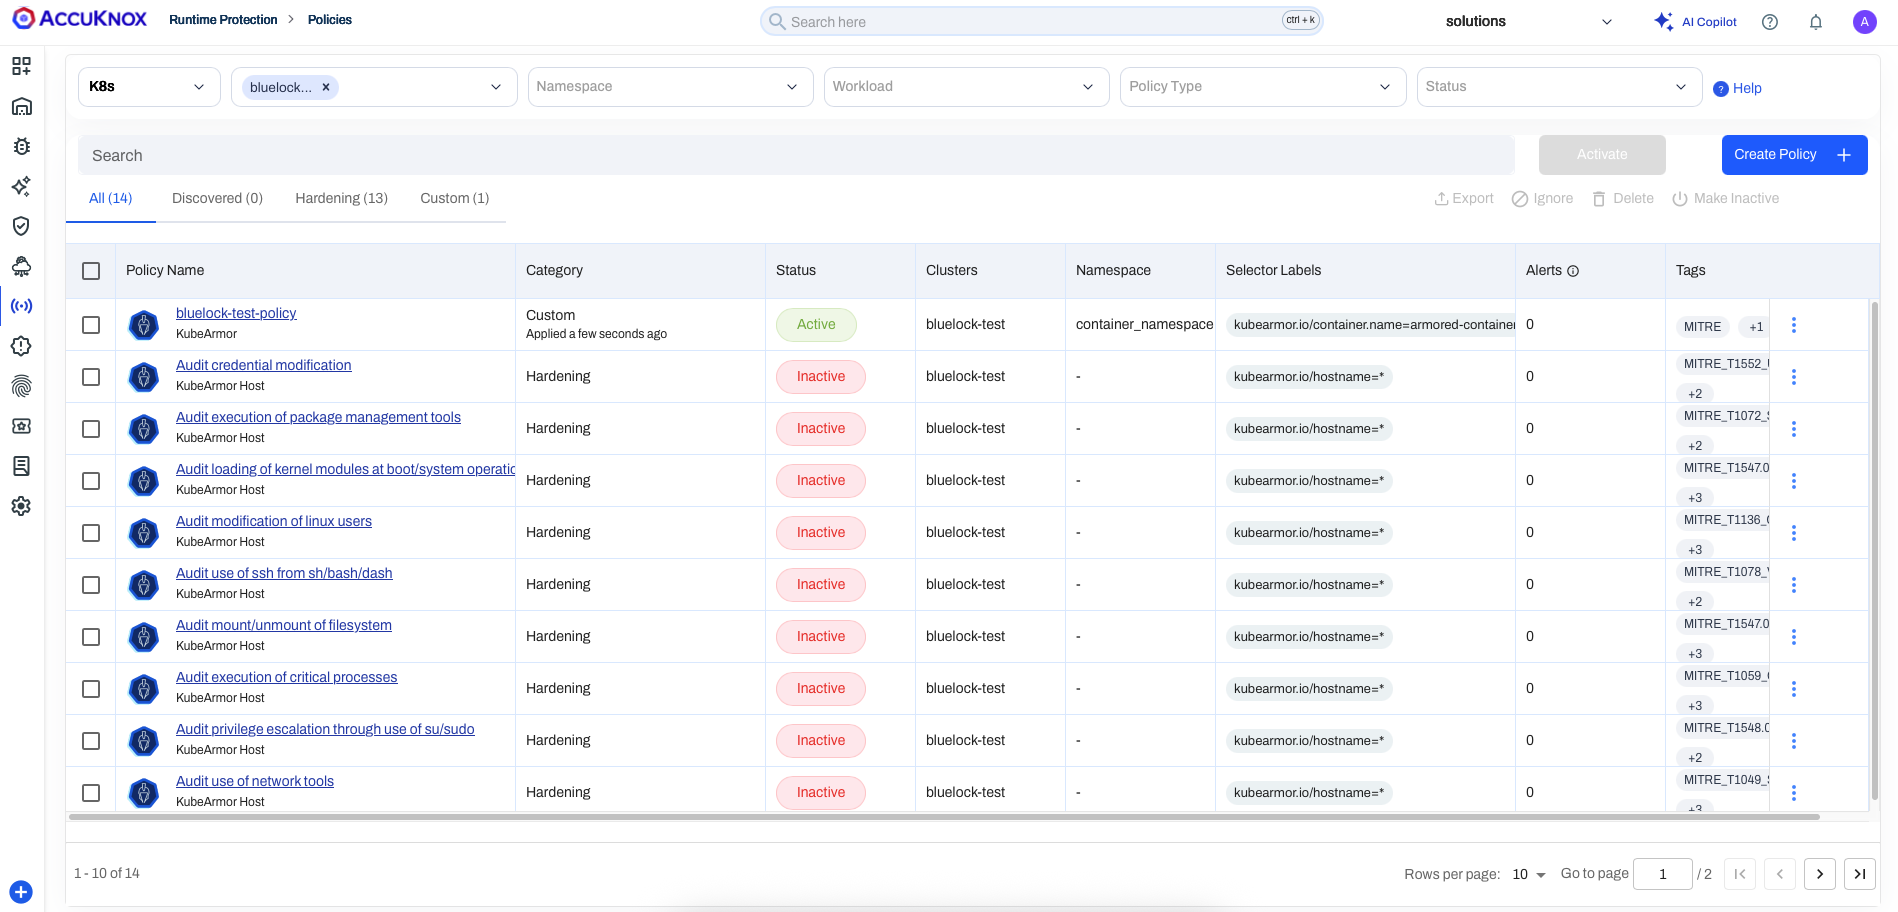
-
In CloudWatch, the
armored-containerstream reports the policy.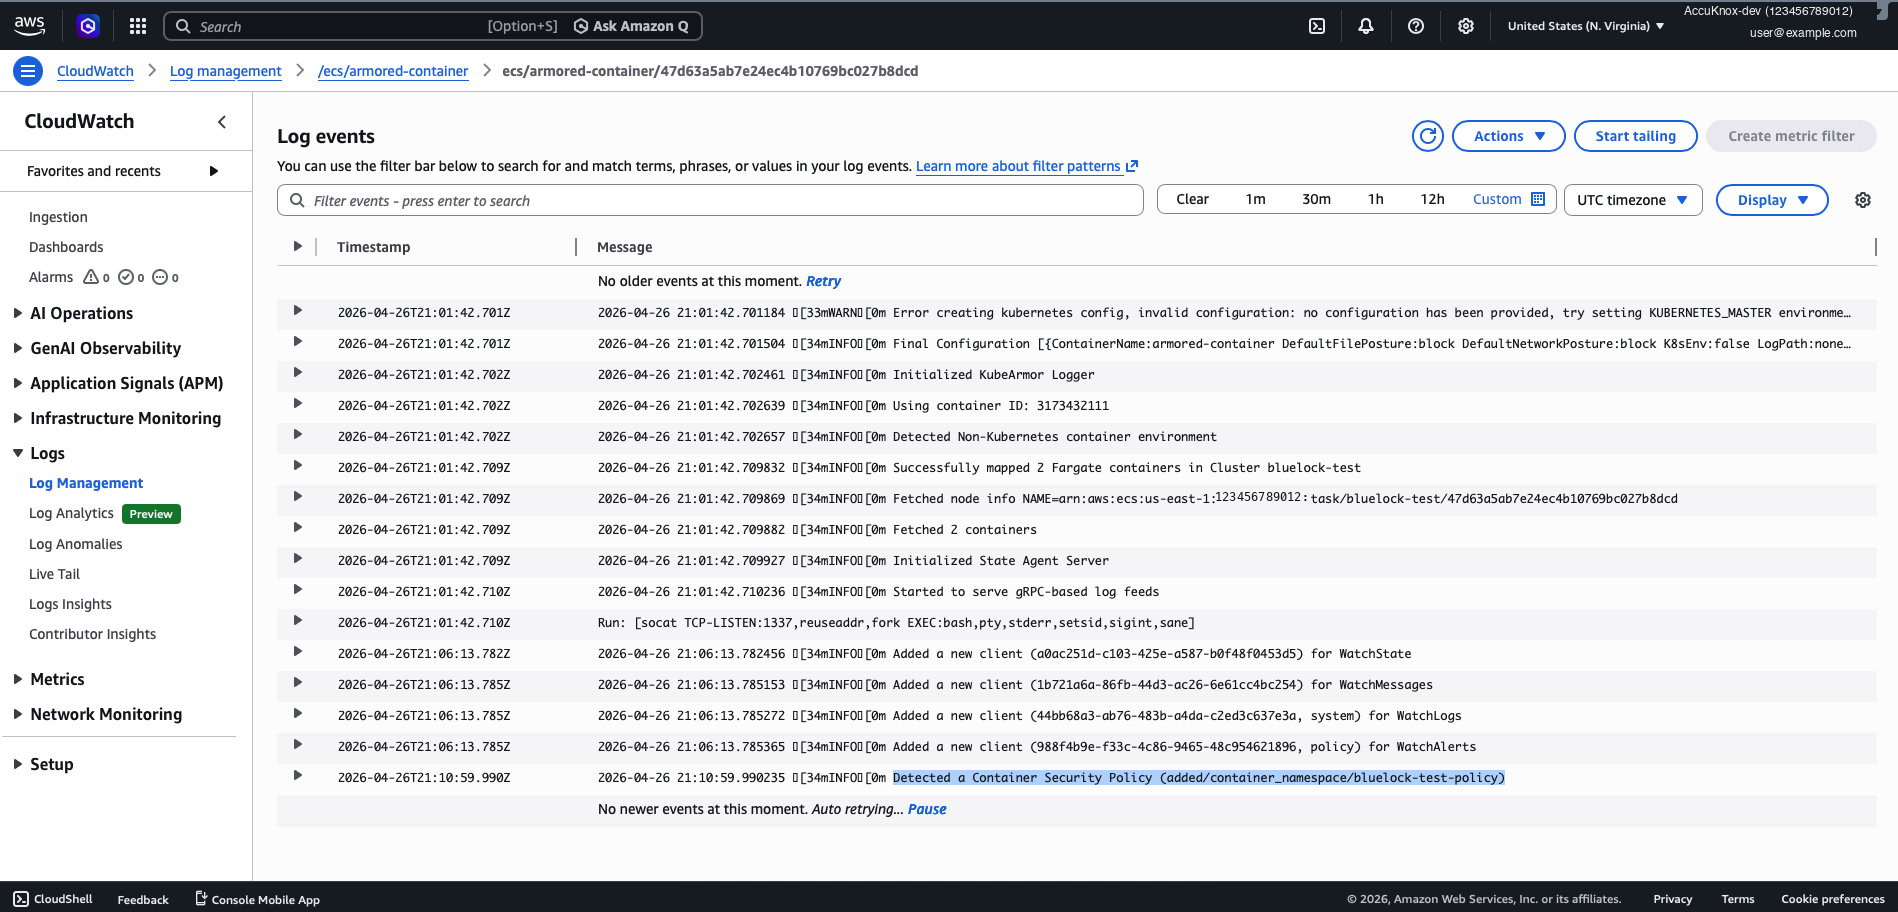
-
Run the command again. It now fails.
ls /etc/ssl/certs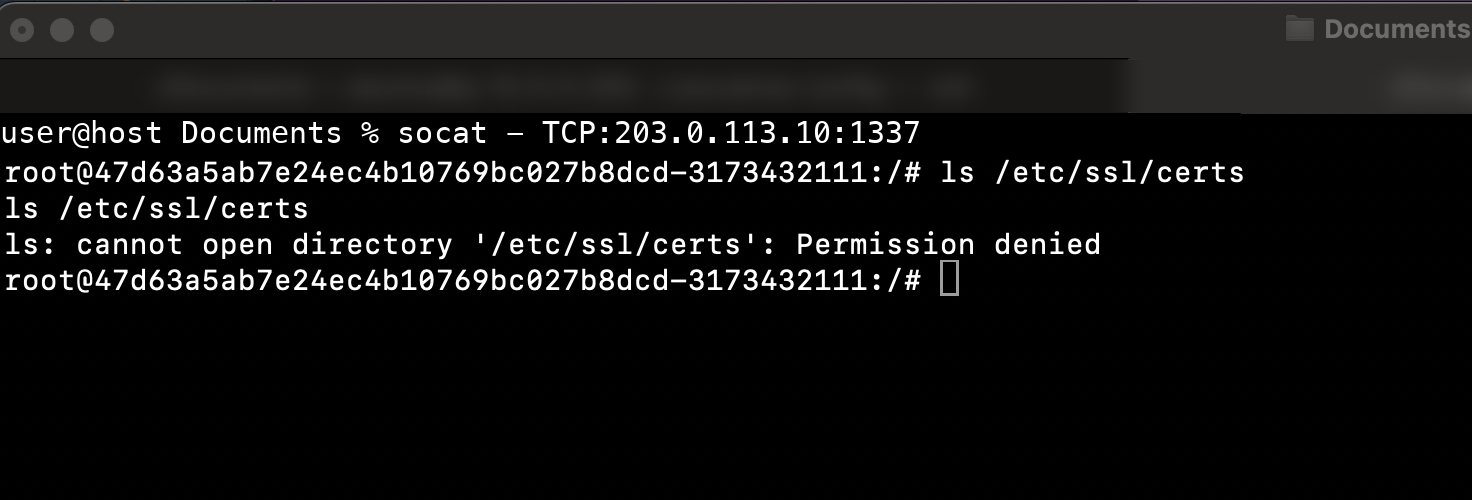
-
Open the alert in AccuKnox.
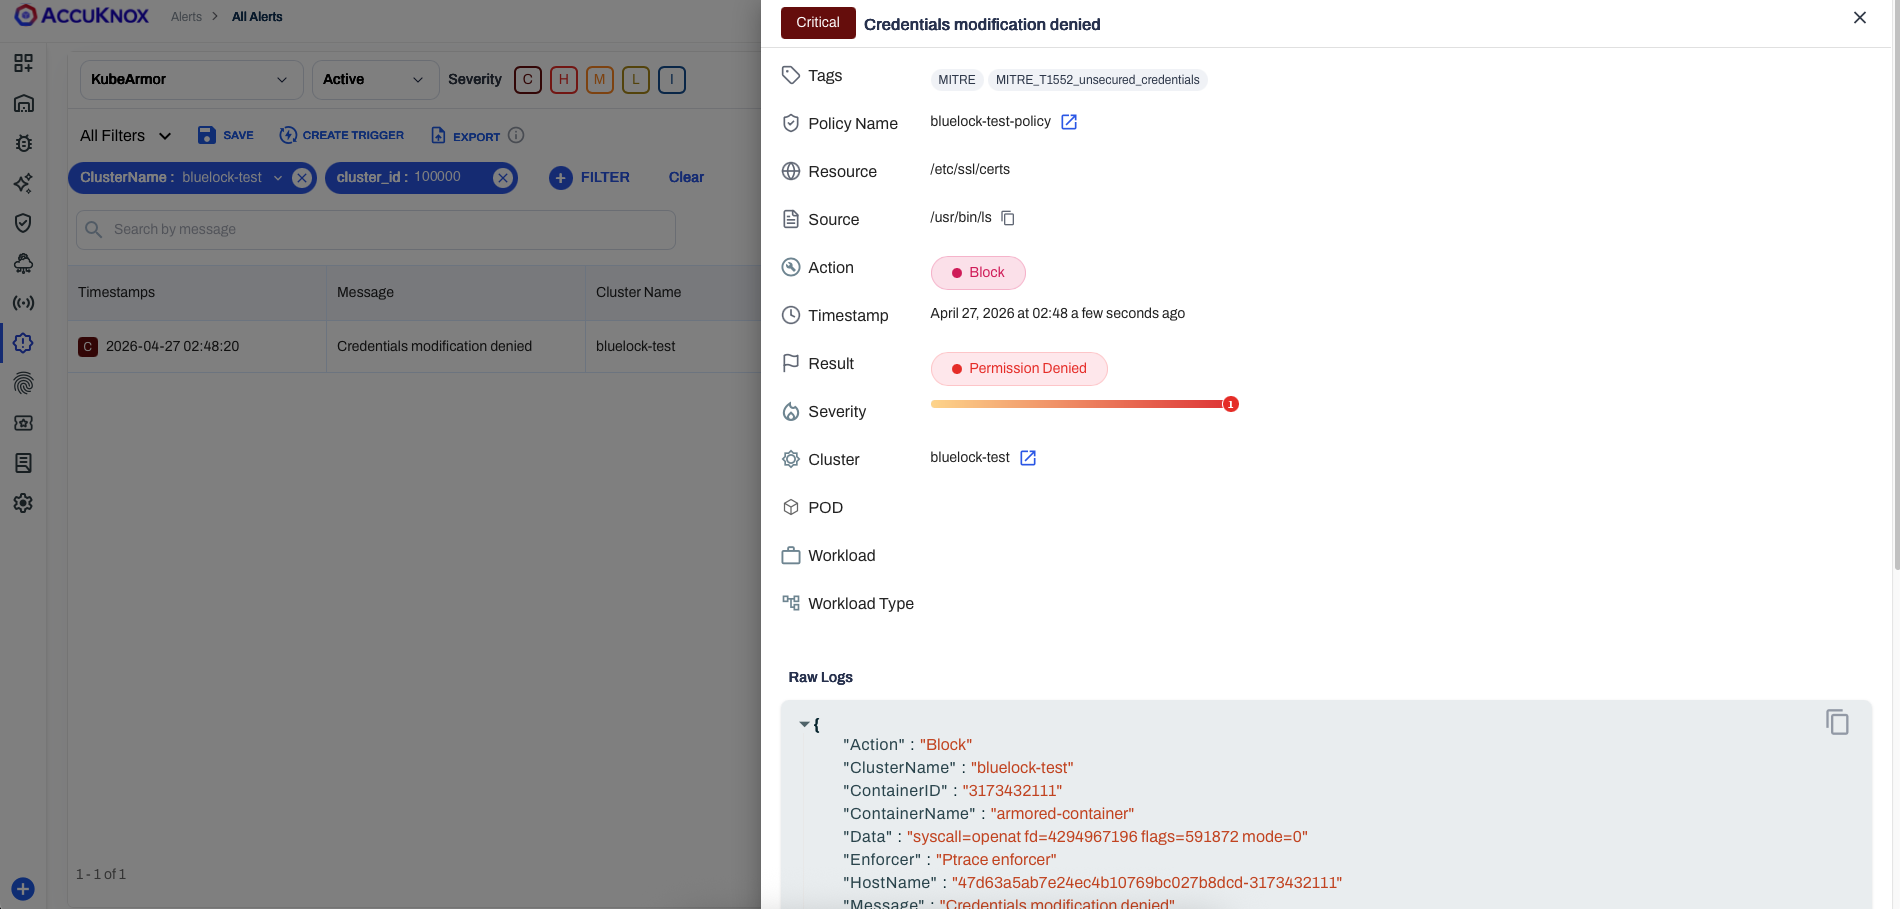
Raw alert
{
  "Action":"Block",
  "ClusterName":"bluelock-test",
  "ContainerID":"3173432111",
  "ContainerName":"armored-container",
  "Data":"syscall=openat fd=4294967196 flags=591872 mode=0",
  "Enforcer":"Ptrace enforcer",
  "HostName":"47d63a5ab7e24ec4b10769bc027b8dcd-3173432111",
  "Message":"Credentials modification denied",
  "Operation":"File",
  "PID":22,
  "PPID":18,
  "ParentProcessName":"/usr/bin/bash",
  "PolicyName":"bluelock-test-policy",
  "ProcessName":"/usr/bin/ls",
  "Resource":"/etc/ssl/certs",
  "Result":"Permission denied",
  "Severity":"1",
  "Source":"/usr/bin/ls",
  "Suppressed":false,
  "Tags":"MITRE,MITRE_T1552_unsecured_credentials",
  "Timestamp":1777238300,
  "Type":"MatchedPolicy",
  "UID":0,
  "_id":"<ALERT_ID>",
  "cluster_id":"<CLUSTER_ID>",
  "component_name":"kubearmor",
  "instanceGroup":"0",
  "instanceID":"0",
  "tenant_id":"<TENANT_ID>",
  "workload":"1"
}
Step 7. Destroy the Test Environment When You Finish
Destroy the service first, then the base infrastructure. base-infra prompts for the join token and SSH key name again.
cd bluelock/terraform/ecs-fargate/test-task
terraform destroy
cd ../base-infra
terraform destroy